Wstęp
This instruction manual provides detailed guidance for the assembly, operation, and maintenance of your BRIO Builder 34599 Volvo Hauler. Designed for children aged 3 years and up, this construction toy combines high-quality wood and plastic components to foster creativity, logical thinking, and problem-solving skills through open-ended play.
The Volvo Hauler features realistic play functions, including a dumping mechanism and a battery-operated warning light, offering an engaging and educational experience.

Image: A child engaging with the fully assembled BRIO Builder Volvo Hauler.
Informacje dotyczące bezpieczeństwa
WARNING: Not suitable for children under 36 months due to small parts. Choking hazard.
- Zawsze nadzoruj dzieci podczas zabawy.
- Ensure all components are securely fastened during assembly and play.
- Trzymaj małe części poza zasięgiem małych dzieci.
- Batteries should be inserted with the correct polarity. Do not mix different types of batteries or new and used batteries. Exhausted batteries should be removed from the toy.
Co jest w pudełku
Your BRIO Builder 34599 Volvo Hauler set includes the following components:
- 1x szczypce
- 1x Battery Light
- 52x Play Components (various wood and plastic pieces, wheels, connectors)
- 1x Instrukcja obsługi

Image: The back of the product packaging illustrating all 55 included pieces and initial assembly steps.
Instrukcja montażu
Follow these step-by-step instructions to assemble your BRIO Builder Volvo Hauler. An easy-to-use plier tool is included to assist with connecting components.
- Identify all components as listed in the 'What's in the Box' section.
- Begin by connecting the wooden and plastic frame pieces using the provided connectors and the plier tool. The plier tool helps to push and pull the connecting pegs securely into place.
- Attach the six wheels to the designated axles on the hauler's chassis. Ensure they spin freely.
- Assemble the cab structure and attach it to the front section of the hauler.
- Integrate the dumping bed mechanism to the rear section of the hauler, ensuring it can pivot smoothly.
- Install the battery light on top of the cab. This requires 2 LR44 batteries (not included). Refer to the 'Operating Instructions' for battery installation.

Obraz: Zbliżenie view of the plier tool in action, demonstrating how to connect two toy components.
For a visual guide to assembly and features, please refer to the official product videos below.
Wideo: Produkt ponadview Wideo. Ten film przedstawia ogólny przeglądview of the BRIO Builder Volvo Hauler, showcasing its components and key features.
Video: BRIO Builder - 34599 Volvo Hauler. This video demonstrates the assembly process and highlights the functional aspects of the hauler.
Instrukcja obsługi
1. Sterowanie
The front section of the hauler is designed to articulate, allowing for steering. Gently turn the front cab left or right to change the direction of the vehicle.

Image: The Volvo Hauler demonstrating its articulated steering capability.
2. Dumping Function
The rear bed of the hauler can be lifted to simulate dumping its contents. Manually raise the bed to unload materials. Ensure the bed is fully lowered and secured before transporting items.
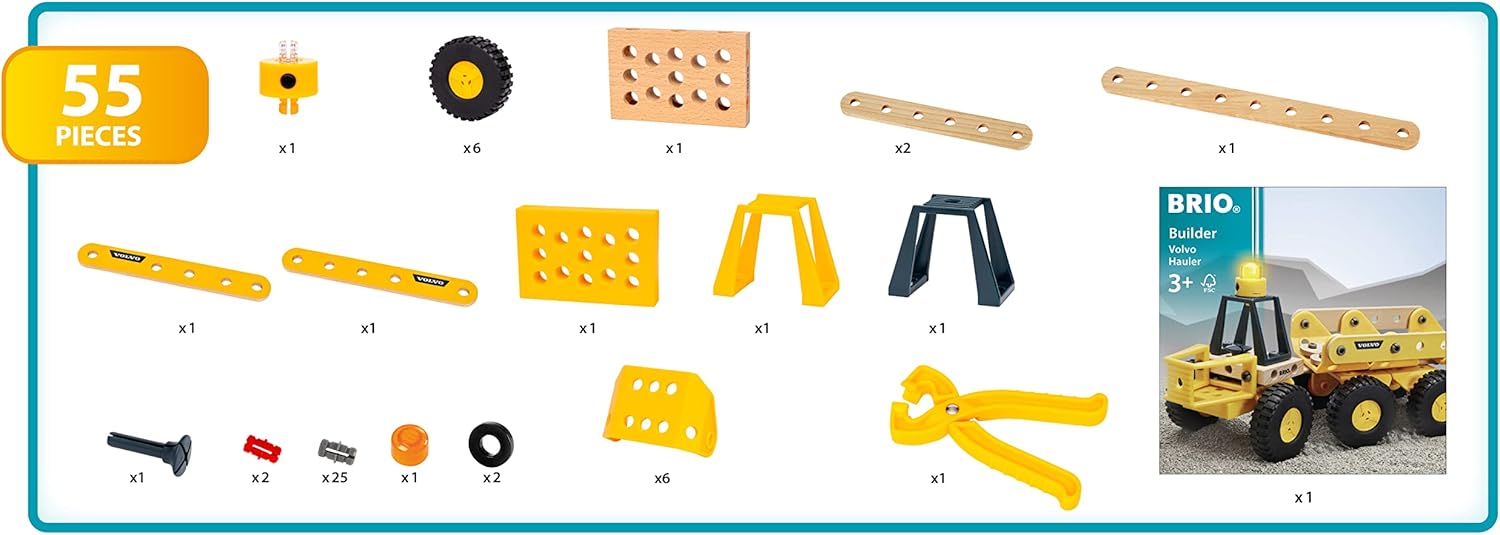
Image: The Volvo Hauler with its rear bed in the raised position, illustrating the dumping function.
3. Battery Warning Light
The warning light on top of the cab requires 2 LR44 batteries. To install or replace batteries, carefully remove the light unit from its peg. Open the battery compartment, insert the batteries with correct polarity, and close the compartment. Press the button on the light unit to activate the flashing warning light.
Konserwacja
- Regularnie sprawdzaj wszystkie elementy pod kątem zużycia.
- Wyczyść zabawkę z reklamąamp ściereczka. Nie zanurzać w wodzie.
- Ensure all connections are tight. If any pegs become loose, use the plier tool to re-secure them.
- Przechowuj zabawkę w suchym miejscu, z dala od bezpośredniego światła słonecznego, aby zapobiec degradacji materiału.
- Replace batteries in the warning light as needed to maintain functionality.
Rozwiązywanie problemów
1. Light Not Working
- Check if batteries are inserted correctly (polarity).
- Wymień baterie na nowe LR44.
- Ensure the light unit is securely attached to the cab.
2. Trudności w łączeniu elementów
- Ensure the plier tool is used as instructed to provide leverage.
- Align holes carefully before attempting to insert pegs.
- If pieces are stiff, gentle wiggling while applying pressure can help.
3. Wheels Not Rolling Smoothly
- Check for any debris or obstructions around the axles.
- Ensure wheels are properly attached and not rubbing against other components.
Specyfikacje
| Funkcja | Szczegół |
|---|---|
| Wymiary produktu | 12.2 x 3.54 x 7.87 cala |
| Waga przedmiotu | 2.56 funta |
| Numer modelu przedmiotu | 63459900 |
| Zalecany wiek producenta | 3 lata i więcej |
| Wymagane baterie | 2 LR44 batteries (for warning light) |
| Przybory | FSC-certified European beech wood, high-quality plastics |
| Data wydania | 1 września 2022 r. |
Gwarancja i wsparcie
BRIO products are manufactured to high-quality standards. For specific warranty information or support inquiries, please refer to the official BRIO webOdwiedź stronę internetową lub skontaktuj się bezpośrednio z działem obsługi klienta. Zachowaj dowód zakupu na wypadek roszczeń gwarancyjnych.
Aby uzyskać dodatkowe informacje, odwiedź stronę Sklep BRIO na Amazonie.


