1. Instrukcje bezpieczeństwa
Please read these safety instructions carefully before using the product. Keep this manual for future reference.
- Produkt przeznaczony jest wyłącznie do użytku wewnątrz pomieszczeń. Nie wystawiać na działanie wilgoci ani ekstremalnych temperatur.
- Do not attempt to open or modify the device. This may void the warranty and pose a safety risk.
- Trzymaj urządzenie poza zasięgiem dzieci.
- Use only the provided micro-USB cable for charging.
- Nie patrz bezpośrednio w źródło światła LED.
2. Zawartość opakowania
Sprawdź, czy w przesyłce znajdują się wszystkie elementy:
- ANSMANN Under-Cabinet Light M
- Kabel ładujący micro-USB
- Instrukcja obsługi
3. Koniec produktuview
The ANSMANN Under-Cabinet Light M is a versatile, rechargeable LED lamp designed for various indoor applications. It features a motion sensor, adjustable color temperatures, and a slim design for discreet placement.

Image 1: The ANSMANN Under-Cabinet Light M, showcasing its sleek, white design and integrated motion sensor.
Główne cechy:
- Czujnik ruchu PIR: Automatically activates the light when motion is detected in low-light conditions.
- Czujnik zmierzchu: Ensures the light only activates in dark environments, conserving battery life.
- Regulowana temperatura barwowa: Choose between 3 color temperatures (cool white, neutral white, warm white) or activate all LEDs for maximum brightness.
- Bezstopniowe ściemnianie: Adjust brightness by holding down the control button.
- Akumulator: Integrated battery for cordless operation, charged via micro-USB.
- Mocowanie magnetyczne: Easy installation and removal with a magnetic strip.

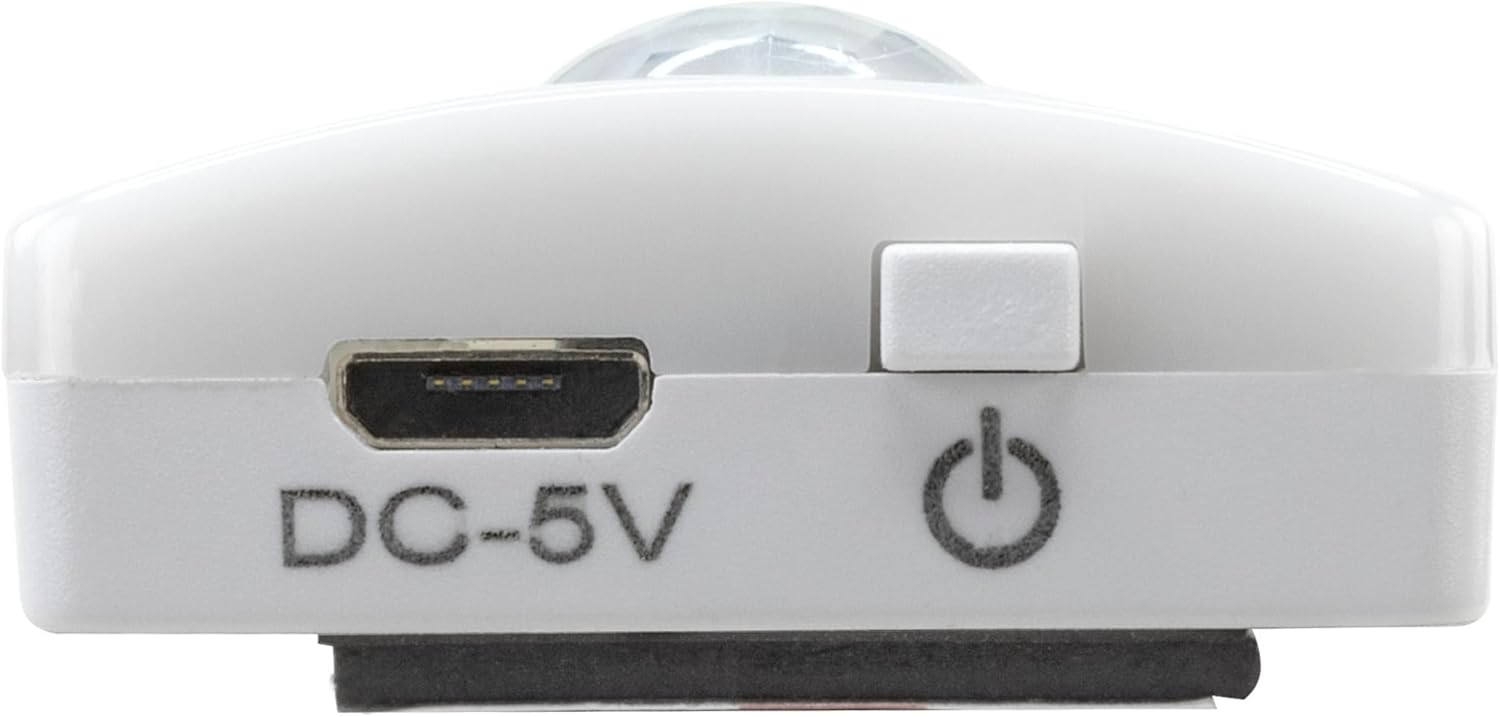
Image 2: Diagram illustrating the Micro-USB Port, On/Off button, and PIR motion sensor on the device.
4. Konfiguracja i instalacja
The Under-Cabinet Light M offers flexible installation options using its integrated magnetic strip.
Mocowanie magnetyczne:
- Identify a suitable, clean, and dry surface for installation (e.g., inside a cabinet, under a shelf).
- The light comes with a fixed magnetic strip on its back. For non-metallic surfaces, use the included adhesive strip.
- Peel off the protective film from the adhesive strip and firmly press it onto the desired surface.
- Attach the Under-Cabinet Light M to the adhesive strip. The magnetic connection will hold it in place.
Obraz 3: Zbliżenie view of the magnetic strip and the removable adhesive strip, demonstrating the mounting mechanism.

Obraz 4: Example of the under-cabinet light installed in a modern kitchen setting, providing illumination over a countertop.
5. Działanie
The Under-Cabinet Light M offers intuitive control for its lighting functions.
Włączanie/wyłączanie:
- Locate the On/Off button (refer to Image 2).
- Press the button once to turn the light on or off.
Regulacja temperatury barwowej:
- With the light on, short press the control button repeatedly to cycle through the 3 available color temperatures: cool white, neutral white, and warm white.
- A fourth press will activate all LEDs for maximum brightness.
Funkcja ściemniania:
- To adjust the brightness, press and hold the control button. The light will gradually dim or brighten. Release the button when the desired brightness level is reached.
Motion and Twilight Sensor:
- When the light is in motion sensor mode, it will automatically turn on when movement is detected within its range.
- The integrated twilight sensor ensures that the motion sensor only activates the light in dark environments, preventing unnecessary illumination during daylight hours.
6. Ładowanie
The Under-Cabinet Light M is equipped with a rechargeable battery for convenient cordless use.
- When the battery is low, the light output may decrease or the light may not turn on.
- Gently detach the light from its magnetic mounting surface.
- Connect the provided micro-USB cable to the micro-USB port on the light (refer to Image 2).
- Connect the other end of the micro-USB cable to a suitable USB power source (e.g., USB wall adapter, computer USB port).
- Kontrolka pokaże stan ładowania (np. czerwona oznacza ładowanie, zielona oznacza pełne naładowanie).
- Once fully charged, disconnect the cable and reattach the light to its mounting surface.

Rysunek 5: Szczegółowy view of the Micro-USB charging port and the On/Off button, essential for charging and operation.
7. Konserwacja
To ensure the longevity and optimal performance of your Under-Cabinet Light M, follow these simple maintenance guidelines:
- Clean the light regularly with a soft, dry cloth. Do not use abrasive cleaners or solvents.
- Ensure the motion sensor lens is kept clean and free from obstructions for proper function.
- Store the light in a cool, dry place if not in use for extended periods.
8. Rozwiązywanie Problemów
If you encounter issues with your Under-Cabinet Light M, refer to the following common problems and solutions:
| Problem | Możliwa przyczyna | Rozwiązanie |
|---|---|---|
| Światło się nie włącza. | Bateria jest rozładowana. | Charge the light using the micro-USB cable. |
| Czujnik ruchu nie wykrywa ruchu. | Ensure the sensor is clean and unobstructed. Check if the environment is dark enough for the twilight sensor to activate. | |
| Światło nie ładuje się. | Wadliwy kabel lub źródło zasilania. | Try a different micro-USB cable or USB power adapter. |
| Port ładowania jest brudny. | Gently clean the micro-USB port with a dry, soft brush. | |
| Światło migocze lub jest słabe. | Niski poziom naładowania baterii. | Naładuj urządzenie. |
Jeśli po wypróbowaniu tych rozwiązań problem nadal występuje, skontaktuj się z obsługą klienta.
9. Specyfikacje
| Funkcja | Szczegół |
|---|---|
| Numer modelu | 1600-0438 |
| Wymiary produktu | 25 dł. x 3.5 szer. x 1.3 wys. cm (9.84 dł. x 1.38 szer. x 0.51 wys. cali) |
| Waga przedmiotu | 112 gramów (0.25 funta) |
| Źródło zasilania | Zasilany bateryjnie |
| Port ładowania | Micro-USB (DC-5V) |
| Tworzywo | Plastikowy |
| Kolor | Biały |
| Typ instalacji | Uchwyt ścienny (magnetyczny) |
| Typ pokoju | Dining Room, Kitchen, Wardrobe, Hallway, etc. |
10. Gwarancja i wsparcie
ANSMANN products are manufactured with high-quality standards. For information regarding warranty terms and conditions, please refer to the documentation provided with your purchase or visit the official ANSMANN webstrona.
For technical support or inquiries, please contact ANSMANN customer service through their official channels.


