1. Wprowadzenie
This manual provides detailed instructions for the installation, operation, and maintenance of your ESLYYDS Double Din Car Stereo. This advanced multimedia system offers a wide range of features including Apple CarPlay, Android Auto, Bluetooth connectivity, a high-definition touchscreen, and support for a backup camera, enhancing your in-car entertainment and navigation experience.

Figure 1.1: ESLYYDS Double Din Car Stereo Overview
2. Zawartość opakowania
Sprawdź, czy w przesyłce znajdują się wszystkie elementy wymienione poniżej:
- ESLYYDS Double Din Car Stereo Unit
- Zestaw uchwytów montażowych
- Camera Wire A
- Camera Wire B
- Steering Wheel Control Unit
- Wiązka przewodów A
- Wiązka przewodów B
- Tył-view Kamera
- Zdalne sterowanie
- Instrukcja obsługi (ten dokument)

Figure 2.1: Stereo Dimensions and Included Accessories
3. Funkcje produktu
The ESLYYDS Double Din Car Stereo is equipped with a variety of features designed for convenience and enhanced driving experience:
- Zgodność z Apple CarPlay i Android Auto: Seamlessly integrate your smartphone for navigation, music, calls, and messages using voice control.
- 7-calowy pojemnościowy ekran dotykowy HD: A responsive and accurate display supporting 1080P video playback.
- Bluetooth 5.2: For stable and clear hands-free calling and audio streaming.
- Link do lustra telefonu: Display your smartphone's screen directly on the stereo.
- Dual USB Interface: One port for media playback and another with 2.1A fast charging capability.
- Tył View Wejście kamery: Supports the included 12 HD LED light, night vision, 170° viewing angle waterproof backup camera for safer reversing.
- Sterowanie z kierownicy (SWC): Kompatybilny z istniejącymi elementami sterowania na kierownicy, co zapewnia wygodną obsługę.
- AM/FM Audio Receiver: Access to radio stations with user-friendly digital control.
- AUX IN Connectivity: Do zewnętrznych urządzeń audio.
- 7 Color LED Buttons: Customizable button illumination.
3.1 Apple CarPlay i Android Auto
Connect your smartphone via USB to access navigation, phone contacts, email, notifications, and music directly on the stereo display. This feature utilizes voice control technology for safe operation while driving.
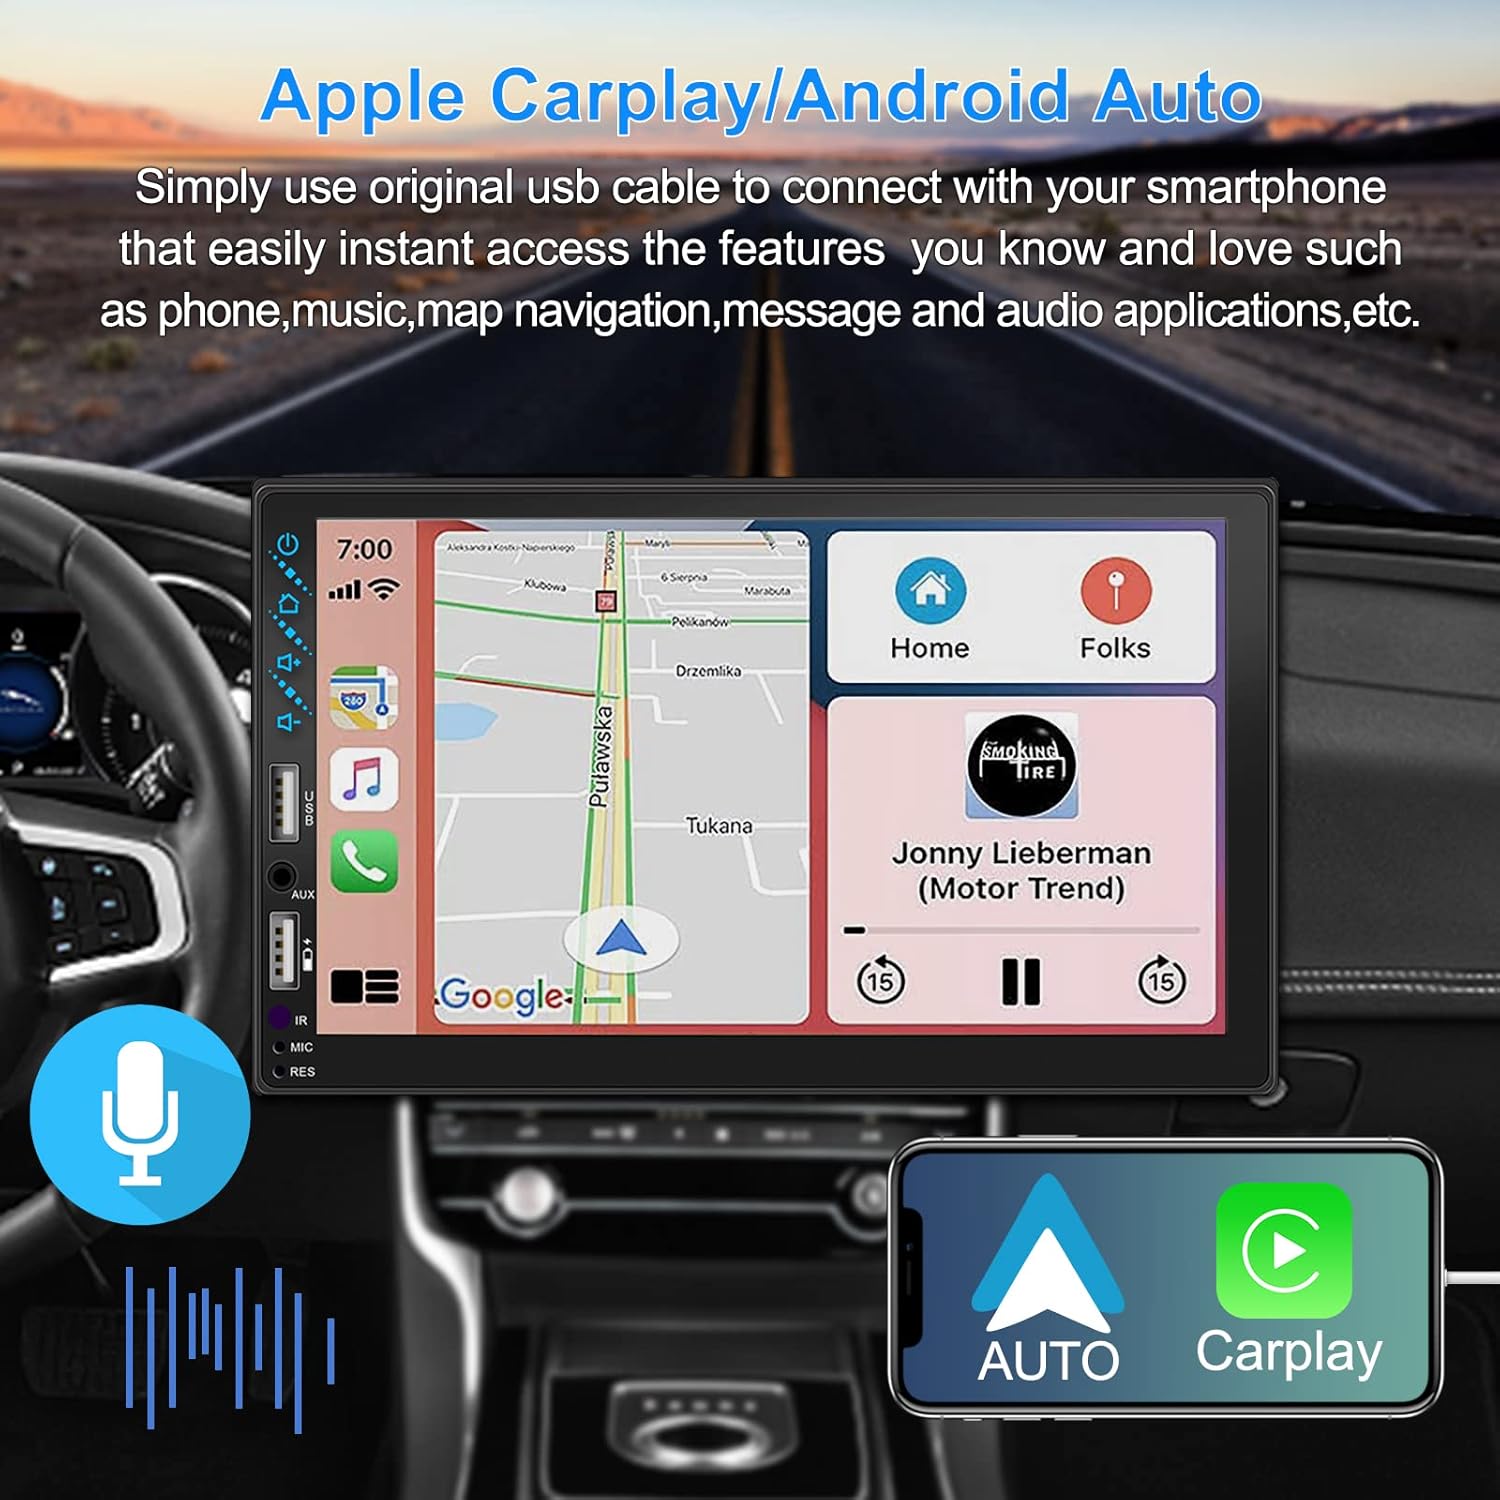
Rysunek 3.1: Interfejs Apple CarPlay i Android Auto
3.2 Sterowanie głosowe
Utilize voice commands to control various functions such as making calls, playing music, and navigating, allowing you to keep your hands on the wheel and eyes on the road.

Rysunek 3.2: Funkcjonalność sterowania głosowego
3.3 Łącze lustrzane telefonu
The Mirror Link function allows you to display your smartphone's screen directly onto the stereo's touchscreen. This supports Android devices (version 10.1 and below) and iPhone devices (version 14.5 and below, including iPhone 12, 11, XR, and 8 series and below) with resolutions up to 1920x1080 pixels.
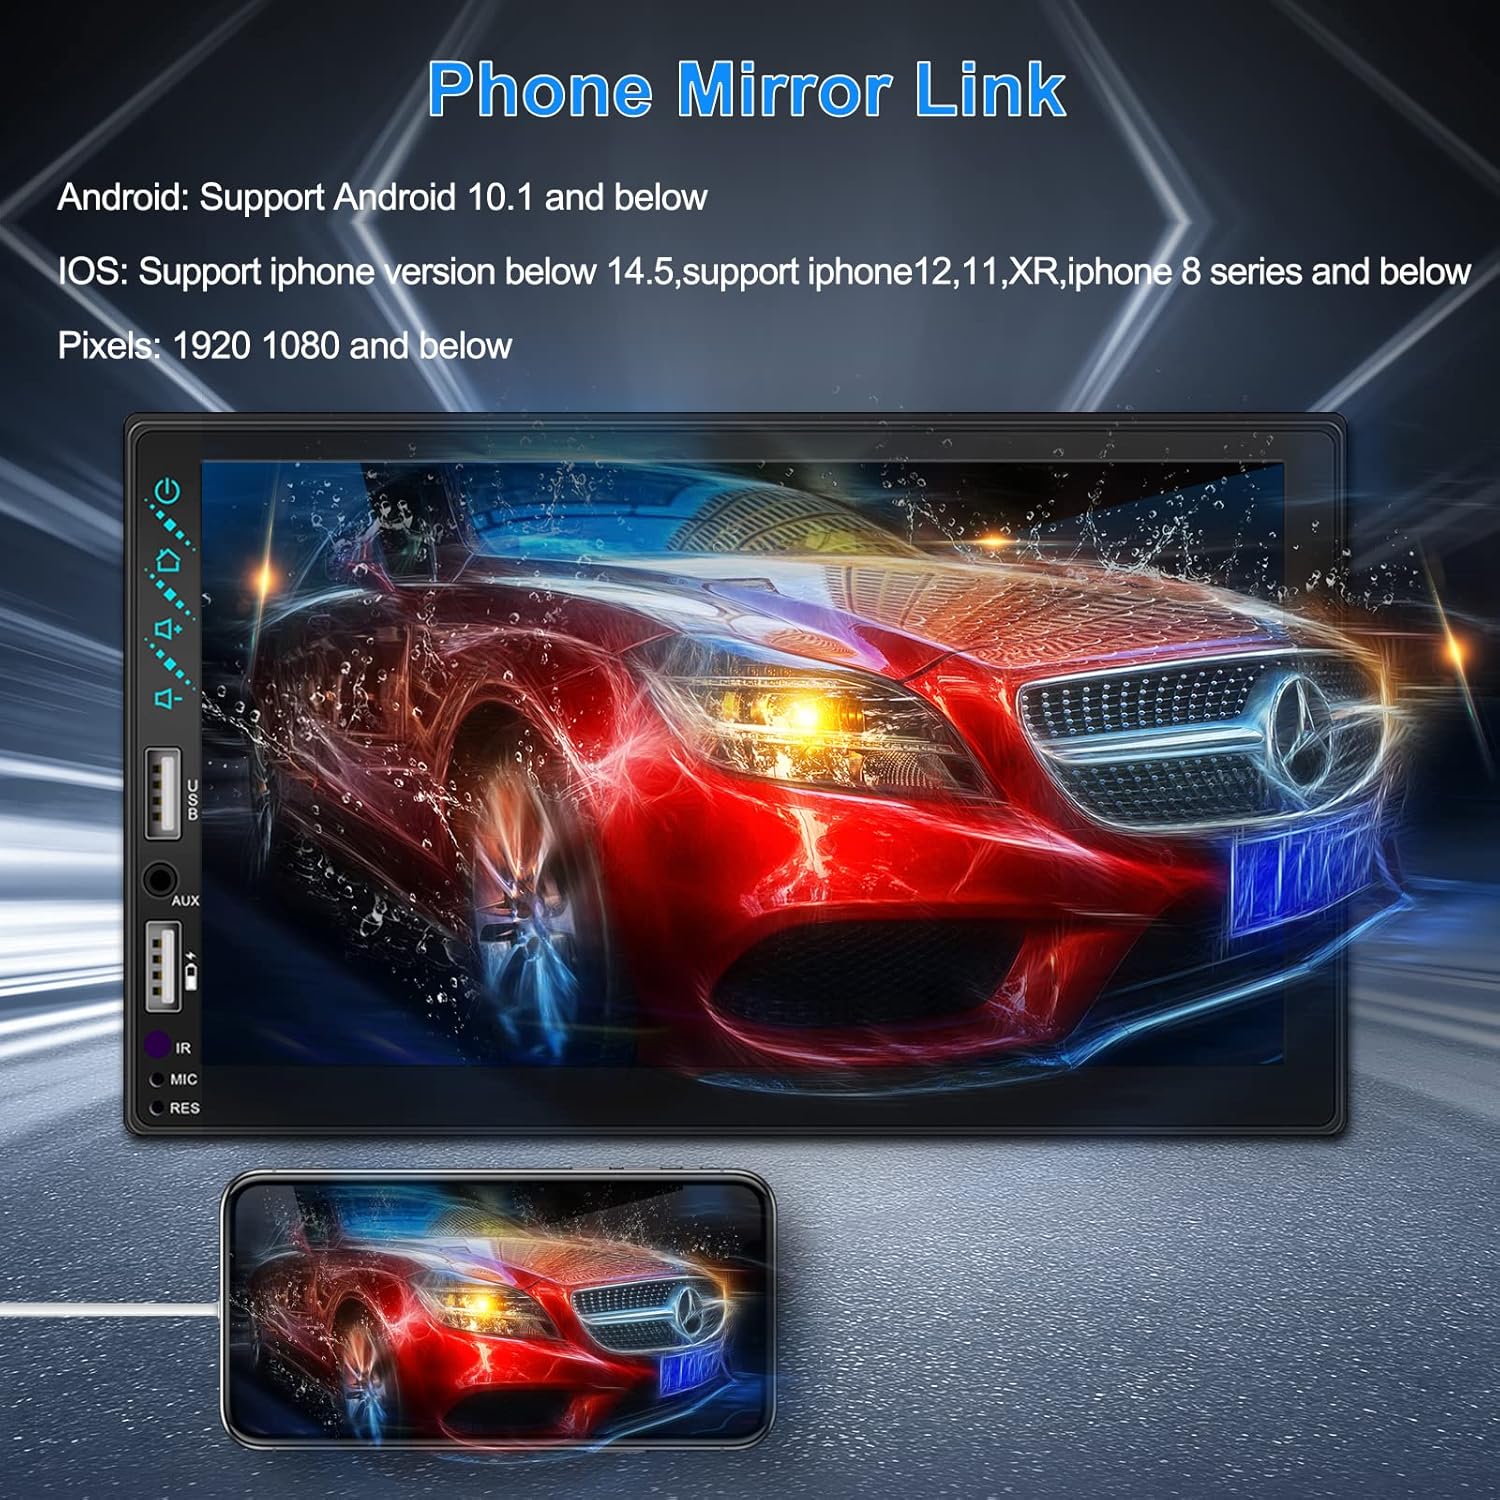
Figure 3.3: Phone Mirror Link
3.4 Tył View Kamera
The included waterproof backup camera features 12 HD LED lights for night vision and a 170° viewing angle. When you shift into reverse, the system automatically displays the camera feed on the screen, providing optimal visibility in various weather conditions.
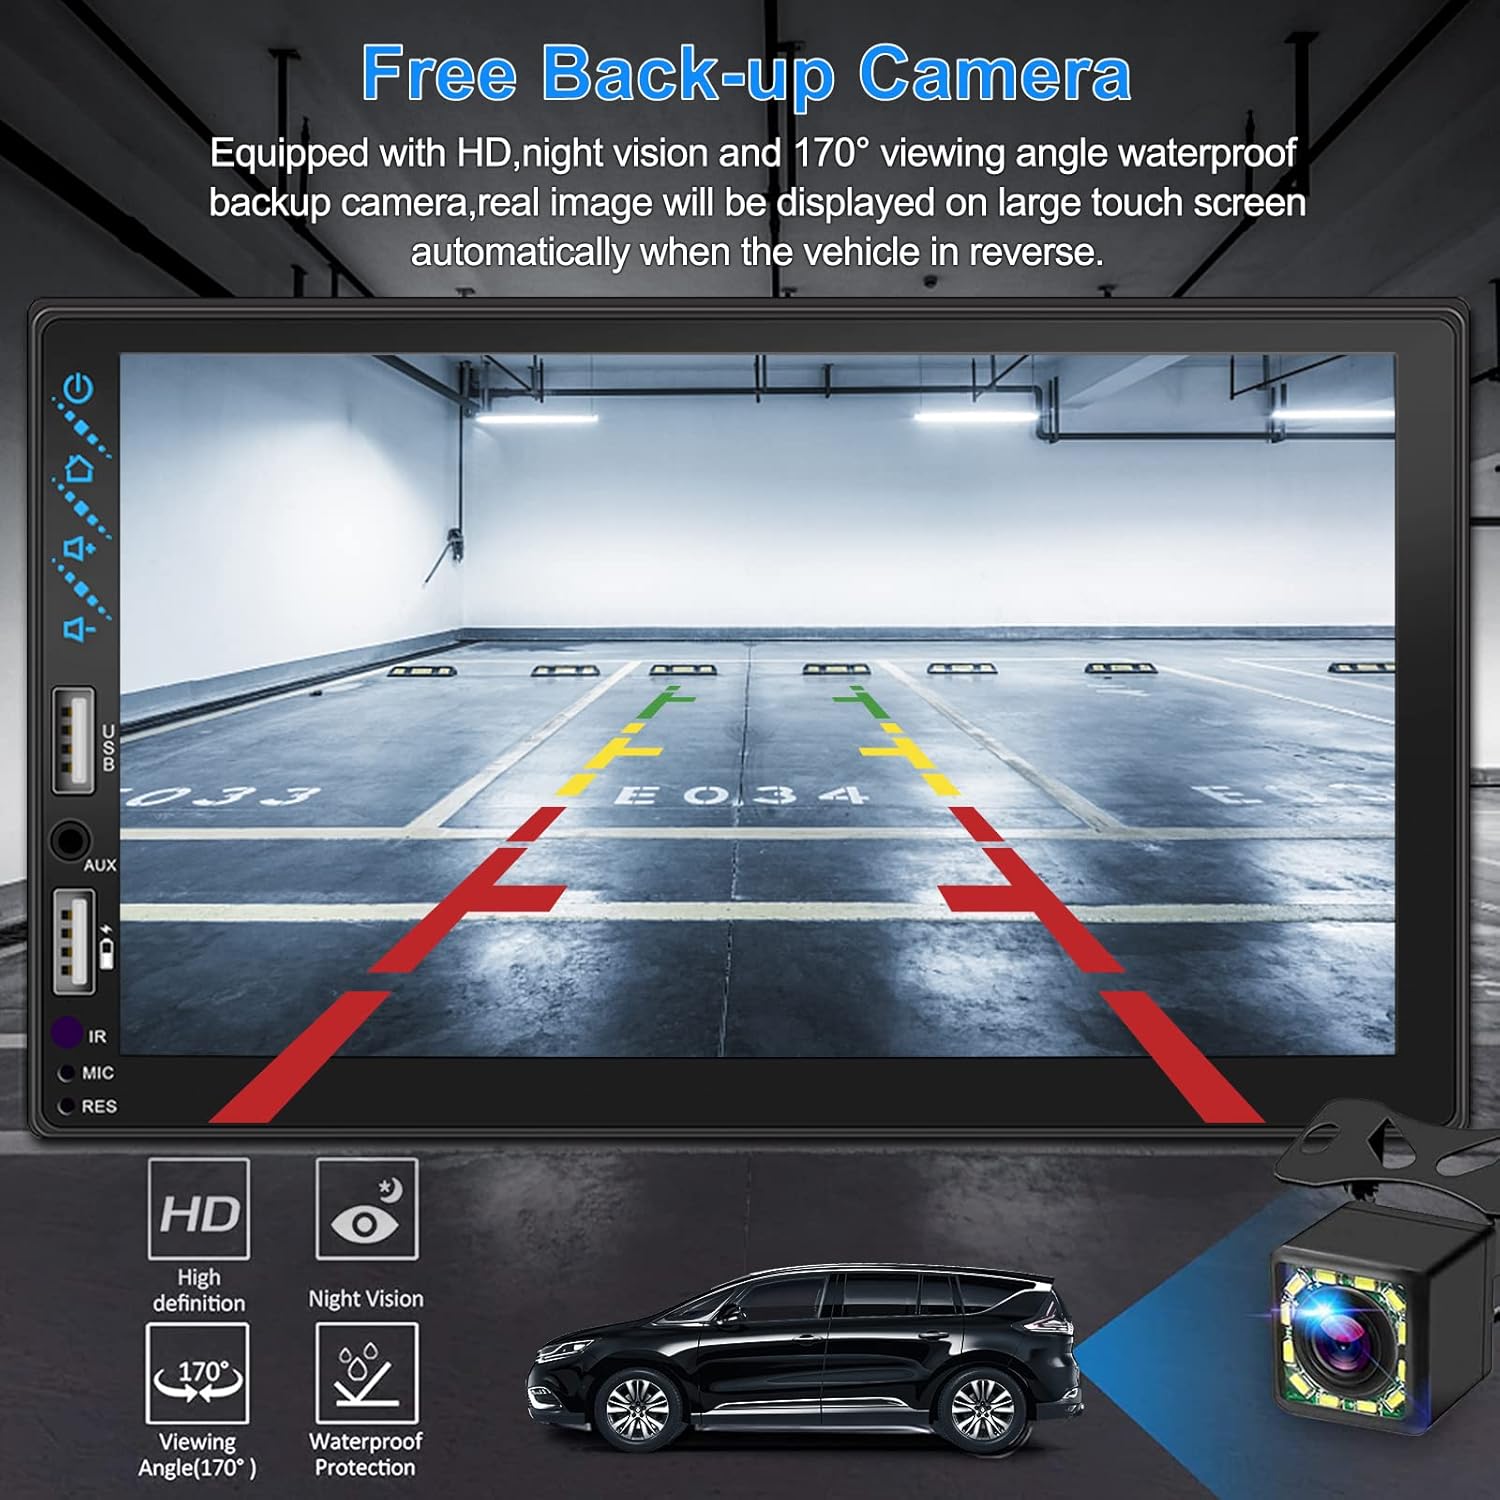
Rysunek 3.4: Tył View Wyświetlacz aparatu
4. Instrukcja instalacji
Prawidłowa instalacja jest kluczowa dla optymalnej wydajności. Jeśli nie masz doświadczenia w okablowaniu car audio, zaleca się zlecenie instalacji profesjonaliście.
4.1 Wymiary
The stereo unit has a standard double din size. Refer to Figure 2.1 for detailed dimensions.
- Szerokość: 178 mm (7 cala)
- Wysokość: 102 mm (4 cala)
- Głębokość: 60 mm (2.6 cala)
4.2 Schemat okablowania
Carefully follow the wiring diagram below to connect the stereo to your vehicle's electrical system. Ensure all connections are secure to prevent malfunctions.
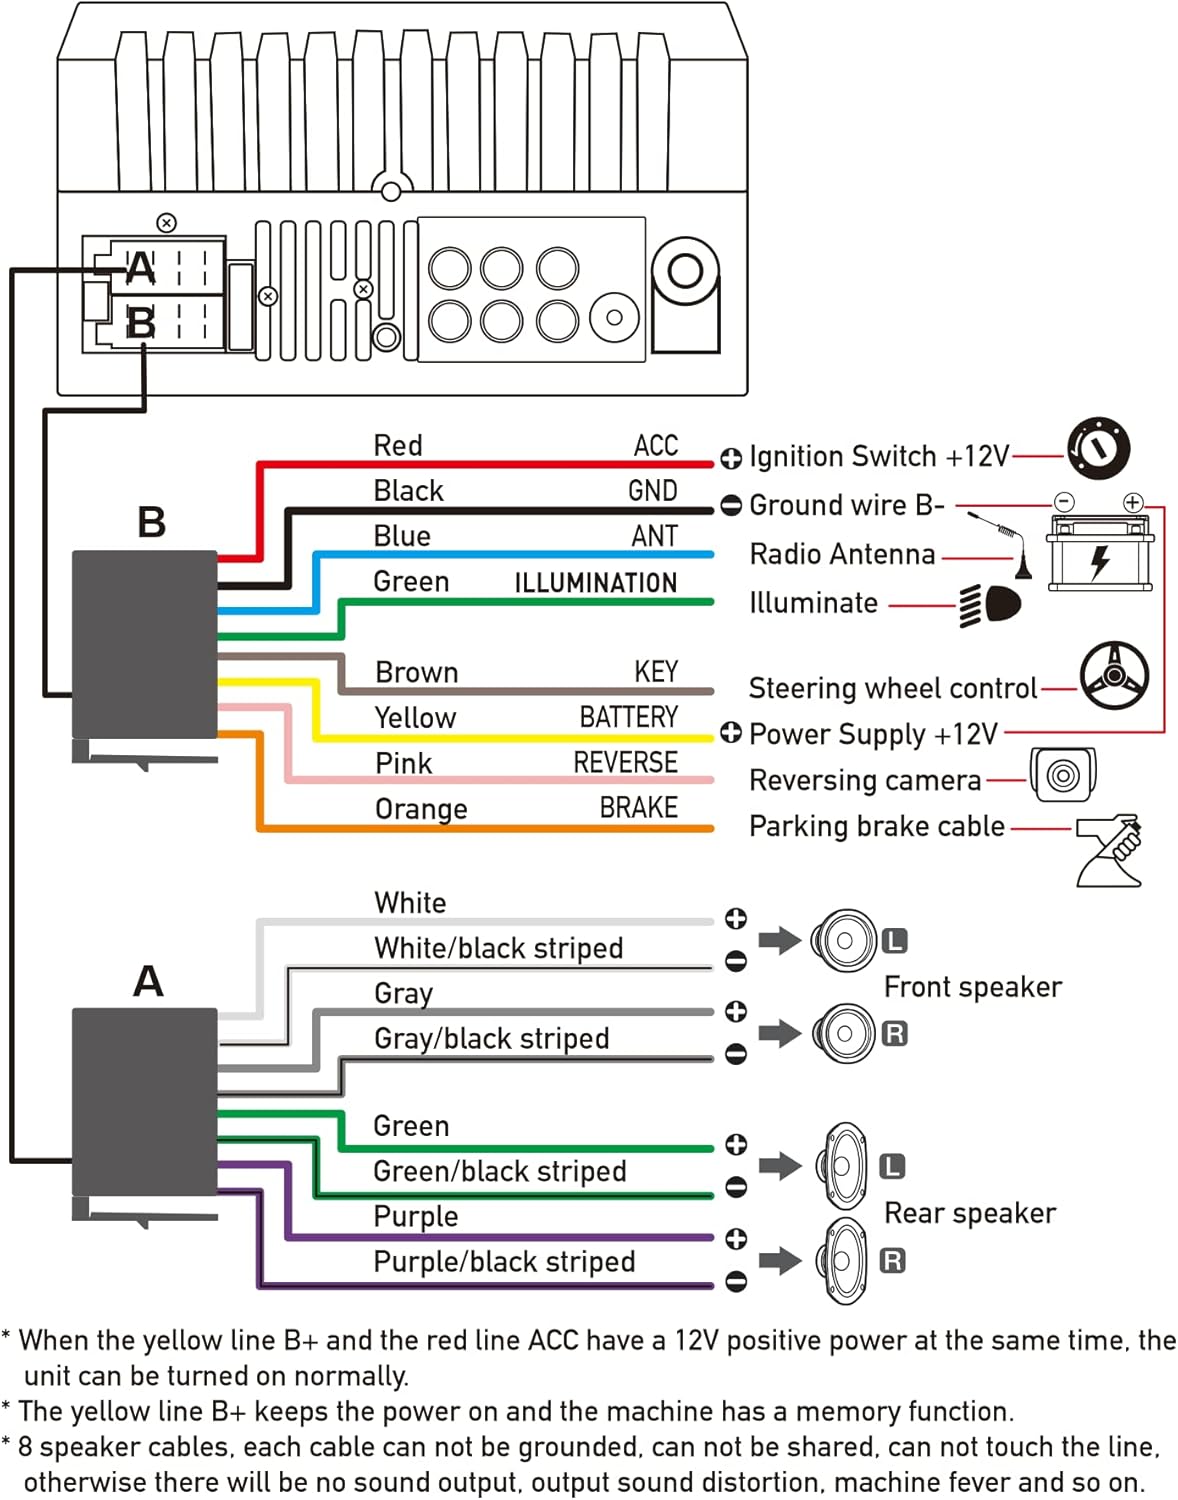
Rysunek 4.1: Główny schemat okablowania
- Czerwony (ACC): Podłącz do wyłącznika zapłonu +12V.
- Czarny (GND): Connect to Ground wire B-.
- Niebieski (ANT): Connect to Radio Antenna (if applicable).
- Zielony (OŚWIETLENIE): Connect to Illuminate wire.
- Brązowy (KLUCZ): Connect to Steering wheel control.
- Żółty (BATERIA): Connect to Power Supply +12V.
- Różowy (ODWRÓCONY): Connect to Reversing camera input.
- Pomarańczowy (HAMULEC): Connect to Parking brake cable.
Speaker Connections (8 speakers supported):
- White / White/black striped: Głośnik przedni lewy
- Gray / Gray/black striped: Prawy przedni głośnik
- Green / Green/black striped: Tylny lewy głośnik
- Purple / Purple/black striped: Tylny prawy głośnik
Ważne uwagi:
- The unit requires both the Yellow (BATTERY) and Red (ACC) wires to have a 12V positive power supply simultaneously for normal operation.
- The Yellow (BATTERY) wire keeps the power on and maintains memory functions.
- For speaker connections, each cable must not be grounded or shared with other cables. Incorrect wiring can lead to no sound output, sound distortion, or damage to the machine.
5. Instrukcja obsługi
5.1 Podstawowe operacje
- Włączanie/wyłączanie: Naciśnij przycisk zasilania na panelu przednim lub pilocie.
- Regulacja głośności: Użyj przycisków głośności na panelu przednim, przycisków sterujących na kierownicy lub pilocie.
- Wybór źródła: Tap the 'Source' or 'Mode' icon on the touchscreen to switch between Radio, Bluetooth, USB, AUX, CarPlay, and Android Auto.
5.2 Apple CarPlay / Android Auto Usage
- Connect your compatible iPhone or Android smartphone to the stereo's USB port using a certified USB cable.
- The stereo will automatically detect the connection and prompt you to launch CarPlay or Android Auto.
- Aby dokończyć konfigurację, postępuj zgodnie z instrukcjami wyświetlanymi na ekranie.
- Once connected, you can access supported apps like Maps, Phone, Messages, and Music directly from the stereo's touchscreen or via voice commands.
5.3 parowanie Bluetooth
- Włącz Bluetooth w swoim smartfonie.
- Na stereo przejdź do menu Bluetooth.
- Szukaj available devices on your smartphone. The stereo's Bluetooth name will typically be 'ESLYYDS' or similar.
- Select the stereo from your smartphone's list and confirm the pairing code if prompted.
- Po sparowaniu możesz wykonywać i odbierać połączenia oraz przesyłać strumieniowo dźwięk bezprzewodowo.
5.4 Phone Mirror Link Usage
- Connect your smartphone to the stereo's USB port.
- Select the 'Mirror Link' option on the stereo's screen.
- Follow the specific instructions displayed on the stereo for your phone's operating system (Android or iOS) to enable screen mirroring. This may involve enabling USB debugging for Android or trusting the device for iOS.
5.5 Działanie radiowe
- Select the 'Radio' source.
- Use the 'Scan' function to automatically search and save stations, or manually tune using the frequency controls.
- Zapisz swoje ulubione stacje pod przyciskami ustawień wstępnych, aby mieć do nich szybki dostęp.
5.6 Odtwarzanie USB
- Włóż dysk USB zawierający dźwięk lub wideo files into the designated USB playback port.
- The stereo will automatically switch to USB mode or prompt you to select it.
- Browse and play your media files using the touchscreen controls.
6. Konserwacja
Aby zapewnić długą żywotność i optymalną pracę radia samochodowego, należy przestrzegać poniższych wskazówek dotyczących konserwacji:
- Czyszczenie: Use a soft, dry cloth to clean the screen and exterior. For stubborn smudges on the screen, use a screen cleaner specifically designed for electronic displays. Avoid abrasive cleaners or solvents.
- Temperatura: Unikaj wystawiania urządzenia na działanie ekstremalnych temperatur, zarówno wysokich, jak i niskich, przez dłuższy czas.
- Wilgoć: Utrzymuj urządzenie w suchości. Nie wystawiaj go na działanie wody ani nadmiernej wilgoci.
- Aktualizacje oprogramowania układowego: Sprawdź producenta webokresowo odwiedzaj tę witrynę w celu sprawdzenia dostępności aktualizacji oprogramowania sprzętowego, które poprawią wydajność i dodadzą nowe funkcje.
7. Rozwiązywanie Problemów
If you encounter issues with your ESLYYDS car stereo, please refer to the following common problems and solutions. If the problem persists, contact customer support.
| Problem | Możliwa przyczyna | Rozwiązanie |
|---|---|---|
| Brak zasilania | Nieprawidłowe okablowanie; Przepalony bezpiecznik; Problem z akumulatorem pojazdu. | Check power (Yellow and Red) and ground (Black) wire connections. Inspect vehicle fuses. Ensure vehicle battery is charged. |
| Brak dźwięku | Nieprawidłowo podłączone przewody głośnikowe; Zbyt niski poziom głośności; Aktywna funkcja wyciszenia. | Verify all speaker wire connections (ensure no shorts or grounds). Increase volume. Check if mute is enabled. |
| Bluetooth nie łączy się | Bluetooth nie jest włączony w telefonie/wieży stereo; nieprawidłowy proces parowania. | Ensure Bluetooth is active on both devices. Delete previous pairings and re-attempt pairing process. |
| CarPlay/Android Auto nie uruchamia się | Faulty USB cable; Phone not compatible; Software issue. | Use a high-quality, certified USB cable. Ensure your phone's OS version is compatible. Restart both phone and stereo. |
| Tylna kamera nie wyświetla obrazu | Camera wire disconnected; Reverse trigger wire not connected. | Check the camera's video input and power connections. Ensure the Pink (REVERSE) wire is correctly connected to the vehicle's reverse light trigger. |
| USB not reading media | Nieobsługiwane file format; Corrupted USB drive; USB port issue. | Zapewnij media files are in supported formats (e.g., MP3, MP4, MKV). Try a different USB drive. |
8. Specyfikacje
| Funkcja | Specyfikacja |
|---|---|
| Wymiary produktu | 7 x 2.6 x 3.94 cala |
| Waga przedmiotu | 2.33 funta |
| Numer modelu | L3 |
| Rozmiar wyświetlacza | 7 cali (18 cm) |
| Typ wyświetlacza | HD Capacitive Touchscreen |
| Technologia łączności | Carplay, Android Auto, Mirror-Link, Bluetooth 5.2, USB, AUX |
| Typ kontrolera | Asystent Google, iOS, Android |
| Cechy specjalne | Touchscreen, RDS, Steering Wheel Control (SWC), Fast Charging USB (2.1A) |
| Kompatybilne urządzenia | Smartfon |
| Typ złącza | USB |
| Tryb wyjścia audio | Otaczać |
| Konfiguracja kanału dźwięku przestrzennego | 5.1 |
| Obsługa kodowania wideo | MKV |
| Kolor | Czarny |
| Data pierwszej dostępności | 25 września 2021 r. |
9. Gwarancja i wsparcie
ESLYYDS is committed to providing excellent customer service and technical support. For any inquiries or assistance, please contact our professional technical team.
- Gwarancja zwrotu pieniędzy: 30-day period from purchase.
- Gwarancja wymiany: 12-month period for product replacement.
- Wsparcie techniczne: Zapewniamy dożywotnie wsparcie techniczne.
Please refer to your purchase documentation for specific contact details or visit the official ESLYYDS webwitryna z informacjami pomocniczymi.


