1. Wprowadzenie
This manual provides detailed instructions for the setup, operation, and maintenance of your MOES Smart Temperature Humidity Monitor with IR Remote Control. This device integrates temperature and humidity sensing with universal infrared remote control capabilities, allowing you to monitor your environment and control various IR-enabled appliances via a smartphone application or voice commands.
2. Koniec produktuview
The MOES Smart Temperature Humidity Monitor is a compact device designed to provide real-time environmental data and smart control. It features an LCD display for immediate readings and connects to your home Wi-Fi network for remote access and automation.

Image 2.1: MOES Smart Temperature Humidity Monitor displaying temperature and humidity, alongside a smartphone showing the companion app interface.
Główne cechy:
- Monitorowanie na żywo: Displays current temperature and humidity on an LCD screen.
- Pilot na podczerwień: Controls various infrared appliances such as TVs, air conditioners, and fans.
- Łączność Wi-Fi: Connects to 2.4GHz Wi-Fi for remote access via the Tuya Smart or Smart Life app.
- Inteligentna automatyzacja: Create rules to automatically control IR devices based on temperature and humidity changes.
- Sterowanie głosowe: Kompatybilny z Amazon Alexa i Google Assistant, co umożliwia obsługę bez użycia rąk.
- Przełącznik jednostek temperatury: Łatwe przełączanie między stopniami Celsjusza i Fahrenheita.
3. Specyfikacje
Detailed technical specifications for the MOES Smart Temperature Humidity Monitor.

Image 3.1: Product dimensions and component labels for the MOES Smart Temperature Humidity Monitor.
| Funkcja | Specyfikacja |
|---|---|
| Nazwa produktu | Inteligentny pilot na podczerwień |
| Numer modelu | WR-TY-THR-BK-MS |
| Wymiary | 65mm x 65mm x 17mm (2.56 x 2.56 x 0.67 cale) |
| Waga przedmiotu | 3.2 uncji |
| Moc wejściowa | DC 5V/1A (Micro USB, adapter not included) |
| Wskaźnik LED | Niebieski |
| Dokładność temperatury | ±1°C |
| Zakres pomiaru temperatury | Temperatura od 0°C do 60°C |
| Wilgotność robocza | ±5% wilgotności względnej |
| Częstotliwość podczerwieni | 38KHz |
| Odległość IR | <10m |
| Połączenie | 2.4GHz Wi-Fi |
| Kompatybilne urządzenia | Air Conditioner, Humidifier, Fan, TV, Set-top Box, Projector, etc. |
| Cechy specjalne | Voice Search, App Control, Automation |
4. Konfiguracja
4.1 Zawartość pudełka
- MOES Smart Temperature Humidity Monitor
- Kabel Micro USB
- Instrukcja obsługi (ten dokument)
4.2 Konfiguracja fizyczna
- Podłączenie zasilania: Connect the provided Micro USB cable to the Micro USB port on the device and plug the other end into a 5V/1A USB power adapter (not included). The device will power on and the LCD display will activate.
- Umieszczenie: Place the monitor in a central location within the room where you intend to measure temperature and humidity and control IR devices. Ensure there are no obstructions between the monitor and the IR-controlled appliances. The IR distance is typically up to 10 meters.
4.3 Instalacja i parowanie aplikacji
The MOES Smart Temperature Humidity Monitor works with the Tuya Smart or Smart Life app.
- Pobierz aplikację: Szukaj "Tuya Smart" or "Smart Life" in your smartphone's app store (iOS App Store or Google Play Store) and download it.
- Zarejestruj się/Zaloguj: Otwórz aplikację i zarejestruj nowe konto lub zaloguj się, jeśli już je posiadasz.
- Dodaj urządzenie:
- Upewnij się, że Twój smartfon jest podłączony do sieci Wi-Fi 2.4 GHz.
- W aplikacji dotknij ikony „+” w prawym górnym rogu, aby dodać urządzenie.
- Select "Sensor" or "Universal Remote Control" from the device list, or use the auto-scan feature.
- Wejdź w tryb parowania: On the MOES monitor, press and hold the "Reset Button" (located at the back, often labeled 'C/F Switch' or 'Reset') for 5-7 seconds until the Wi-Fi icon on the LCD display starts blinking rapidly.
- Follow the on-screen instructions in the app to connect the device to your Wi-Fi network. This usually involves confirming the blinking indicator and entering your Wi-Fi password.
- Once successfully paired, the Wi-Fi icon on the monitor will stop blinking and remain solid.
5. Instrukcja obsługi
5.1 Wyświetlacz LCD powyżejview
The LCD display provides essential information at a glance:

Rysunek 5.1: Szczegółowy view wyświetlacza LCD i jego wskaźników.
- Wyświetlacz temperatury: Shows the current temperature (in °C or °F).
- Wyświetlacz wilgotności: Shows the current relative humidity (%).
- Sygnał Wi-Fi: Wskazuje stan połączenia Wi-Fi.
- Czas i data: Wyświetla aktualną godzinę i datę.
- Week/AM/PM: Shows the day of the week and AM/PM indicator.
5.2 Przełączanie jednostek temperatury (°C/°F)
To switch between Celsius and Fahrenheit, briefly press the "Reset Button" on the back of the device. The unit on the LCD display will change accordingly. This can also be adjusted within the Tuya Smart/Smart Life app.

Image 5.2: Switching temperature units via the Smart Life app.
5.3 IR Remote Control Functionality
The device can learn and emit IR signals to control various home appliances.
- Adding IR Devices:
- In the Tuya Smart/Smart Life app, navigate to your MOES monitor device.
- Look for an option like "IR Remote Control" or "Add Remote".
- Select the type of appliance you want to control (e.g., TV, Air Conditioner, Fan, Set-top Box).
- Follow the app's instructions to either select from a pre-programmed library of remote codes or use the "DIY" (Do It Yourself) function to learn commands from your original remote control.
- For DIY learning, point your original remote at the MOES monitor and press the desired button when prompted by the app.
- Urządzenia sterujące: Once an IR device is added, you can control it directly from the app interface, even when you are away from home.
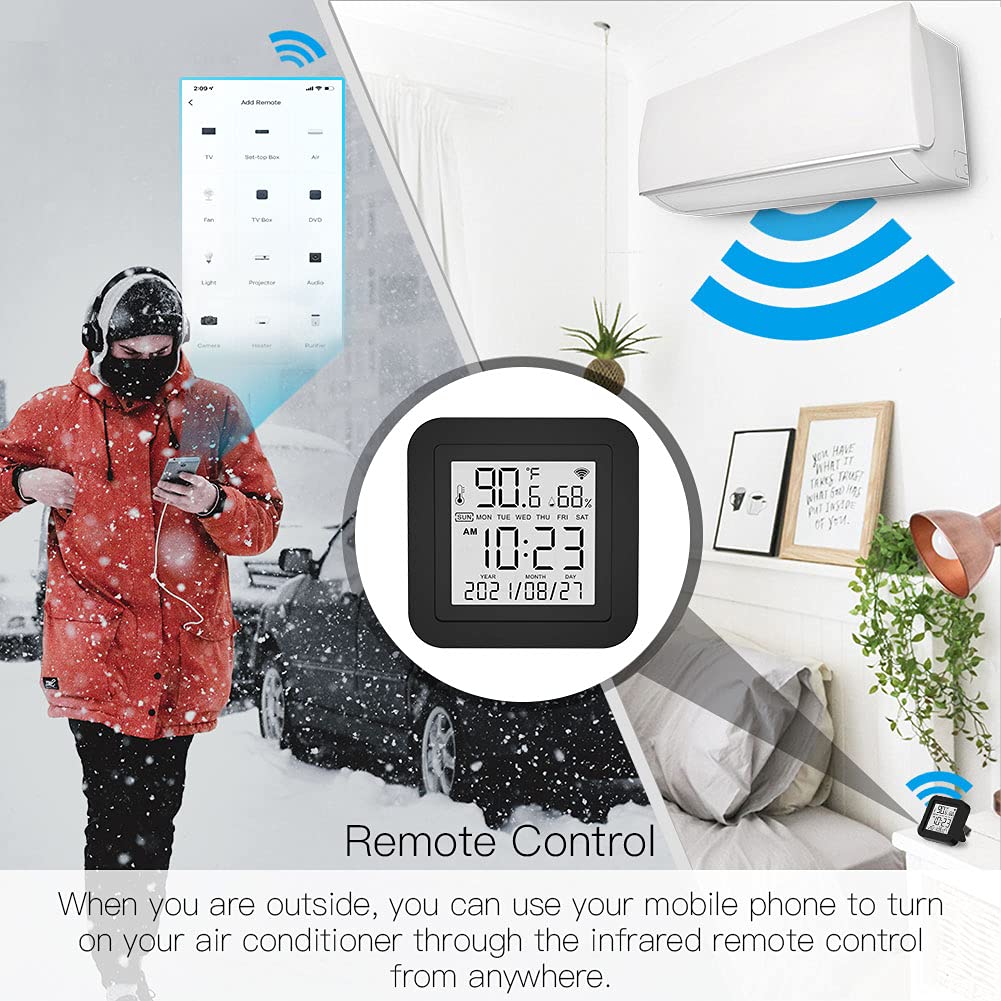
Image 5.3: Remote control functionality via the smartphone app.
5.4 Inteligentna automatyka
Leverage the temperature and humidity data to create automated routines for your IR-controlled devices.
- Access Automation: In the Tuya Smart/Smart Life app, go to the "Smart" or "Automation" section.
- Create a Scene/Automation:
- Select "When device status changes" or "Schedule" as the condition.
- Choose your MOES monitor and set a condition based on temperature or humidity (e.g., "Temperature rises above 26°C" or "Humidity drops below 50%").
- For the task, select "Run the device" and choose the IR-controlled appliance (e.g., Air Conditioner, Humidifier). Set the desired action (e.g., "Turn On", "Set Temperature to 24°C").

Obraz 5.4: Example of temperature-based automation for an air conditioner.

Obraz 5.5: Example of humidity-based automation for a humidifier.
5.5 Sterowanie głosowe
The MOES Smart Temperature Humidity Monitor is compatible with Amazon Alexa and Google Assistant.
- Połącz konta: W aplikacji Alexa lub Google Home włącz umiejętność/usługę „Tuya Smart” lub „Smart Life” i połącz swoje konto.
- Odkryj urządzenia: Once linked, ask your voice assistant to discover new devices. Your MOES monitor and any configured IR devices will appear.
- Polecenia głosowe: You can now use voice commands to control your IR appliances. Examples:
- "Alexa, włącz telewizor."
- „Hej Google, ustaw klimatyzację na 22 stopnie”.
- "Alexa, wyłącz wentylator."

Image 5.6: Voice control integration with Amazon Alexa and Google Assistant.
6. Konserwacja
- Czyszczenie: Use a soft, dry cloth to clean the device. Do not use liquid cleaners or sprays, as they may damage the internal components.
- Umieszczenie: Avoid placing the device in direct sunlight, near heat sources, or in areas with high humidity to ensure accurate readings and optimal performance.
- Aktualizacje oprogramowania układowego: The device's firmware may be updated periodically via the Tuya Smart/Smart Life app. Ensure your app is up-to-date and follow any prompts for device firmware updates.
7. Rozwiązywanie Problemów
| Problem | Możliwe rozwiązanie |
|---|---|
| Urządzenie nie włącza się | Ensure the Micro USB cable is securely connected and the power adapter is working. Try a different USB port or adapter. |
| Nie można połączyć się z siecią Wi-Fi |
|
| Pilot na podczerwień nie działa |
|
| Niedokładne odczyty temperatury/wilgotności |
|
| Sterowanie głosowe nie odpowiada |
|
| Device unresponsive / needs reset | Press and hold the "Reset Button" on the back of the device for approximately 10 seconds until the device restarts or enters pairing mode. You may need to re-pair it with the app. |
8. Gwarancja i wsparcie
MOES products are designed for reliability and performance. For warranty information, technical support, or further assistance, please refer to the official MOES webOdwiedź stronę internetową lub skontaktuj się bezpośrednio z działem obsługi klienta. Zachowaj paragon jako dowód zakupu na wypadek reklamacji.
Zasoby internetowe:
- Odwiedź Sklep MOES na Amazon aby uzyskać aktualizacje produktów i powiązane akcesoria.


