1. Wprowadzenie
Thank you for choosing the Midea MMDF07S2WW 0.7 cubic feet microwave oven. This manual provides essential information for the safe and efficient operation, maintenance, and troubleshooting of your appliance. Please read these instructions thoroughly before use and retain them for future reference.

Rycina 1: Przód view of the Midea MMDF07S2WW Microwave Oven.
2. Ważne instrukcje bezpieczeństwa
Podczas korzystania z urządzeń elektrycznych należy przestrzegać podstawowych zasad bezpieczeństwa, w tym:
- Przed użyciem urządzenia należy przeczytać całą instrukcję.
- Nie należy podejmować prób uruchomienia kuchenki mikrofalowej z otwartymi drzwiczkami, gdyż może to spowodować szkodliwe działanie energii mikrofalowej.
- Do not place any object between the oven front face and the oven door or allow soil or cleaner residue to accumulate on sealing surfaces.
- Nie używaj kuchenki, jeśli jest uszkodzona. Szczególnie ważne jest, aby drzwiczki piekarnika zamykały się prawidłowo i aby nie doszło do uszkodzenia: (1) drzwi (wygięte), (2) zawiasów i zatrzasków (złamanych lub poluzowanych), (3) uszczelek drzwi i powierzchni uszczelniających.
- Piekarnika nie powinien regulować ani naprawiać nikt inny niż odpowiednio wykwalifikowany personel serwisowy.
- Zawsze należy upewnić się, że urządzenie jest prawidłowo uziemione.
- Nie podgrzewaj płynów ani innych produktów spożywczych w szczelnie zamkniętych pojemnikach, gdyż istnieje ryzyko ich eksplozji.
- Never use metal utensils or containers in the microwave.
3. Konfiguracja i instalacja
3.1 Rozpakowanie
Carefully remove the microwave oven from its packaging. Remove all packing materials, including any protective film or tape. Inspect the oven for any damage. If the oven appears damaged, do not operate it and contact customer service.
3.2 Umieszczenie
Place the microwave oven on a flat, stable surface that is strong enough to hold the oven and the food you will be placing in it. Ensure there is adequate ventilation around the oven. Maintain a minimum of 4 inches (10 cm) of space on the top, back, and sides for proper airflow.
3.3 Połączenie zasilania
Plug the microwave oven into a dedicated 120V, 60Hz, AC-only electrical outlet. Do not use an extension cord or adapter. The microwave operates at 1050 watts.
4. Instrukcja obsługi
4.1 Panel sterowania ponadview
The control panel features a digital display, numeric keypad, and various function buttons for easy operation.
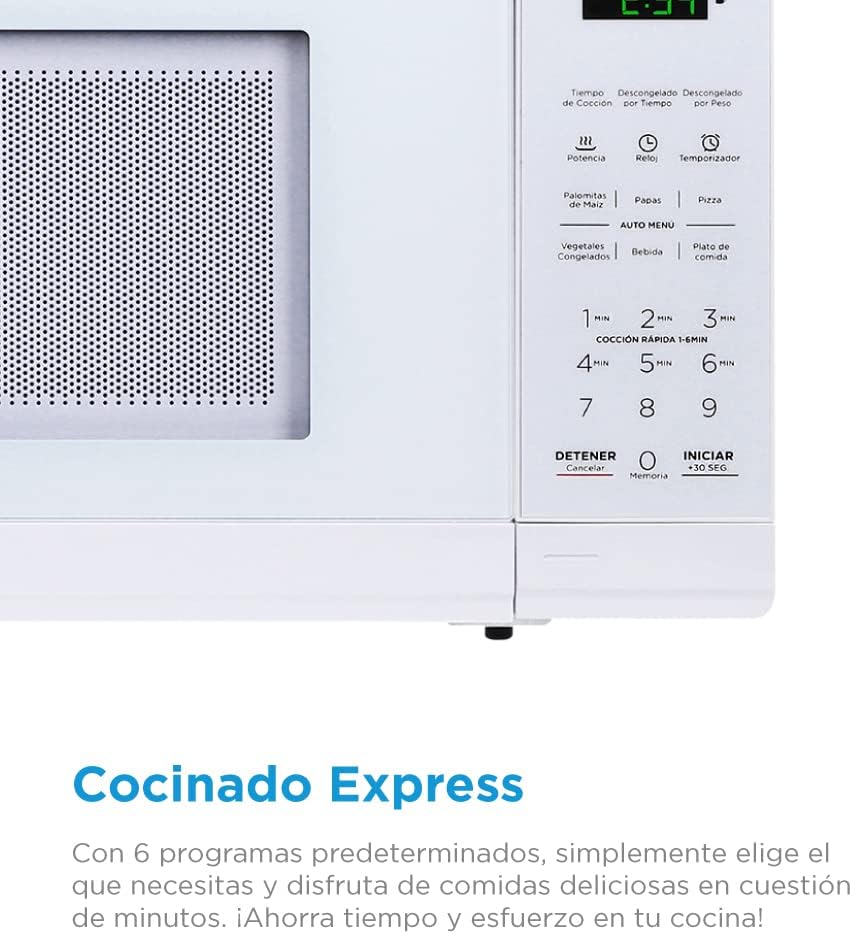
Rysunek 2: Szczegółowy view of the control panel, showing various cooking and defrost options.
4.2 Czas gotowania
Aby gotować jedzenie przez określony czas:
- Włóż żywność do piekarnika i zamknij drzwi.
- Naciśnij "Time Cook" przycisk.
- Wprowadź żądany czas gotowania za pomocą klawiatury numerycznej.
- Naciskać "Start" zacząć gotować.
4.3 poziomy mocy
The microwave offers 10 power levels to suit various cooking needs, from gentle warming to rapid cooking.

Figure 3: Illustration of the 10 available power levels for precise cooking control.
Aby wyregulować poziom mocy:
- Naciśnij "Moc" button after setting the cooking time.
- Select the desired power level (e.g., 1 for 10%, 10 for 100%) using the numeric keypad.
- Naciskać "Start".
4.4 Opcje rozmrażania
The microwave provides options for defrosting by time or by weight, ensuring your food is thawed evenly.

Figure 4: The microwave's defrost functions, allowing for thawing by weight or time.
Follow the instructions on the control panel for "Time Defrost" or "Weight Defrost".
4.5 Quick Cook and +30 Seconds Option
Aby szybko podgrzać, wystarczy nacisnąć "Start/+30 Sec" button to immediately start cooking for 30 seconds at full power. You can press it repeatedly to add more time in 30-second increments.

Figure 5: The Timer and +30 Seconds option for convenient and quick cooking.
4.6 menu automatycznych
The microwave includes convenient auto menus for common foods:
- Prażona kukurydza: For perfectly popped corn.
- Ziemniak: Idealny do pieczenia ziemniaków.
- Pizza: Reheat pizza slices.
- mrożone warzywa: Cook frozen vegetables.
- Napój: Heat drinks.
- Talerz obiadowy: Reheat a full dinner plate.
Select the desired auto menu and press "Start"Piekarnik automatycznie ustawi odpowiedni czas pieczenia i poziom mocy.
5. Konserwacja i czyszczenie
5.1 Czyszczenie powierzchni zewnętrznej
Przetrzyj zewnętrzną część piekarnika ściereczką damp cloth and mild soap. Avoid using abrasive cleaners or scouring pads, as they can scratch the surface. Ensure the control panel is kept dry.
5.2 Czyszczenie wnętrza
Clean the interior cavity regularly. For stubborn food splatters, place a bowl of water with lemon slices inside and microwave for 2-3 minutes. The steam will loosen the residue, making it easier to wipe clean with a soft cloth. The glass turntable can be removed and washed with warm, soapy water.
5.3 Pielęgnacja gramofonu
Ensure the turntable and its support ring are correctly positioned before operating the oven. Do not operate the oven without the turntable in place.
6. Rozwiązywanie Problemów
If you experience issues with your microwave oven, refer to the following common problems and solutions:
- Piekarnik nie uruchamia się: Check if the power cord is securely plugged in. Ensure the door is completely closed. Check for a blown fuse or tripped circuit breaker.
- Jedzenie nie nagrzewa się: Sprawdź, czy czas gotowania i poziom mocy są ustawione prawidłowo. Upewnij się, że drzwiczki są całkowicie zamknięte.
- Sparking inside the oven: Remove any metal objects or containers. Ensure the interior is clean and free of food residue.
- Gramofon się nie obraca: Check if the turntable is correctly placed on its support. Ensure there is no obstruction preventing rotation.
If the problem persists after trying these solutions, please contact Midea customer support.
7. Specyfikacje
| Numer modelu | MMDF07S2WW |
| Marka | Midea |
| Pojemność | 0.7 stopy sześciennej (20 l) |
| Cotage | 1050 watów |
| Tomtage | 120 wolty |
| Wymiary produktu | 10 x 12 x 17 cala |
| Waga przedmiotu | 23.1 funta (10.5 kilograma) |
| Kolor | Biały |
| Tworzywo | Stal nierdzewna |
| Typ instalacji | Wolnostojące |
| Typ kontrolera | Dotykać |
| Funkcja specjalna | Programowalny |
8. Gwarancja i wsparcie
Midea oferuje 2-letnia gwarancja on parts and components for this microwave oven. Additionally, the magnetron component is covered by a 6-letnia gwarancja. Zachowaj dowód zakupu na wypadek roszczeń gwarancyjnych.

Figure 6: Warranty information for the Midea microwave oven.
For technical support, service, or warranty inquiries, please contact Midea customer service through their official webstronę internetową lub dane kontaktowe podane w dokumentacji produktu.


