1. Wprowadzenie
The Sonel CMM 30 is an advanced industrial multimeter engineered for versatility, modern functionality, and exceptional durability. This device integrates 11 fundamental measurement functions along with additional features, providing a broad spectrum of applications for professionals. Its robust design includes drop protection and an IP67 rated casing, ensuring reliable performance even in challenging environments.
Key features include a smartphone application for remote reading and data saving via wireless communication, an automatically adjusting backlight for optimal screen visibility, and a built-in flashlight for illumination in dark conditions. This manual provides essential information for the safe and effective use of your CMM 30 multimeter.
2. Informacje dotyczące bezpieczeństwa
Always adhere to the following safety precautions to prevent electric shock, injury, or damage to the meter or equipment under test.
- Read and understand all instructions and safety information in this manual before operating the meter.
- Nie używaj miernika, jeśli wygląda na uszkodzony lub jeśli izolacja przewodów pomiarowych jest naruszona.
- Zawsze odłączaj zasilanie obwodu i rozładuj wszystkie ładunki wysokiego napięcia.tage capacitors before making resistance, continuity, diode, or capacitance measurements.
- Zachowaj ostrożność podczas pracy z objętościątagpowyżej 30 V AC RMS, 42 V szczytowo lub 60 V DC. Te wartościtagStwarzają ryzyko porażenia prądem.
- Nie należy przekraczać maksymalnych limitów wejściowych dla żadnej funkcji.
- Przed podłączeniem przewodów pomiarowych do obwodu należy upewnić się, że przełącznik funkcji jest ustawiony w odpowiedniej pozycji dla żądanego pomiaru.
- Aby zapewnić dokładne odczyty, należy wymienić baterie, gdy tylko pojawi się wskaźnik niskiego poziomu naładowania baterii.
- Nie należy używać miernika w środowiskach, w których występuje zagrożenie wybuchem gazów, oparów lub pyłów.
3. Zawartość opakowania
Verify that all items listed below are present and undamaged upon opening the package:
- Sonel CMM 30 Industrial Multimeter
- Przewody pomiarowe (czerwony i czarny)
- Sonda temperatury (termopara typu K)
- 4 baterie AAA (w zestawie lub osobno)
- Instrukcja obsługi (ten dokument)
Jeśli brakuje jakichkolwiek elementów lub są one uszkodzone, prosimy o natychmiastowy kontakt z dostawcą.
4. Koniec produktuview
Familiarize yourself with the components of your Sonel CMM 30 multimeter:
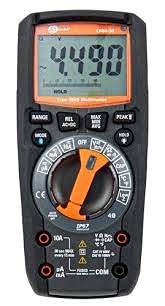
Rycina 4.1: Przód view of the Sonel CMM 30 Industrial Multimeter. This image displays the device's main components, including the digital display, the central rotary function switch, and the various input terminals for test leads.
4.1. Wyświetl
The large LCD shows measurement readings, units, function indicators, and battery status. It features an automatic backlight that adjusts to ambient light conditions for optimal visibility.
4.2. Przełącznik funkcji obrotowych
This central switch is used to select the desired measurement function (e.g., Voltage, Current, Resistance, Capacitance, Temperature, Frequency).
4.3. Przyciski funkcyjne
Various buttons provide additional controls and features:
- ZASIĘG: Toggles between manual and automatic ranging.
- Sposób użycia: Selects sub-functions within a main rotary switch position (e.g., AC/DC voltagnp. dioda/ciągłość).
- TRZYMAĆ: Zamraża aktualny odczyt wyświetlacza.
- MAKS./MIN./ŚRED.: Records maximum, minimum, and average readings.
- REL: Relative mode, subtracts a stored value from subsequent measurements.
- Bluetooth/Light: Activates Bluetooth connectivity for the smartphone app and controls the built-in flashlight.
4.4. Gniazda wejściowe
These are the connection points for the test leads:
- KOM: Common terminal for the black test lead.
- VΩHzCAP°C: Wejście dla voltage, resistance, frequency, capacitance, and temperature measurements (red test lead).
- mAµA: Dane wejściowe dla miliampere i mikroamppomiary prądu (czerwony przewód pomiarowy).
- 10A: Input for up to 10 Amppomiary prądu (czerwony przewód pomiarowy).
5. Konfiguracja
5.1. Instalacja baterii
The Sonel CMM 30 requires 4 AAA batteries. These may be pre-installed or included separately.
- Upewnij się, że multimetr jest wyłączony.
- Znajdź komorę baterii z tyłu miernika.
- Use a screwdriver to loosen the screw(s) securing the battery cover.
- Zdejmij pokrywę baterii.
- Włóż 4 baterie AAA, zwracając uwagę na prawidłową biegunowość (+ i -) wskazaną wewnątrz komory.
- Załóż pokrywę baterii i mocno dokręć śrubę(y).
Notatka: Always use fresh batteries of the same type. Remove batteries if the meter is not used for an extended period to prevent leakage.
6. Instrukcja obsługi
6.1. Włączanie/wyłączanie zasilania
Turn the rotary function switch from the OFF position to any desired measurement function to power on the meter. To power off, turn the switch back to the OFF position.
6.2. Basic Measurement Procedures
Before any measurement, ensure the test leads are correctly inserted into the appropriate input jacks for the selected function.
6.2.1. TomtagPomiary (prąd przemienny/stały)
- Insert the black test lead into the COM jack and the red test lead into the VΩHzCAP°C jack.
- Obróć przełącznik obrotowy na V~ (prąd zmienny)tage) lub V- (objętość DCtage) position. If both are combined, use the MODE button to select AC or DC.
- Podłącz przewody pomiarowe równolegle do obwodu lub elementu, który chcesz zmierzyć.
- Przeczytaj tomtage wartość na wyświetlaczu.
6.2.2. Pomiar prądu (AC/DC)
Ostrożność: Never connect the meter in parallel for current measurement. Always connect in series with the circuit.
- Insert the black test lead into the COM jack. For currents up to 10A, insert the red test lead into the 10A jack. For smaller currents (mA/µA), insert the red test lead into the mAµA jack.
- Turn the rotary switch to the A~ (AC Current) or A- (DC Current) position, or the mA/µA position as appropriate. Use the MODE button to select AC or DC if needed.
- Otwórz obwód, w którym będziesz mierzyć prąd i podłącz miernik szeregowo.
- Odczytaj aktualną wartość na wyświetlaczu.
6.2.3. Pomiar rezystancji
- Insert the black test lead into the COM jack and the red test lead into the VΩHzCAP°C jack.
- Ustaw przełącznik obrotowy w pozycji Ω (rezystancja).
- Przed podłączeniem przewodów pomiarowych należy upewnić się, że obwód lub element jest odłączony od napięcia.
- Odczytaj wartość rezystancji z wyświetlacza.
6.2.4. Pomiar pojemności
- Insert the black test lead into the COM jack and the red test lead into the VΩHzCAP°C jack.
- Turn the rotary switch to the CAP (Capacitance) position.
- Ensure the capacitor is fully discharged before connecting the test leads across it.
- Odczytaj wartość pojemności na wyświetlaczu.
6.2.5. Pomiar temperatury
- Insert the temperature probe into the VΩHzCAP°C and COM jacks, observing polarity if applicable.
- Turn the rotary switch to the °C/°F (Temperature) position.
- Umieść końcówkę sondy temperatury na obiekcie, którego temperaturę chcesz zmierzyć, lub w jego pobliżu.
- Odczytaj wartość temperatury na wyświetlaczu.
6.3. Zaawansowane funkcje
6.3.1. Pomiar rzeczywistej wartości skutecznej (RMS)
The CMM 30 features True RMS for AC voltage and current measurements, providing accurate readings for non-sinusoidal waveforms.
6.3.2. Wireless Communication and Smartphone App
The CMM 30 can connect wirelessly to a smartphone application, allowing for remote reading and saving of measurements. This is particularly useful in hard-to-reach or hazardous locations.
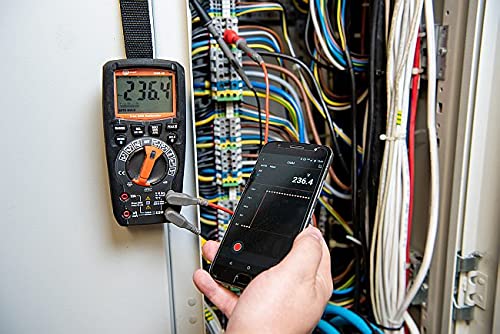
Figure 6.1: The Sonel CMM 30 Multimeter connected to an electrical panel, demonstrating its wireless communication feature. A smartphone displays the measurement reading remotely, highlighting the convenience for inaccessible areas.
Aby skorzystać z tej funkcji:
- Download the official Sonel CMM app from your smartphone's app store.
- Włącz Bluetooth w swoim smartfonie.
- Press the Bluetooth button on the multimeter to activate its wireless communication.
- Follow the app's instructions to pair with your CMM 30 and begin remote monitoring.
6.3.3. Wbudowana latarka
The integrated flashlight assists in illuminating measurement areas, especially in low-light conditions. Activate it by pressing the dedicated light button.
6.4. Durability and IP67 Rating
The CMM 30 is designed with an IP67 rating, signifying its protection against dust ingress and immersion in water up to 1 meter for 30 minutes. This makes it suitable for demanding industrial environments.
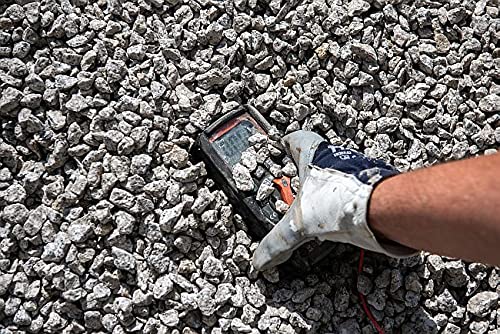
Figure 6.2: The Sonel CMM 30 Multimeter partially submerged in gravel, illustrating its robust construction and resistance to dust and debris, a testament to its IP67 rating.

Figure 6.3: The Sonel CMM 30 Multimeter creating a splash as it impacts a muddy puddle, demonstrating its exceptional water resistance and ability to withstand harsh, wet conditions.

Figure 6.4: A person, wearing protective boots and gloves, retrieves the Sonel CMM 30 Multimeter from a muddy environment. This image emphasizes the device's resilience and ease of handling even after exposure to challenging conditions.
7. Konserwacja
7.1. Czyszczenie
Wytrzyj licznikasing z reklamąamp Ściereczką i łagodnym detergentem. Nie używaj środków ściernych ani rozpuszczalników. Przed użyciem upewnij się, że miernik jest całkowicie suchy.
7.2. Wymiana baterii
Refer to Section 5.1 for battery replacement instructions. Replace batteries promptly when the low battery indicator appears on the display.
7.3. Przechowywanie
When not in use for extended periods, store the multimeter in a dry, cool place, away from direct sunlight and extreme temperatures. Remove the batteries to prevent leakage.
8. Rozwiązywanie Problemów
| Problem | Możliwa przyczyna | Rozwiązanie |
|---|---|---|
| Miernik się nie włącza. | Rozładowane lub nieprawidłowo zainstalowane baterie. | Sprawdź biegunowość baterii lub wymień baterie. |
| Brak odczytu lub komunikat „OL” (Przeciążenie). | Incorrect function selected; open circuit; measurement exceeds range. | Select correct function; check circuit continuity; switch to a higher range or auto-range. |
| Niedokładne odczyty. | Low battery; dirty test leads/jacks; external interference. | Replace batteries; clean leads/jacks; move away from strong electromagnetic fields. |
| Problemy z połączeniem Bluetooth. | Bluetooth not enabled on meter/phone; app issues; distance. | Ensure Bluetooth is on; restart app/phone; reduce distance between devices. |
9. Specyfikacje
| Funkcja | Specyfikacja |
|---|---|
| Marka | Sonela |
| Numer modelu | SON001 |
| Kolor | Czarny |
| Waga przedmiotu | 418 gramów |
| Wymiary opakowania | Wymiary 30 x 15 x 10 cm |
| Baterie | Wymagane 4 baterie AAA (w zestawie) |
| Funkcje pomiarowe | AC/DC Objętośćtage, AC/DC Current, Resistance, Capacity, Temperature, Duty Cycle, Frequency |
| Nośny | Ręczny i automatyczny |
| Prawdziwy RMS | Yes (for AC voltage i prąd) |
| Stopień ochrony IP | IP67 |
| Łączność | Wireless (Smartphone App) |
| Dodatkowe funkcje | HOLD function, Built-in flashlight, Backlight auto-adjustment |
10. Gwarancja i wsparcie
10.1. Informacje o gwarancji
Sonel products are manufactured to high standards and are warranted against defects in materials and workmanship for a period specified by your regional distributor from the date of purchase. This warranty does not cover damage caused by misuse, unauthorized modification, accident, or neglect. Please retain your proof of purchase for warranty claims.
10.2. Wsparcie techniczne
For technical assistance, troubleshooting beyond this manual, or warranty inquiries, please contact your local Sonel distributor or the authorized service center. Contact information can typically be found on the Sonel official webna stronie internetowej lub w miejscu zakupu.
When contacting support, please have your product model number (SON001) and purchase date readily available.


