1. Wprowadzenie
The Orbit Pocket Star Ultimate 6-Station Indoor Irrigation Programmer (Model 94886) is designed to provide efficient and reliable control over your automatic sprinkler system. Featuring Easy-Set Logic programming and a large LCD display, this programmer simplifies the management of up to six independent watering zones. It offers flexible scheduling options, including multiple start times, adjustable watering durations, and rain delay functionality. This manual will guide you through the setup, programming, and operation of your new irrigation programmer.

Rysunek 1.1: Przód view of the Orbit Pocket Star Ultimate 6-station indoor irrigation programmer. This image displays the unit's LCD screen, the central control panel with directional buttons and 'Enter', 'Manual', 'Clear', 'Rain Delay', and 'Program A-B' buttons, and the rotary dial for selecting various programming modes.
2. Co znajduje się w pudełku
Po otwarciu opakowania należy sprawdzić, czy znajdują się w nim wszystkie elementy:
- Orbit Pocket Star Ultimate 6-Station Indoor Irrigation Programmer
- External Transformer (for power supply)
- CR2032 Lithium Battery (pre-installed for program memory backup)
- Instrukcja obsługi (ten dokument)

Rysunek 2.1: Retail packaging of the Orbit Pocket Star Ultimate programmer. The box displays the product name, key features, and an image of the programmer, indicating its indoor use and 6-station capability.
3. Informacje dotyczące bezpieczeństwa
Please read and understand all safety instructions before installing and operating this device. Failure to do so may result in injury or property damage.
- This programmer is designed for indoor use only. Do not install it outdoors or in areas exposed to direct moisture.
- Use only the provided external transformer. Using an incorrect power supply may damage the unit and void the warranty.
- Aby zapobiec zagrożeniom elektrycznym, należy upewnić się, że wszystkie połączenia przewodów są solidne i właściwie zaizolowane.
- Disconnect power before performing any maintenance or wiring adjustments.
- Przechowywać urządzenie w miejscu niedostępnym dla dzieci.
4. Instalacja
4.1 Mounting the Programmer
- Choose a suitable indoor location near a standard electrical outlet and away from direct sunlight or extreme temperatures.
- Mark the desired mounting screw locations on the wall.
- Install mounting screws (not included) into the wall, leaving a small gap between the screw head and the wall.
- Hang the programmer onto the screws using the keyhole slots on the back of the unit.
- Secure the programmer by tightening the screws.

Rysunek 4.1: Diagram showing the recommended indoor installation of the Orbit programmer. The unit is mounted on a wall, with wiring extending to an outdoor valve box, emphasizing its indoor-only placement.
4.2 Podłączanie zasilania
Connect the external transformer to the 24VAC terminals on the programmer. Then, plug the transformer into a standard electrical outlet. The programmer's display should illuminate.
5. Okablowanie
The Orbit Pocket Star Ultimate features tool-free wire connection terminals for easy installation.
5.1 Connecting Valve Wires
- Identify the common wire from your irrigation valves. Insert it into the terminal labeled "COM".
- Connect each individual valve wire to its corresponding station terminal (1 through 6). For example, connect the wire for Zone 1 to terminal 1, Zone 2 to terminal 2, and so on.
Rysunek 5.1: Close-up of the wiring terminal block. This image clearly shows the labeled terminals for 24VAC (power), SENSOR, COM (common), stations 1 through 6, and PUMP, along with the push-in connectors for tool-free wiring.
5.2 Connecting a Rain Sensor (Optional)
If you are installing a rain sensor (sold separately), connect its wires to the terminals labeled "SENSOR". Refer to your rain sensor's manual for specific wiring instructions. Ensure the rain sensor bypass switch on the programmer is set correctly.
5.3 Connecting a Pump Start Relay (Optional)
If your system requires a pump start relay (sold separately), connect its control wires to the terminal labeled "PUMP" and the common terminal. Consult the pump start relay's manual for detailed wiring instructions.

Rysunek 5.2: Example irrigation zone layout. This diagram illustrates how a property can be divided into six distinct watering zones, each controlled by a separate station on the programmer, optimizing water distribution.
6. Programowanie
The programmer uses Easy-Set Logic for straightforward programming. Use the rotary dial to select a programming mode and the directional buttons (+, -, arrows, ENTER) to adjust settings.

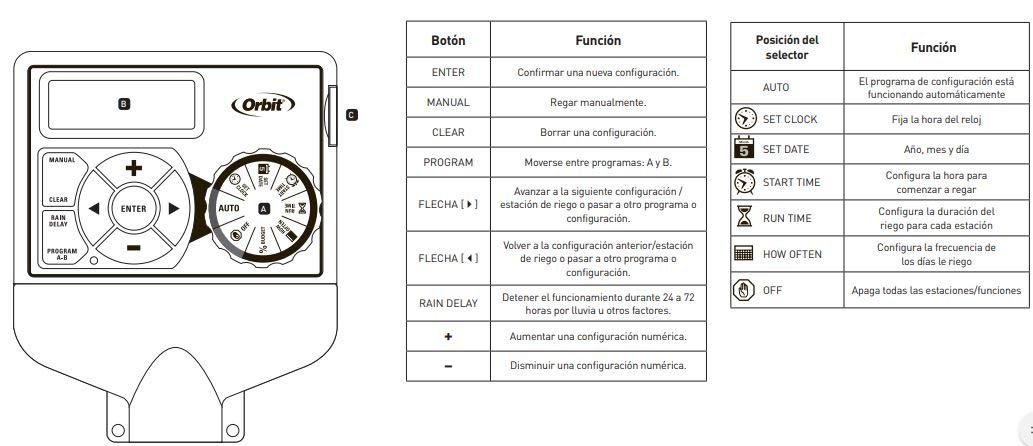
Rysunek 6.1: Panel sterowania ponadview with button and dial functions. This diagram labels each button and rotary dial position, explaining its specific function for programming and manual operation.
6.1 Funkcje przycisków
| Przycisk | Funkcjonować |
|---|---|
| WCHODZIĆ | Confirm a new setting. |
| PODRĘCZNIK | Water manually. |
| JASNE | Clear a setting. |
| PROGRAM A-B | Move between programs A and B. |
| Arrows (Left/Right) | Advance to the next setting/watering station or move to another program/setting. |
| Arrows (Up/Down) | Return to the previous setting/watering station or move to another program/setting. |
| OPÓŹNIENIE Z POWODU DESZCZU | Stop operation for 24 to 72 hours due to rain or other factors. |
| + | Increase a numeric setting. |
| - | Decrease a numeric setting. |
6.2 Rotary Dial Positions
| Pozycja selektora | Funkcjonować |
|---|---|
| AUTOMATYCZNY | The configured program is running automatically. |
| USTAW ZEGAR | Ustawia czas zegarowy. |
| USTAWIĆ DATĘ | Sets the year, month, and day. |
| CZAS ROZPOCZĘCIA | Sets the start time for watering. Up to 8 daily starts are available. |
| CZAS PRACY | Sets the watering duration for each station (1 to 240 minutes). |
| JAK CZĘSTO | Sets the frequency of watering days (e.g., specific days of the week, intervals of 1 to 28 days, or even/odd days). |
| WYŁĄCZONY | Turns off all stations/functions. |
6.3 Podstawowe kroki programowania
- Ustaw zegarek: Turn the dial to SET CLOCK. Use the + and - buttons to adjust the time, then ENTER to confirm.
- Ustawić datę: Turn the dial to SET DATE. Use the + and - buttons to adjust the year, month, and day, then ENTER to confirm each.
- Ustaw godziny rozpoczęcia: Turn the dial to START TIME. Use the + and - buttons to set the desired start time(s) for watering. Press ENTER to confirm each start time. You can set up to 8 start times per program.
- Ustaw czasy wykonania: Turn the dial to RUN TIME. Use the arrow buttons to select the station (1-6). Use the + and - buttons to set the watering duration for that station (1 to 240 minutes). Press ENTER to confirm. Repeat for all active stations.
- Ustaw jak często: Turn the dial to HOW OFTEN. Select your desired watering frequency: specific days of the week, interval days (1-28 days), or even/odd days. Use the + and - buttons and arrow buttons to make your selections, then ENTER to confirm.
- Aktywuj program: Turn the dial to AUTO. Your programmer will now operate according to your set schedule.
The programmer supports two independent programs (A and B). Use the PROGRAM A-B button to switch between and configure them separately.
7. Działanie
7.1 Praca automatyczna
Once programmed and the dial is set to AUTO, the programmer will automatically execute the watering schedules at the specified start times and durations.
7.2 Ręczne nawadnianie
To manually water a station or all stations:
- Naciśnij przycisk RĘCZNY.
- Use the arrow buttons to select the desired station or 'ALL' for all stations.
- Use the + and - buttons to set the manual watering duration.
- Press ENTER to start manual watering. The programmer will return to AUTO mode after the manual cycle is complete.
7.3 Opóźnienie z powodu deszczu
If rain is expected or has occurred, you can temporarily suspend watering:
- Naciśnij przycisk OPÓŹNIENIE DESZCZU.
- Use the + or - buttons to select a delay of 24, 48, or 72 hours.
- Press ENTER to activate the rain delay. The programmer will resume its schedule automatically after the delay period.
7.4 Wyłączanie systemu
To completely stop all watering and programming, turn the rotary dial to the OFF position.
8. Konserwacja
8.1 Wymiana baterii
The programmer uses a CR2032 lithium battery to maintain program memory during power outages. It is recommended to replace this battery annually.
- Locate the battery compartment on the back of the programmer.
- Otwórz komorę i wyjmij starą baterię CR2032.
- Włóż nową baterię CR2032, zwracając uwagę na prawidłową polaryzację.
- Zamknij komorę baterii.
8.2 Czyszczenie
Wipe the programmer's exterior with a soft, damp ściereczką. Nie używaj środków czyszczących o właściwościach ściernych ani nie zanurzaj urządzenia w wodzie.
9. Rozwiązywanie Problemów
| Problem | Możliwa przyczyna | Rozwiązanie |
|---|---|---|
| Wyświetlacz jest pusty. | Brak zasilania urządzenia. | Check if the transformer is plugged into a live outlet. Ensure the transformer is properly connected to the programmer's 24VAC terminals. |
| Stacje nie podlewają. | Program not set or dial is in OFF position. Wiring issue. Rain sensor activated. | Ensure the dial is set to AUTO. Verify programming (start times, run times, how often). Check all wiring connections, especially common and station wires. Check if the rain sensor is wet or activated; bypass it if necessary. |
| Only some stations water. | Faulty valve or wiring to specific station. | Check wiring for the non-watering stations. Test the solenoid valve for the affected station. |
| Program lost after power outage. | Brak lub rozładowanie zapasowej baterii CR2032. | Wymień baterię litową CR2032. |
| Podlewanie odbywa się w sposób ciągły. | Stuck valve or electrical short. | Turn the dial to OFF. Inspect the valve for debris or damage. Check for shorts in the wiring. |
10. Specyfikacje
- Numer modelu: 94886
- Marka: Orbita
- Typ: Indoor Irrigation Programmer
- Liczba stacji: 6
- Pobór mocy: 120V AC, 60Hz (via external transformer)
- Power Output to Valves: 24 V prądu zmiennego
- Bateria zapasowa: 1 x CR2032 litowa (w zestawie)
- Czas podlewania: 1 to 240 minutes per station
- Godziny rozpoczęcia: Up to 8 per day, per program
- Częstotliwość podlewania: Specific days of the week, 1-28 day intervals, even/odd days
- Opóźnienie z powodu deszczu: 24, 48 lub 72 godzin
- Tworzywo: Plastikowy
- Kolor: Szary
- Wymiary produktu: Około 5.75" dł. x 2.44" szer. x 9.25" wys. (14.6 cm dł. x 6.2 cm szer. x 23.5 cm wys.)
- Waga: Około 1.54 funtów (0.7 kg)
- Cechy: Easy-Set Logic, Large LCD Display, Automatic Circuit Breaker (no fuse), Tool-free wire terminals, Connection for rain sensor and pump start relay (accessories sold separately).
11. Gwarancja i wsparcie
For warranty information and technical support, please refer to the official Orbit website or contact Orbit customer service directly. Keep your purchase receipt as proof of purchase for any warranty claims.
Orbit Customer Service: Proszę odwiedzić www.orbitonline.com/support Aby uzyskać dane kontaktowe i dalszą pomoc.


