Wstęp
This manual provides essential information for the safe and effective operation, setup, and maintenance of your Traynor YBA-100 All Tube Lightweight 100 Watt Bass Head. Please read this manual thoroughly before operating the unit to ensure proper use and to prevent damage.
Instrukcje bezpieczeństwa
Podczas korzystania z tego produktu należy zawsze przestrzegać podstawowych zasad bezpieczeństwa, aby zmniejszyć ryzyko pożaru, porażenia prądem elektrycznym lub obrażeń ciała.
- Nie wystawiać urządzenia na działanie deszczu i wilgoci.
- Nie zasłaniaj żadnych otworów wentylacyjnych. Montaż należy wykonać zgodnie z instrukcją producenta.
- Nie należy instalować w pobliżu źródeł ciepła, takich jak grzejniki, kratki wentylacyjne, piece lub inne urządzenia (w tym amp(lifiers) wytwarzające ciepło.
- Chroń przewód zasilający przed deptaniem i przytrzaśnięciem, zwłaszcza przy wtyczkach, gniazdkach i miejscach, w których wychodzi z urządzenia.
- Stosować wyłącznie dodatki/akcesoria wskazane przez producenta.
- Odłączaj urządzenie od zasilania podczas burzy z piorunami lub jeśli nie używasz go przez dłuższy czas.
- Wszelkie prace serwisowe należy zlecać wykwalifikowanemu personelowi serwisowemu. Serwisowanie jest wymagane, gdy urządzenie zostało w jakikolwiek sposób uszkodzone, np. przewód zasilający lub wtyczka są uszkodzone, płyn został wylany lub przedmioty wpadły do urządzenia, urządzenie zostało wystawione na działanie deszczu lub wilgoci, nie działa normalnie lub zostało upuszczone.
Panel przedni nadview

Figure 1: Front panel of the Traynor YBA-100 Bass Head, showing inputs, controls, and power switches.
- Wejścia: Two 1/4-inch inputs, one Passive and one Active, for connecting your bass guitar.
- Deep Switch: Engages a low-frequency boost for a fuller sound.
- Jasny przełącznik: Engages a high-frequency boost for added clarity and presence.
- Gain Control: Adjusts the input sensitivity and overall preamp osiągać.
- Kontrola basu: Dostosowuje korekcję niskich częstotliwości.
- Kontrola środka: Dostosowuje wyrównanie średnich częstotliwości.
- Kontrola częstotliwości: Selects the center frequency for the Mid control.
- Kontrola tonów wysokich: Dostosowuje korekcję wysokich częstotliwości.
- Kontrola główna: Dostosowuje ogólną głośność wyjściową ampliyfikator.
- Przycisk zasilania: Obraca amplifier włączony lub wyłączony.
- Przełącznik czuwania: Places the amplifier in standby mode, allowing tubes to warm up or cool down without signal passing through.
- Kontrola rezonansu: Adjusts the low-end damping and resonance of the power ampliyfikator.
Tylny panel nadview
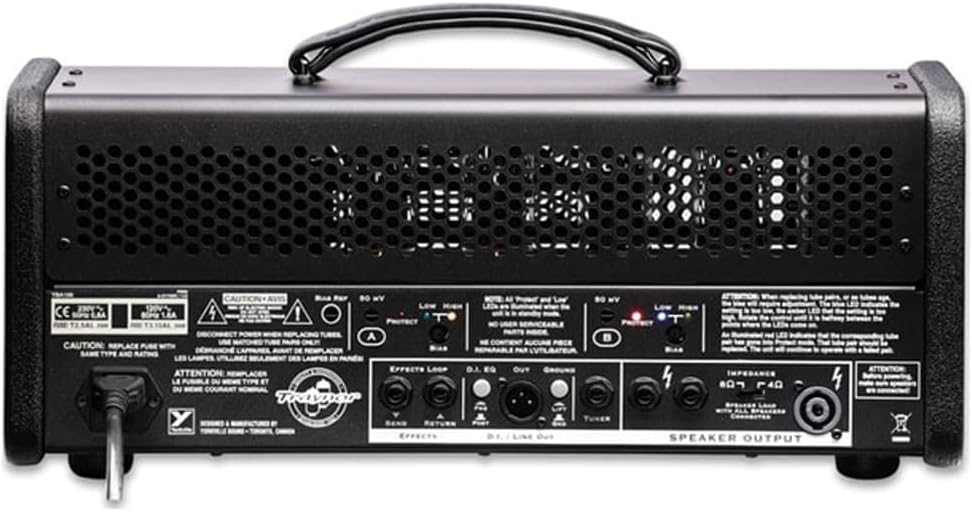
Figure 2: Rear panel of the Traynor YBA-100 Bass Head, showing power input, effects loop, DI out, and speaker outputs.
- Wejście AC: Standard IEC power inlet for connecting the supplied power cord.
- Uchwyt bezpiecznika: Contains the main fuse for the ampliyfikator.
- Pętla efektów (wysyłanie/powrót): 1/4-inch jacks for connecting external effects pedals or processors.
- DI Out (XLR): Balanced XLR output for direct connection to a mixing console or recording interface.
- Przełącznik podnoszenia naziemnego: Lifts the ground connection for the DI Out to eliminate hum.
- Wyjścia głośnikowe: Two 1/4-inch speaker jacks and one Speakon connector for connecting speaker cabinets. Ensure correct impedance matching.
- Regulacja odchylenia: Controls and LED indicators for adjusting the bias of the power tubes.
Organizować coś
- Umieszczenie: Place the YBA-100 on a stable, level surface, ensuring adequate ventilation around the unit. Avoid placing it near heat sources or in direct sunlight.
- Połączenie głośnika: Connect your speaker cabinet(s) to the Speaker Output jacks on the rear panel. Ensure the total impedance of your speaker setup matches the amplifier's output impedance (4 or 8 ohms). Use high-quality speaker cables.
- Podłączenie instrumentu: Connect your bass guitar to either the 'Passive' or 'Active' input on the front panel using a standard 1/4-inch instrument cable. Use the 'Active' input for basses with active pickups or higher output.
- Podłączenie zasilania: Ensure the Power and Standby switches are in the 'OFF' position. Connect the supplied IEC power cord to the AC Input on the rear panel and then to a grounded electrical outlet.
- Początkowe uruchomienie: With all connections made, first flip the Power switch to 'ON'. Wait approximately 30-60 seconds for the tubes to warm up, then flip the Standby switch to 'ON'. The amplifier jest teraz gotowy do użycia.
Instrukcja obsługi
Podstawowa obsługa
- Dostosuj Osiągać control to achieve your desired input level and amount of overdrive.
- Użyj Bas, Średni, Częstotliwość, I Potroić controls to shape your tone. The Frequency control allows you to select the specific mid-range frequency to boost or cut.
- Ten Głęboko I Jasny switches provide quick tonal enhancements for low-end fullness or high-end clarity.
- Ten Rezonans control fine-tunes the low-end response of the power amplifier, affecting how tight or loose your bass sounds.
- Dostosuj Gospodarz control for your overall output volume.
Tube Biasing (for Tube Swapping)
The YBA-100 ships with 6L6 power tubes. It can also operate with EL34 tubes after a simple re-biasing procedure. This procedure should only be performed by a qualified technician or experienced user.
- Zapewnij amplifier jest wyłączony i odłączony od zasilania.
- Carefully replace the existing power tubes with the desired type (6L6 or EL34).
- Locate the bias adjustment controls and LED indicators on the rear panel.
- Włącz zasilanie amplifier (Power then Standby) and allow it to warm up.
- Using a small screwdriver, adjust the bias trim pots (A and B) until the corresponding LED indicators turn green. Refer to the markings on the rear panel for specific instructions.
- If the LEDs are red, the bias is too hot; if they are off, it's too cold. Adjust until green.
Note: Incorrect biasing can damage tubes and the amplifier. If unsure, consult a professional.
Effects Loop and DI Out
- Pętla efektów: Connect the 'Send' jack to the input of your effects unit and the output of your effects unit to the 'Return' jack. This places effects after the preamp sekcja.
- Wyjście DI: Use the balanced XLR DI Out to send your signal directly to a mixing board or recording device. The Ground Lift switch can be used to eliminate ground loop hum if present.
Konserwacja
- Czyszczenie: Oczyść zewnętrzną część ampPrzetrzyj miękką, suchą ściereczką. Nie używaj środków czyszczących ani rozpuszczalników o działaniu ściernym.
- Wymiana rurki: Vacuum tubes have a finite lifespan and will eventually need replacement. If you notice a decrease in performance, excessive noise, or inconsistent tone, it may be time to replace the tubes. Always replace tubes with high-quality, matched sets and ensure proper biasing as described in the 'Operating Instructions' section.
- Wymiana bezpiecznika: Jeśli amplifier fails to power on, check the main fuse located in the AC input receptacle. Always replace the fuse with one of the exact same type and rating as specified on the unit.
- Wentylacja: Ensure that the ventilation grilles are kept clear of dust and debris to prevent overheating.
Rozwiązywanie problemów
| Problem | Możliwa przyczyna | Rozwiązanie |
|---|---|---|
| Brak zasilania / Urządzenie nie włącza się | Power cord not connected; Blown fuse; Faulty power outlet | Check power cord connection; Replace fuse with correct type; Try a different outlet |
| Brak dźwięku | Standby switch off; Speaker cable disconnected/faulty; Instrument cable disconnected/faulty; Master volume too low; Faulty tubes | Flip Standby switch to ON; Check all cable connections; Increase Master volume; Consult technician for tube check |
| Zniekształcony lub słaby dźwięk | Incorrect impedance match; Worn out tubes; Input gain too high; Faulty speaker | Verify speaker impedance; Consider tube replacement/biasing; Reduce Gain control; Test with another speaker |
| Szum lub niepożądany hałas | Ground loop; Faulty cables; Proximity to other electronics; Worn tubes | Engage DI Out Ground Lift switch; Try different cables; Move amplifier away from noise sources; Consult technician for tube check |
Jeśli po wypróbowaniu tych rozwiązań problem nadal występuje, skontaktuj się z wykwalifikowanym personelem serwisowym.
Specyfikacje
| Funkcja | Szczegół |
|---|---|
| Nazwa modelu | YBA-100 |
| Moc wyjściowatage | 100 watów |
| Źródło zasilania | Elektryczny przewodowy |
| Waga przedmiotu | 27 funta |
| Kolor | Czarny |
| Kompatybilne urządzenia | Kontrabas |
| Typ złącza | Gniazdo 6.35 mm |
Gwarancja i wsparcie
For warranty information and technical support, please refer to the official Traynor website or contact your authorized Traynor dealer. Keep your purchase receipt as proof of purchase for warranty claims.


