1. Wprowadzenie
Thank you for choosing the Ciciglow Mini MP3 Player. This ultra-lightweight, clip-on device is designed for portable music playback, featuring an LCD screen for easy navigation and a durable metal shell. This manual will guide you through the setup, operation, and maintenance of your new MP3 player.

Obraz 1: Przód view of the Ciciglow Mini MP3 Player.
2. Koniec produktuview
2.1 Funkcje
- Mini LCD Screen Display: Provides clear visibility of song progress and menu options.
- Ultra-Lightweight Clip-on Design: Allows for secure attachment to clothing or other devices, ideal for sports and active use.
- Memory Card Expansion Slot: Supports a maximum extension of 32GB (memory card not included).
- Długa żywotność baterii: Offers over 5 hours of continuous playback on a single charge.
- Durable Aluminum Alloy Material: Ensures a firm and long-lasting service life.
2.2 Zawartość pudełka
- 1 x Ciciglow Mini MP3 Player
- 1 x słuchawki
- 1 x kabel USB
2.3 Diagram produktu

Image 2: Close-up of the MP3 player's screen and control buttons.
The MP3 player features a central control panel with 'M' (Menu/Mode), Play/Pause, Previous Track, Next Track, and 'VOL' (Volume) buttons. The LCD screen displays current mode and song information.
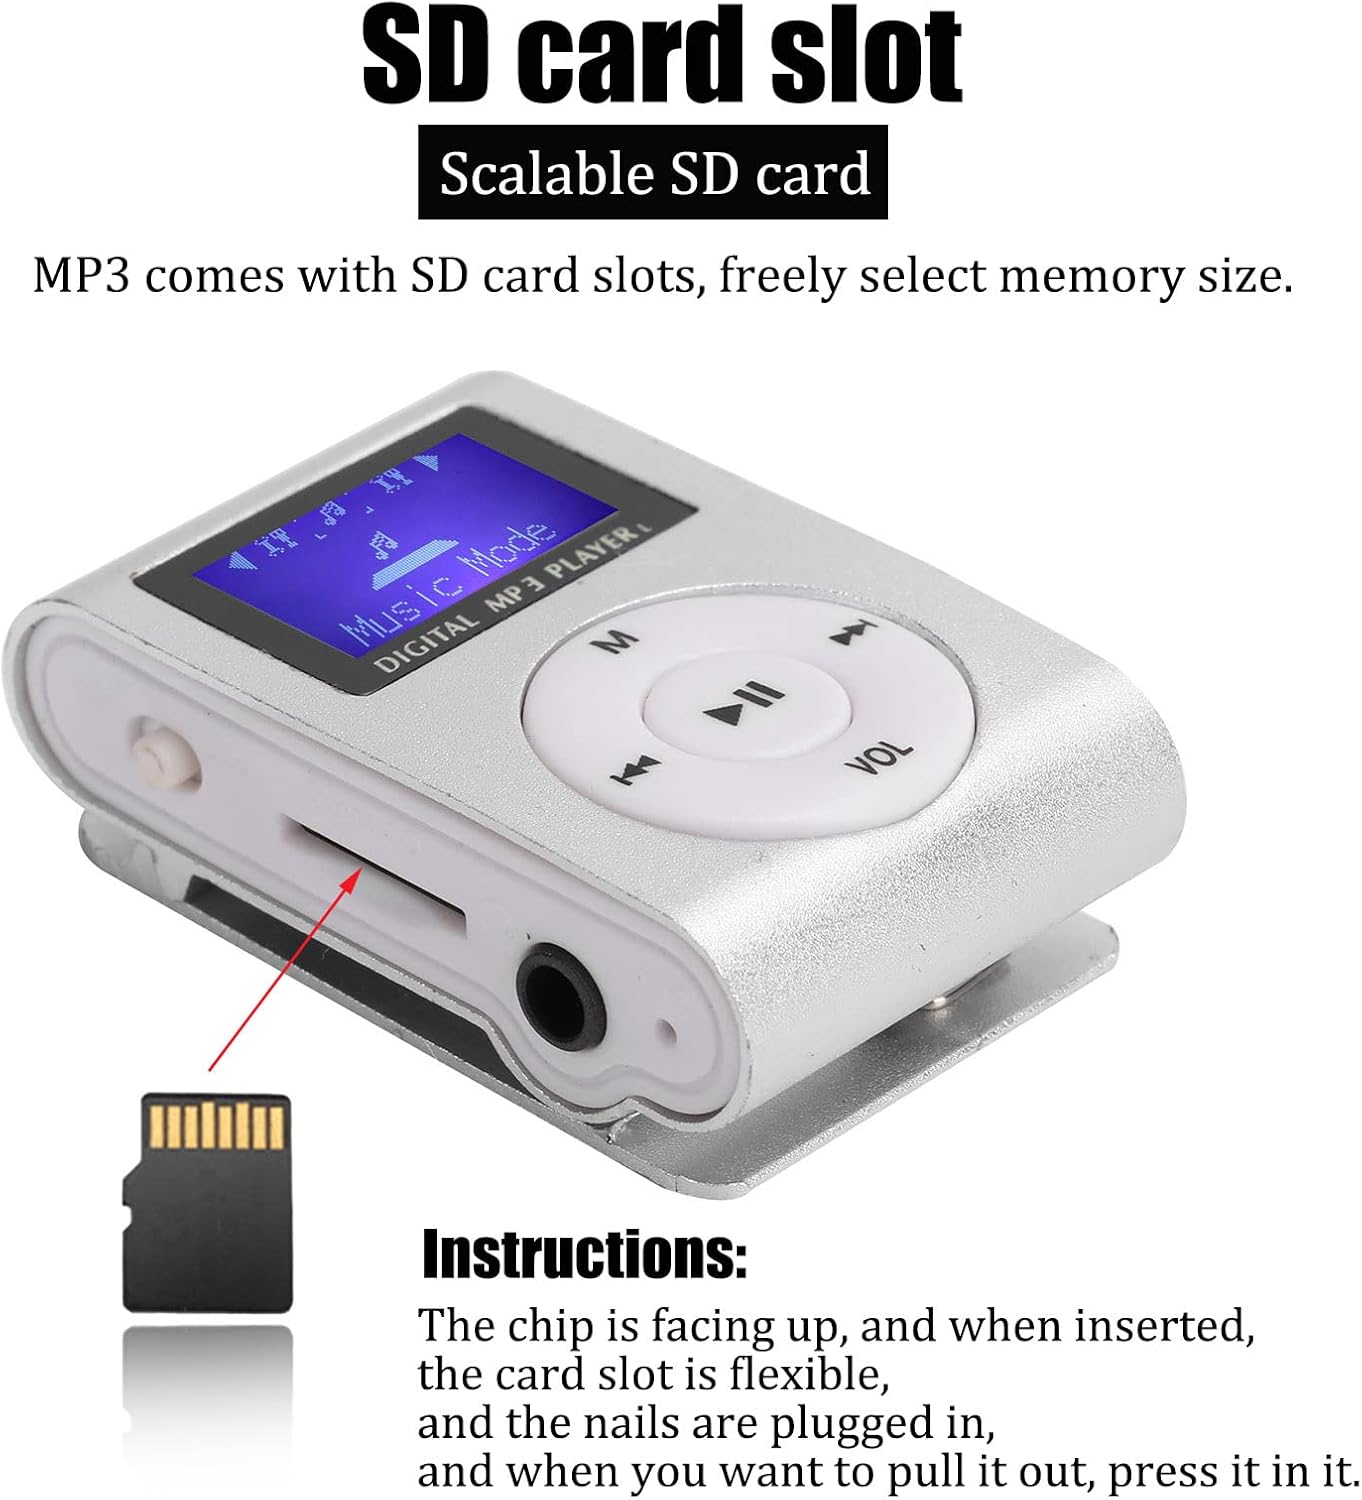
Obraz 3: Bok view showing the Micro SD card slot, 3.5mm headphone jack, and power switch.
On the side, you will find the Micro SD card slot, a 3.5mm headphone jack, and the power switch. The USB charging port is located on the opposite side.
3. Konfiguracja
3.1 Ładowanie urządzenia
Before first use, fully charge the MP3 player. Connect the included USB cable to the player's USB port and to a computer's USB port or a compatible USB wall adapter. The device will indicate when charging is complete.
3.2 Wkładanie karty Micro SD
The MP3 player requires a Micro SD card (not included) to store music files. Locate the Micro SD card slot on the side of the device. Insert the Micro SD card with the metal contacts facing up until it clicks into place. To remove, gently press the card until it springs out.
Image 4: Instructions for inserting the Micro SD card. Ensure the chip is facing up.
3.3 Podłączanie słuchawek
Plug the 3.5mm jack of the included earphones into the headphone port on the side of the MP3 player.
4. Instrukcja obsługi
4.1 Włączanie/wyłączanie zasilania
To power on the device, slide the power switch to the 'ON' position. To power off, slide the switch to the 'OFF' position.
4.2 Przesyłanie muzyki Files
Connect the MP3 player to your computer using the USB cable. The player will appear as a removable disk. Drag and drop your MP3 format music files into the player's storage (Micro SD card). Ensure filePliki są w formacie MP3, aby zapewnić kompatybilność.
4.3 Odtwarzanie muzyki
- Włącz urządzenie.
- The LCD screen will display "Music Mode".
- Naciśnij Odtwórz/Pauza przycisk, aby rozpocząć odtwarzanie.
- Naciskać Poprzedni utwór or Następny utwór buttons to skip songs.
- Naciśnij 'M' button to cycle through different modes or menu options.
4.4 Regulacja głośności
Naciśnij 'VOL' przycisk, a następnie użyj Poprzedni utwór I Następny utwór buttons to adjust the volume level. Press 'VOL' again to confirm or wait a few seconds for the volume adjustment to exit.
Video 1: A short demonstration of the Mini MP3 Player's features and operation.
Video 2: Product show and introduction, highlighting the design and functionality.
5. Konserwacja
- Przechowuj urządzenie w suchym miejscu. Unikaj narażenia na działanie wilgoci i płynów.
- Czyść urządzenie miękką, suchą ściereczką. Nie używaj silnych środków chemicznych ani rozpuszczalników.
- Unikaj ekstremalnych temperatur.
- Nie upuszczaj urządzenia i nie narażaj go na silne uderzenia.
- Store the device in a protective case when not in use to prevent scratches.

Image 5: The MP3 player stored in a protective case.
6. Rozwiązywanie Problemów
- Urządzenie się nie włącza: Upewnij się, że akumulator jest naładowany. Podłącz do źródła zasilania i spróbuj ponownie. Sprawdź, czy włącznik zasilania jest w pozycji „ON”.
- No music playback: Verify that a Micro SD card with MP3 files is correctly inserted. Check earphone connection and volume level.
- Nie można przenieść filedo urządzenia: Ensure the MP3 player is properly connected to the computer via USB. The computer should recognize it as a removable drive.
- Krótka żywotność baterii: Ensure the device is fully charged before use. Battery performance may decrease over time.
7. Specyfikacje
| Marka | Ciciglow |
| Numer modelu | CiCiglowyiwue9a2km1039-11 |
| Kolor | Srebrny |
| Wyświetlacz | LCD Mini Screen (1 inch) |
| Technologia łączności | Aux, USB |
| Pojemność pamięci masowej | Obsługuje do 32 GB (karta Micro SD nie jest dołączona) |
| Obsługiwane standardy | MP3 |
| Typ baterii | Wbudowana bateria litowa 250mAh |
| Żywotność baterii | Ponad 5 godzin |
| Waga przedmiotu | 47 gram |
| Tworzywo | Stop aluminium |

Image 6: Dimensions of the MP3 player.
8. Gwarancja i wsparcie
For warranty information or technical support, please refer to the product packaging or contact Ciciglow customer service through the retailer where the product was purchased. Keep your purchase receipt for warranty claims.