1. Wprowadzenie
The Kuryakyn Tørke 24L Solo Dry Pannier is designed to provide waterproof storage for your motorcycle. This manual outlines the proper installation, operation, and maintenance procedures to ensure optimal performance and longevity of your pannier.
2. Informacje dotyczące bezpieczeństwa
OSTRZEŻENIE: Ten produkt może narazić Cię na działanie chemikaliów, w tym ftalanu di(2-etyloheksylu) (DEHP), o którym w stanie Kalifornia wiadomo, że powoduje raka i wady wrodzone lub inne szkodliwe skutki dla rozrodczości. Aby uzyskać więcej informacji, przejdź do www.P65Warnings.ca.gov.
Always ensure the pannier is securely mounted to your vehicle before operation. Regularly check all straps and attachment points for wear or damage. Do not overload the pannier beyond its stated capacity.
3. Zawartość opakowania
Przed przystąpieniem do instalacji sprawdź, czy wszystkie komponenty są obecne.
- Kuryakyn Tørke 24L Solo Dry Pannier
- External Cargo Net
- Removable Shoulder Strap
- Full Strap Kit for mounting (various lengths and buckle types)
- Small internal hook-and-loop storage pouch

Figure 1: Included accessories for the Tørke 24L Solo Dry Pannier.
4. Funkcje ponadview
The Tørke 24L Solo Dry Pannier offers a range of features designed for durability and convenience:
- Pojemność: 24 liters of storage.
- Wymiary: Approximately 16 inches wide x 15.5 inches tall x 6 inches deep.
- Budowa: Fully waterproof, RF-welded double-coated TPU material.
- Zamki: Submersible IPX7-rated zippers with lockable pulls.
- Struktura wewnętrzna: Removable hi-vis internal support structure for rigidity.
- Pamięć wewnętrzna: Hook-and-loop storage pouch and neoprene pockets for tablets or laptops.
- Pamięć zewnętrzna: Waterproof external pouches and a mesh water bottle pocket.
- Air Valve: Integrated air purge valve for compression.
- Montowanie: Universal fit, designed to mount on the left or right side of a vehicle, or on top racks.

Figure 2: Kuryakyn Tørke 24L Solo Dry Pannier.
5. Konfiguracja i instalacja
The Tørke 24L Solo Dry Pannier offers versatile mounting options. Choose the method that best suits your motorcycle and cargo needs.
5.1 Attaching the Pannier to Your Vehicle
- Pozycjonowanie: Determine the optimal placement for the pannier on your motorcycle. It can be mounted on the left or right side, or secured to a top rack. Ensure it does not interfere with moving parts, exhaust, or rider/passenger comfort.
- Strap Selection: Utilize the provided strap kit. Identify the appropriate strap lengths and buckle types for your chosen mounting points. The pannier features multiple webbing loops and D-rings for secure attachment.
- Bezpieczne mocowanie: Thread the straps through the pannier's attachment points and around secure parts of your motorcycle frame, passenger seat, or rack. Ensure straps are tightened firmly to prevent movement during travel. Double-check all buckles and adjusters.
- Strap Management: Secure any excess strap length to prevent it from flapping in the wind or getting caught in wheels.

Figure 3: Detail of strap attachment point.

Figure 4: Pannier mounted on a motorcycle (without cargo net).
5.2 Using the External Cargo Net
The included cargo net can be attached to the top of the pannier for additional external storage of lightweight items.
- Zamocuj siatkę: Clip the cargo net's hooks to the designated loops on the top surface of the pannier.
- Zabezpieczone przedmioty: Place items under the net and adjust the tension to hold them firmly in place.
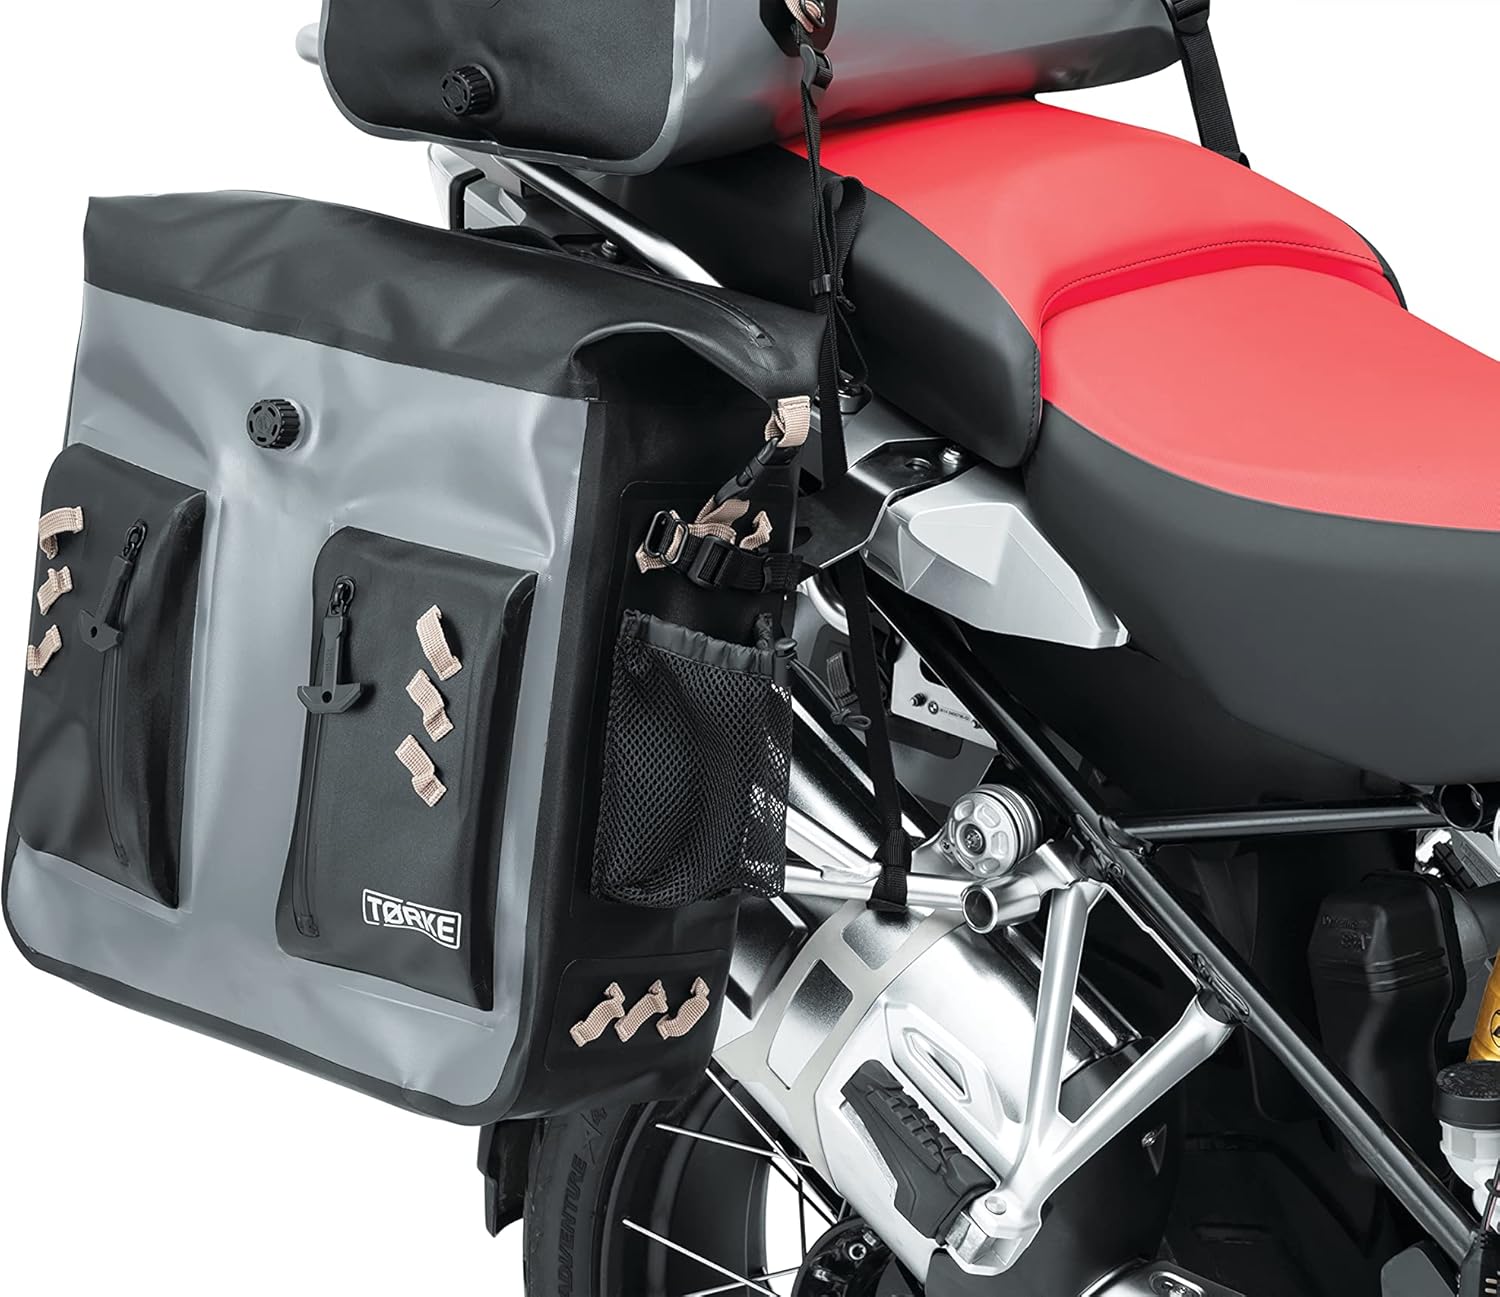
Figure 5: Pannier mounted with external cargo net.
6. Instrukcja obsługi
6.1 Dostęp do głównego przedziału
The main compartment is accessed via the large, submersible IPX7-rated zipper located on the top of the pannier. The zipper pulls are designed for easy grip, even with gloves.

Figure 6: Waterproof zipper detail.
6.2 Using the Air Purge Valve
The integrated air purge valve allows you to compress the pannier and remove excess air, making it more compact and stable. To use:
- Załaduj zawartość: Place your items inside the pannier and close the main zipper.
- Open Valve: Twist the valve cap counter-clockwise to the "OPEN" position.
- Kompres: Gently press on the pannier to expel air.
- Close Valve: Once desired compression is achieved, twist the valve cap clockwise to the "CLOSE" position to seal.

Figure 7: Air purge valve.
6.3 Internal and External Pockets
- Internal Pouch: A removable hook-and-loop pouch is provided for small, easily misplaced items.
- Neoprene Pockets: Internal neoprene pockets are suitable for protecting tablets or laptops.
- External Waterproof Pockets: Two zippered pockets on the front provide quick access to items that need to remain dry.
- Kieszeń na butelkę z wodą: A mesh pocket on the side is designed to hold a water bottle or similar item.

Figure 8: External waterproof pocket with Kuryakyn logo.
7. Konserwacja
Proper maintenance will extend the life of your Tørke Dry Pannier.
- Czyszczenie: Przetrzyj powierzchnię zewnętrzną środkiem adamp Ściereczką i łagodnym mydłem. Nie używaj silnych środków chemicznych ani ściernych środków czyszczących. Dokładnie wypłucz i pozostaw do całkowitego wyschnięcia na powietrzu przed schowaniem.
- Pielęgnacja zamków błyskawicznych: Periodically clean the zippers to remove dirt and debris. Lubricate with a silicone-based zipper lubricant if they become stiff.
- Składowanie: Store the pannier in a cool, dry place away from direct sunlight when not in use. Ensure it is clean and dry to prevent mold or mildew.
- Kontrola: Regularly inspect all seams, straps, and buckles for signs of wear, cuts, or damage. Replace damaged components as necessary.
8. Rozwiązywanie Problemów
- Pannier feels loose during travel:
Ensure all mounting straps are securely fastened and tightened. Re-adjust straps if necessary. Verify that the pannier is not overloaded, which can affect stability.
- Trudności z zamykaniem zamków błyskawicznych:
Check for any fabric or debris caught in the zipper teeth. Clean the zipper and apply a silicone-based lubricant if resistance persists.
- Wnikanie wody:
Ensure all zippers are fully closed and the air purge valve is in the "CLOSE" position. Inspect the pannier for any punctures or tears in the fabric. While the pannier is highly water-resistant and submersible, extreme conditions or damage can compromise its seal.
9. Specyfikacje
| Marka | Kuryakyn |
| Model | Tørke Dry Pannier |
| Numer modelu przedmiotu | 5078 |
| Pojemność | 24 litrów |
| Wymiary (dł. x szer. x wys.) | 16" wide x 15.5" tall x 6" deep (approximate) |
| Waga przedmiotu | 5.3 funta |
| Tworzywo | RF-welded double-coated TPU |
| Stopień wodoodporności | IPX7 submersible zippers |
| Cechy specjalne | Lightweight, Waterproof, Integrated Air Purge Valve, Internal Support Structure |
10. Gwarancja i wsparcie
For warranty information or technical support regarding your Kuryakyn Tørke 24L Solo Dry Pannier, please refer to the official Kuryakyn webOdwiedź witrynę lub skontaktuj się z działem obsługi klienta. Zachowaj dowód zakupu na wypadek roszczeń gwarancyjnych.
Odwiedzać www.kuryakyn.com Aby uzyskać więcej informacji.


