Wstęp
Thank you for choosing the NEXT 8000 Full HD Satellite Receiver. This manual provides detailed instructions for the proper installation, operation, and maintenance of your device. Please read this manual thoroughly before using the receiver to ensure optimal performance and safety.
The NEXT 8000 is designed to deliver a high-quality viewing experience with its Full HD capabilities, multi-satellite search, and media playback features. It supports various languages and offers convenient software upgrades via USB.
Zawartość opakowania
Sprawdź, czy w przesyłce znajdują się wszystkie elementy:
- NEXT 8000 Satellite Receiver Unit
- Zdalne sterowanie
- Kabel HDMI
- Kabel USB
- Zasilacz

Image: The NEXT 8000 Full HD Satellite Receiver unit shown alongside its remote control.
Przewodnik po konfiguracji
1. Podłączenie odbiornika
Aby podłączyć odbiornik satelitarny do telewizora i anteny satelitarnej, wykonaj następujące czynności:
- Satelita IN: Connect the coaxial cable from your satellite dish to the 'LNB IN' port on the back of the receiver.
- Połączenie HDMI: Use the provided HDMI cable to connect the 'HD OUT' port on the receiver to an available HDMI input on your television. Note the HDMI input number on your TV (e.g., HDMI 1, HDMI 2).
- Połączenie AV (opcjonalnie): If your TV does not have an HDMI input, use an AV cable (not included) to connect the 'AV' port on the receiver to the corresponding AV inputs on your television.
- Podłączenie zasilania: Connect the power adapter to the 'DC 12V' input on the receiver, then plug the adapter into a power outlet.
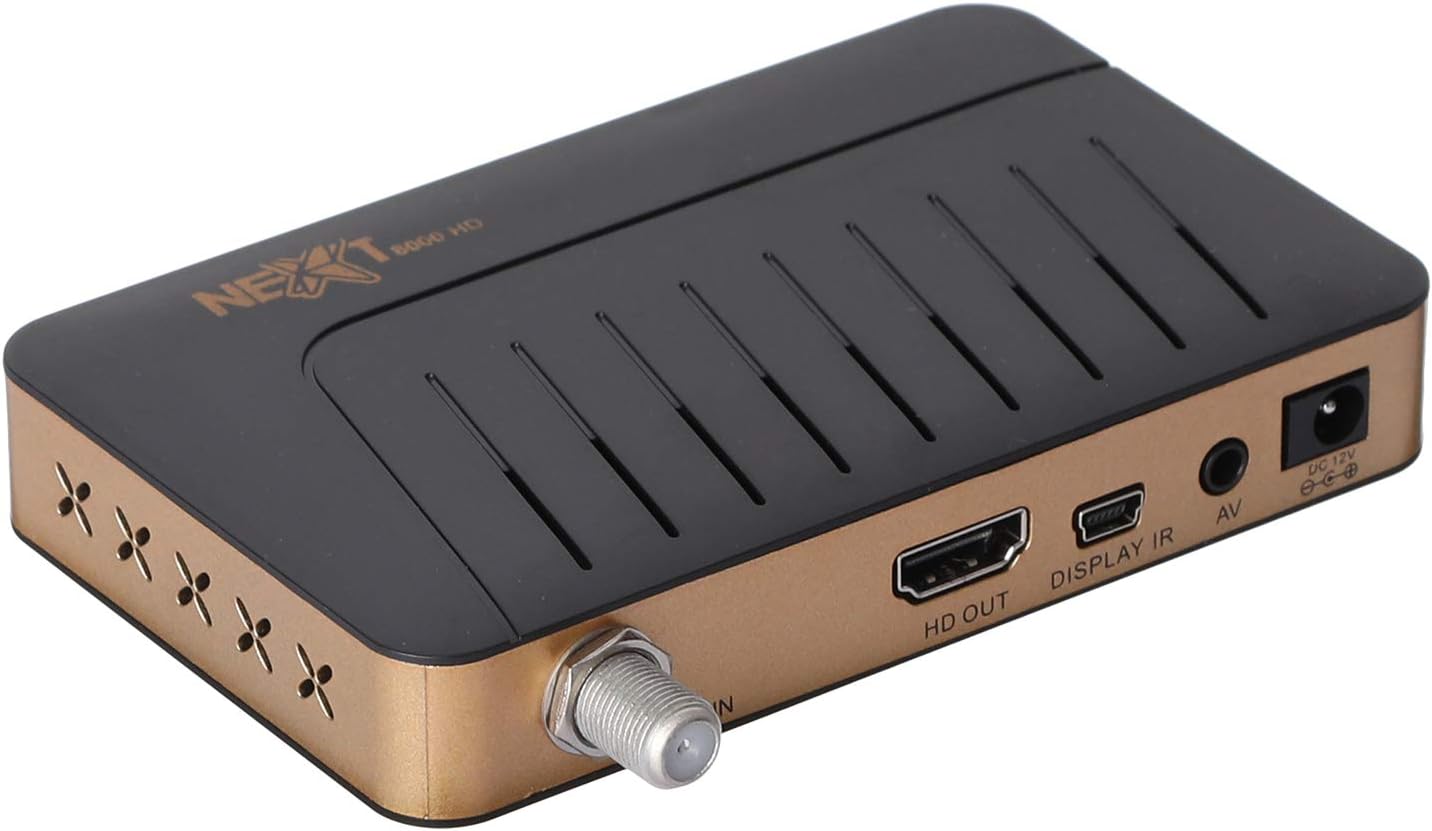
Obraz: Tył view of the NEXT 8000 receiver, highlighting the LNB IN, HD OUT (HDMI), AV, and DC 12V power input ports.
2. Pierwsze włączenie i konfiguracja
Po podłączeniu wszystkich kabli:
- Turn on your television and select the correct HDMI or AV input source.
- The receiver will power on automatically. The initial setup wizard should appear on your screen.
- Follow the on-screen instructions to select your preferred language, time zone, and perform a channel scan. Refer to the 'Operating Instructions' section for details on channel scanning.
3. Zdalne sterowanieview
Zapoznaj się z funkcjami pilota:

Image: The remote control for the NEXT 8000 satellite receiver, showing various buttons for power, navigation, volume, channel, and special functions.
- Przycisk zasilania: Turns the receiver on/off or to standby mode.
- MENU: Dostęp do menu głównego w celu uzyskania dostępu do ustawień i funkcji.
- OK: Potwierdza wybór lub wyświetla listę kanałów.
- Przyciski strzałek (góra/dół/lewo/prawo): Nawigacja po menu i opcjach.
- WYJŚCIE: Wraca do poprzedniego ekranu lub wychodzi z menu.
- GŁOŚNOŚĆ +/-: Reguluje głośność.
- CO +/-: Zmienia kanały.
- EPG: Wyświetla elektroniczny przewodnik po programach.
- SOBOTA: Selects satellite.
- USB: Accesses USB media playback.
- Przesunięcie w czasie: Activates the Timeshift function (requires USB storage).
Instrukcja obsługi
1. Channel Search and Management
To find and organize channels:
- Naciśnij MENU przycisk na pilocie.
- Navigate to 'Installation' or 'Channel Search' using the arrow buttons and press OK.
- Select 'Multi-satellite search' or 'Network search' based on your setup.
- Follow the on-screen prompts to initiate the scan. The receiver will automatically detect available channels.
- After the scan, you can access options to 'Program lock', 'Delete', 'Move', or 'Rename' channels within the channel management menu.
2. Media Playback via USB
The receiver supports media playback from a USB flash drive.
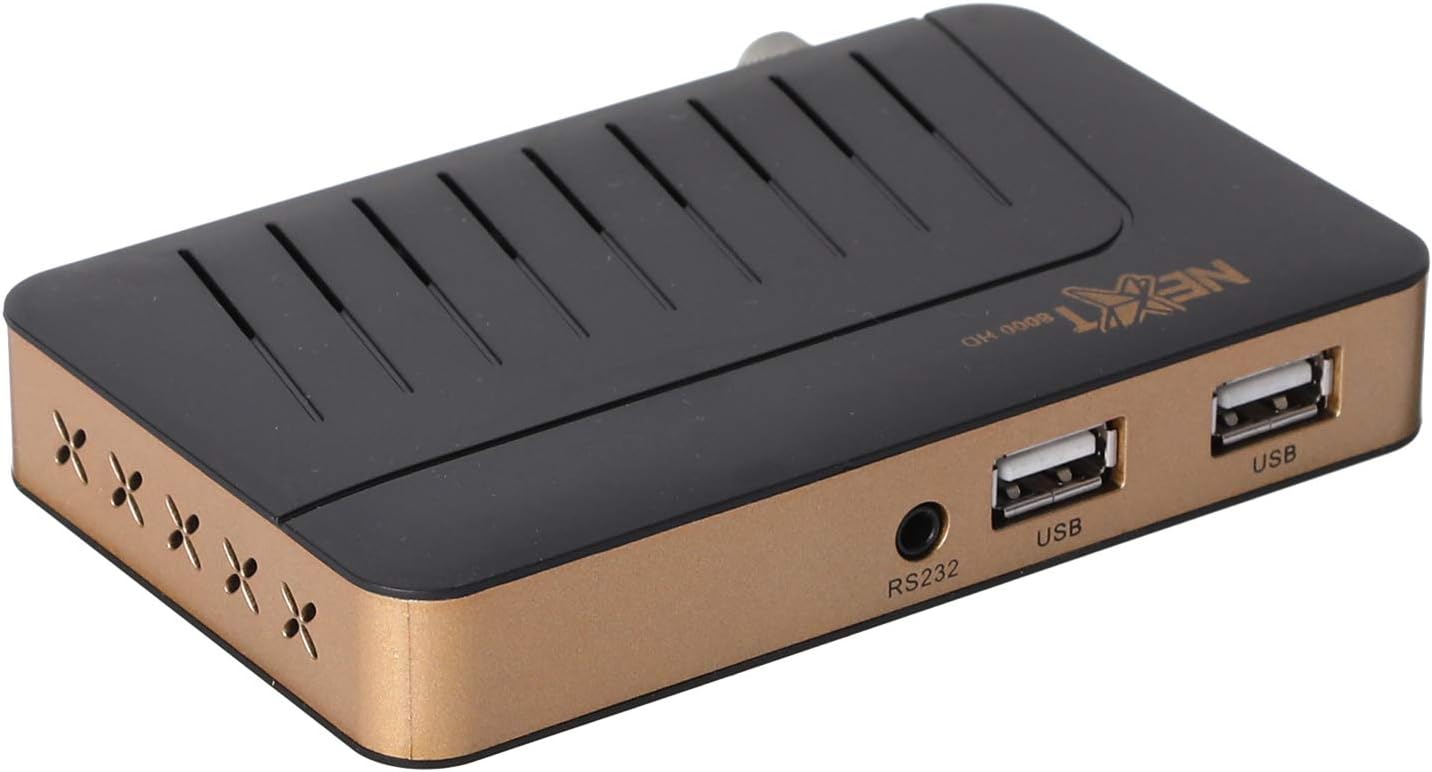
Obraz: Przód view of the NEXT 8000 receiver, showing the two USB ports available for connecting external storage devices.
- Insert a USB flash drive into one of the USB ports on the receiver.
- Naciśnij USB button on the remote control or navigate to the 'Media' menu.
- Select the type of media you wish to play (e.g., Video, Music, Photo).
- Browse your USB drive content and select the desired file. The receiver supports AVI, MKV, TS, TP, TRP, MPG, and MP4 files.
3. Nagrywanie i przesunięcie w czasie
To record programs or use the Timeshift function, a USB storage device must be connected.
- Nagranie: Podczas oglądania programu naciśnij przycisk Nagrywać button (usually a red circle) on the remote control to start recording. Press it again to stop. Recorded content will be saved to the connected USB drive.
- Przesunięcie w czasie: Naciśnij Przesunięcie w czasie button on the remote control to pause live TV. You can then fast-forward or rewind within the buffered content.
4. Elektroniczny przewodnik po programach (EPG)
Naciśnij EPG przycisk na pilocie, aby view the 7-day electronic program guide. This allows you to see upcoming programs and set reminders or recordings.
5. Parental Lock
To restrict access to certain channels or menus, navigate to the 'System Settings' or 'Parental Control' menu. You can set a password to lock programs or specific functions.
Konserwacja
1. Software Upgrade via USB
To ensure your receiver has the latest features and bug fixes, you can upgrade its software:
- Pobierz najnowsze oprogramowanie file from the official NEXT website to a USB flash drive. Ensure the file is placed in the root directory of the USB drive.
- Włóż pamięć USB do portu USB odbiornika.
- Idź do MENU > 'System Settings' > 'Software Upgrade' (or similar option).
- Select 'Upgrade by USB' and choose the software file.
- Confirm the upgrade. The receiver will restart automatically after the upgrade is complete. Do not power off the receiver during the upgrade process.
2. Czyszczenie
To clean the receiver, disconnect it from the power supply. Use a soft, dry cloth to wipe the exterior surfaces. Do not use liquid cleaners or abrasive materials.
Rozwiązywanie problemów
If you encounter issues with your NEXT 8000 receiver, refer to the following table:
| Problem | Możliwa przyczyna | Rozwiązanie |
|---|---|---|
| Brak obrazu i dźwięku | Incorrect TV input selected; Loose HDMI/AV cable; Receiver not powered on. | Select correct TV input; Check all cable connections; Ensure receiver is powered on. |
| Nie znaleziono kanałów | Satellite dish not aligned; Incorrect LNB settings; Channel scan not performed. | Check satellite dish alignment; Verify LNB settings in menu; Perform a channel scan. |
| Pilot nie działa | Dead batteries; Obstruction between remote and receiver; Remote sensor blocked. | Replace batteries; Remove obstructions; Ensure receiver's IR sensor is clear. |
| USB media not playing | Nieobsługiwane file format; dysk USB nie został prawidłowo włożony; uszkodzony file. | Sprawdzać file format compatibility; Re-insert USB drive; Try a different USB drive or file. |
Jeśli po wypróbowaniu tych rozwiązań problem nadal występuje, skontaktuj się z obsługą klienta.
Specyfikacje
Key technical specifications for the NEXT 8000 Full HD Satellite Receiver:
- Model: 8000
- Rozdzielczość wyjścia wideo: 576i, 576p, 720p, 1080i, 1080p (50/60 Hz)
- Łączność: HDMI, USB (2 ports), RS232, AV
- Obsługiwane formaty audio: Dolby Digital, DTS, AAC, PCM
- Supported Video/Media Formats: AVI, MKV, TS, TP, TRP, MPG, MP4
- Pamięć masowa: 100 satellites, 4000 frequencies, 8000 channels
- Edytor: Sunplus
- Cechy: Recording by USB flash, Screen enlargement, Multi-satellite search, Network search, Media playback, 7-day Electronic Program Guide (EPG), Teletex, Timeshift, Parental lock.
- Wymiary: Wymiary 19.6 x 17.4 x 6.6 cm
- Waga: 396 gramów
Gwarancja i wsparcie
For warranty information and technical support, please refer to the documentation provided with your purchase or visit the official NEXT product support webZachowaj paragon jako dowód zakupu na wypadek reklamacji.


