Wstęp
Thank you for choosing the Yaheetech Multi-Functional Drafting Table. This product is designed to provide a versatile and comfortable workspace for various activities, including drawing, crafting, reading, and general office tasks. Its adjustable tabletop and sturdy construction make it an ideal addition to any home or office environment. Please read this manual thoroughly before assembly and use to ensure proper setup and safe operation.

Ponadview of the Yaheetech drafting table, showcasing its adjustable tabletop feature with artwork.
Informacje dotyczące bezpieczeństwa
- Przed montażem i użyciem należy uważnie przeczytać wszystkie instrukcje.
- Wszystkie materiały opakowaniowe należy przechowywać z dala od dzieci.
- Przed rozpoczęciem montażu upewnij się, że wszystkie części są kompletne i nieuszkodzone. Nie używaj, jeśli którejkolwiek części brakuje lub jest uszkodzona.
- Aby zapobiec zarysowaniom, produkt należy składać na miękkiej i czystej powierzchni.
- Tighten all screws and bolts securely, but do not overtighten. Periodically check and retighten fasteners.
- Do not stand or sit on the table surface, except for the designated stool.
- Keep hands and fingers clear of moving parts, especially when adjusting the tabletop angle.
- Aby zapewnić stabilność stołu, należy ustawić go na równej powierzchni.
- Maximum weight capacity for the tabletop is approximately 50 lbs (22.7 kg). Do not exceed this limit.
Zawartość opakowania
Sprawdź, czy w opakowaniu znajdują się wszystkie elementy wymienione poniżej:
- Drafting Table Frame Components
- Tabletop Panels (Fixed and Adjustable)
- Stool Components (Seat, Legs, Crossbars)
- Pakiet osprzętu (śruby, nakrętki, podkładki, klucz imbusowy)
- Movable Pencil Ledge
- Instrukcja montażu (ten dokument)
Konfiguracja i montaż
Assembly is required for this product. It is recommended to have two people for easier and safer assembly. Please refer to the detailed assembly instructions provided in the included PDF manual for step-by-step guidance. A general overview Poniżej przedstawiono szczegółowy przebieg procesu.
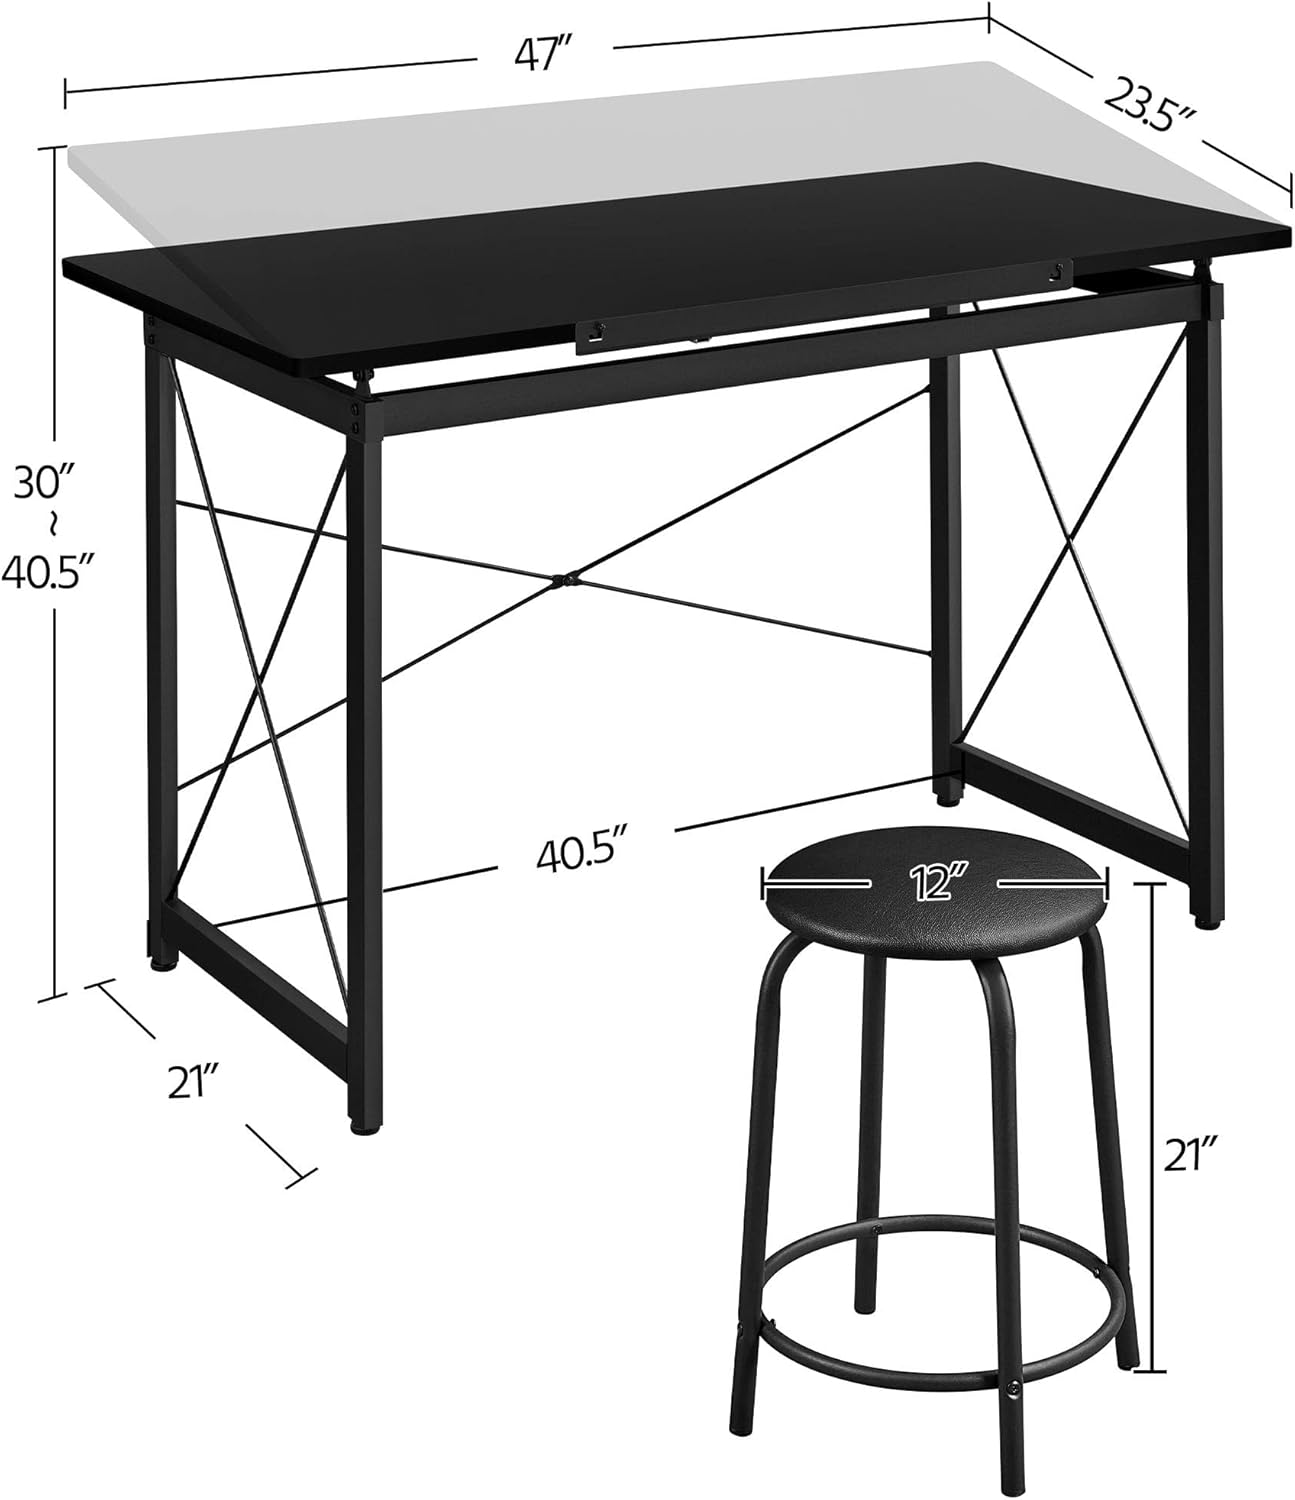
A diagram illustrating the key measurements of the drafting table and stool, including length, width, height, and adjustable range.
Etapy Zgromadzenia Ogólnego:
- Rozpakuj i zidentyfikuj części: Carefully remove all components from the packaging and lay them out. Compare them with the parts list in the detailed manual to ensure everything is present.
- Złóż ramę stołu: Attach the crossbars and support beams to the main leg frames using the provided hardware. Ensure all connections are secure.
- Zamontuj panele blatu stołu: Secure the fixed and adjustable tabletop panels to the assembled frame. Pay attention to the hinge mechanism for the adjustable section.
- Złóż stołek: Connect the stool legs to the seat and secure the crossbars for stability.
- Zainstaluj akcesoria: Attach the movable pencil ledge to the front edge of the adjustable tabletop.
- Kontrola końcowa: Once assembled, gently shake the table and stool to ensure stability. Tighten any loose fasteners.
Aby uzyskać szczegółowe instrukcje wizualne, zapoznaj się z oficjalną instrukcją Instrukcja instalacji (PDF).
Instrukcja obsługi
Adjusting the Tabletop Angle:
The Yaheetech Drafting Table features an adjustable tabletop, allowing you to tilt the surface to your preferred angle for various tasks. To adjust:
- Lift the Tabletop: Gently lift the front edge of the adjustable tabletop.
- Wybierz kąt: As you lift, you will notice a support mechanism with multiple notches. Select the desired angle by resting the tabletop support bar into one of these notches.
- Bezpieczna pozycja: Ensure the support bar is firmly seated in the notch before applying pressure to the tabletop.
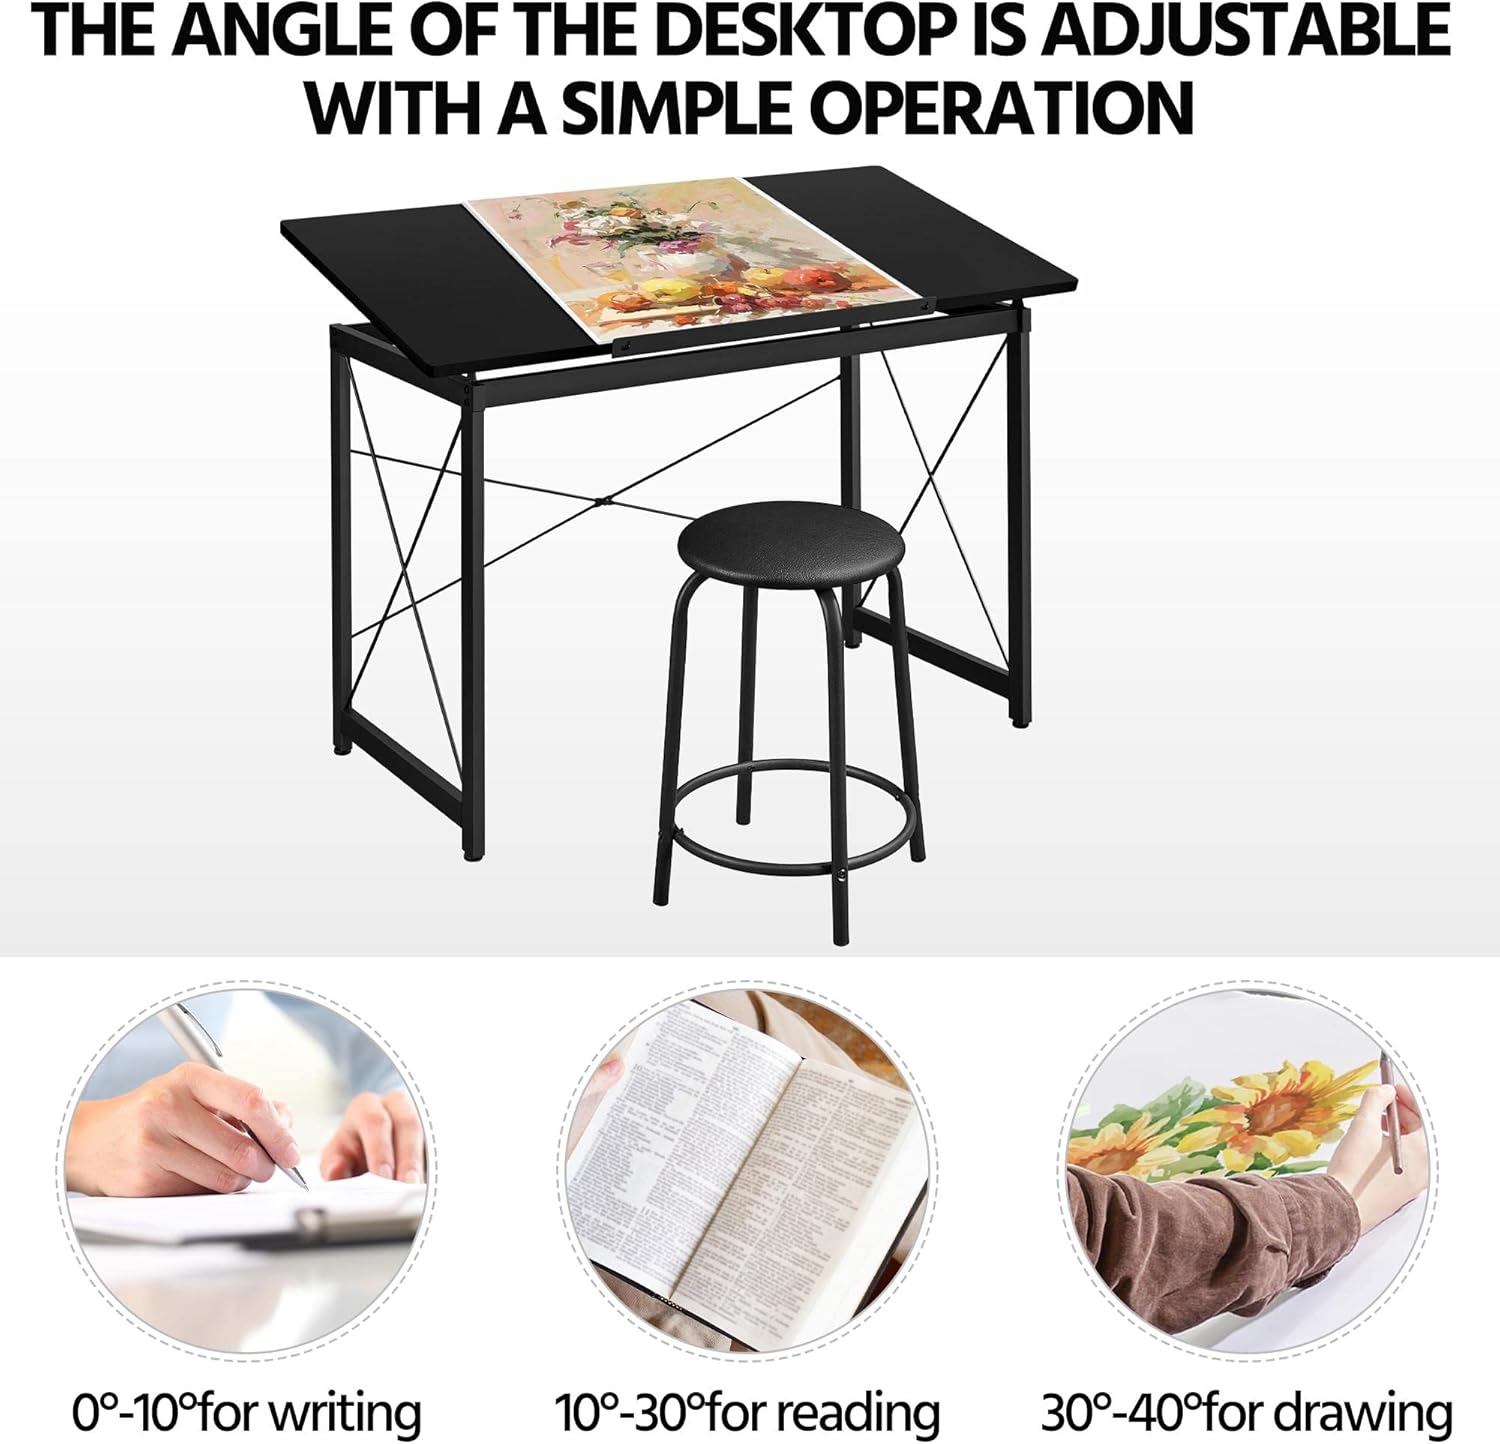
This image highlights the adjustable tabletop feature, indicating optimal angles for different activities: 0-10 degrees for writing, 10-30 degrees for reading, and 30-40 degrees for drawing.
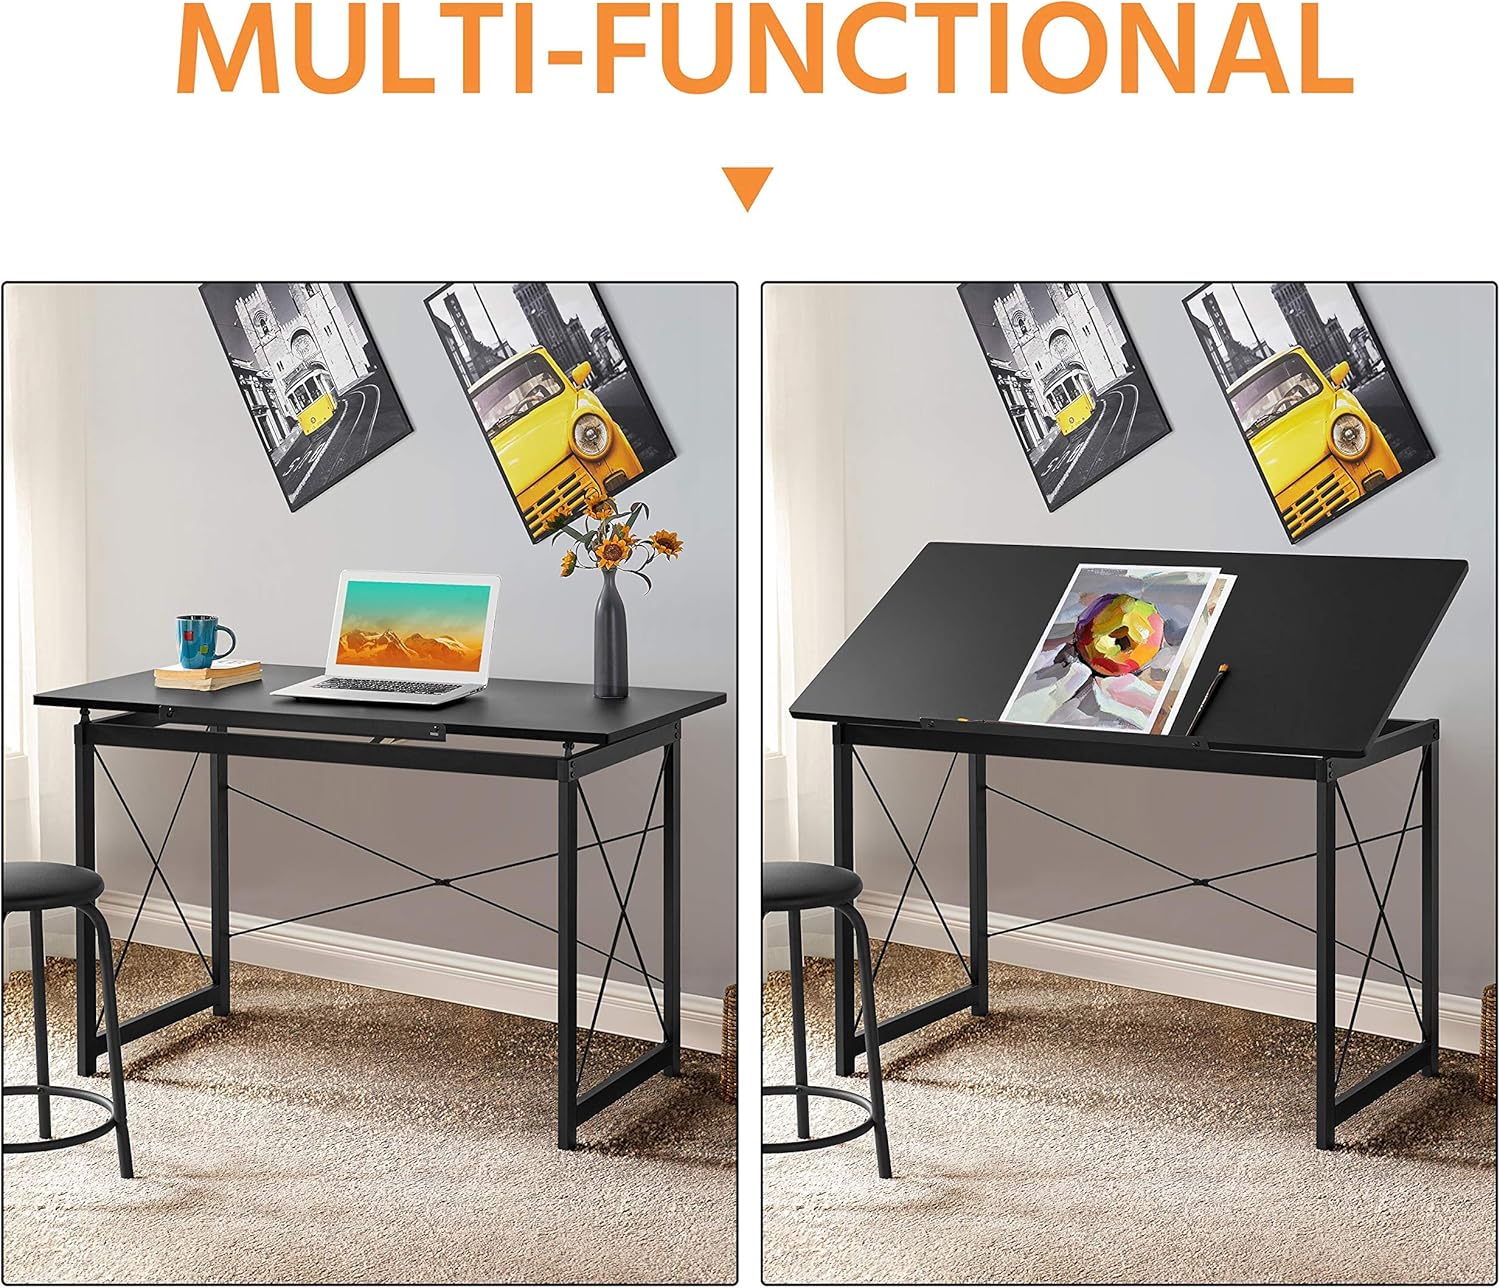
Dwa views of the table side-by-side, illustrating its transformation from a flat desk suitable for laptop use to a tilted drafting table for creative work.
Using the Movable Pencil Ledge:
The movable pencil ledge can be attached to the front edge of the adjustable tabletop to prevent items like pencils, pens, or papers from sliding off when the table is tilted. Simply slide it into the designated slots on the front edge of the tabletop.

Szczegółowy views of the table's construction and features, including the smooth rounded edges for safety, a movable pencil ledge to prevent items from sliding, the robust steel frame for stability, and adjustable screw-in protective pads for floor protection and leveling.
Ogólne zastosowanie:
The table can be used flat for general desk work, such as using a laptop, or tilted for drawing, drafting, or reading. The included stool provides comfortable seating for extended periods of use.
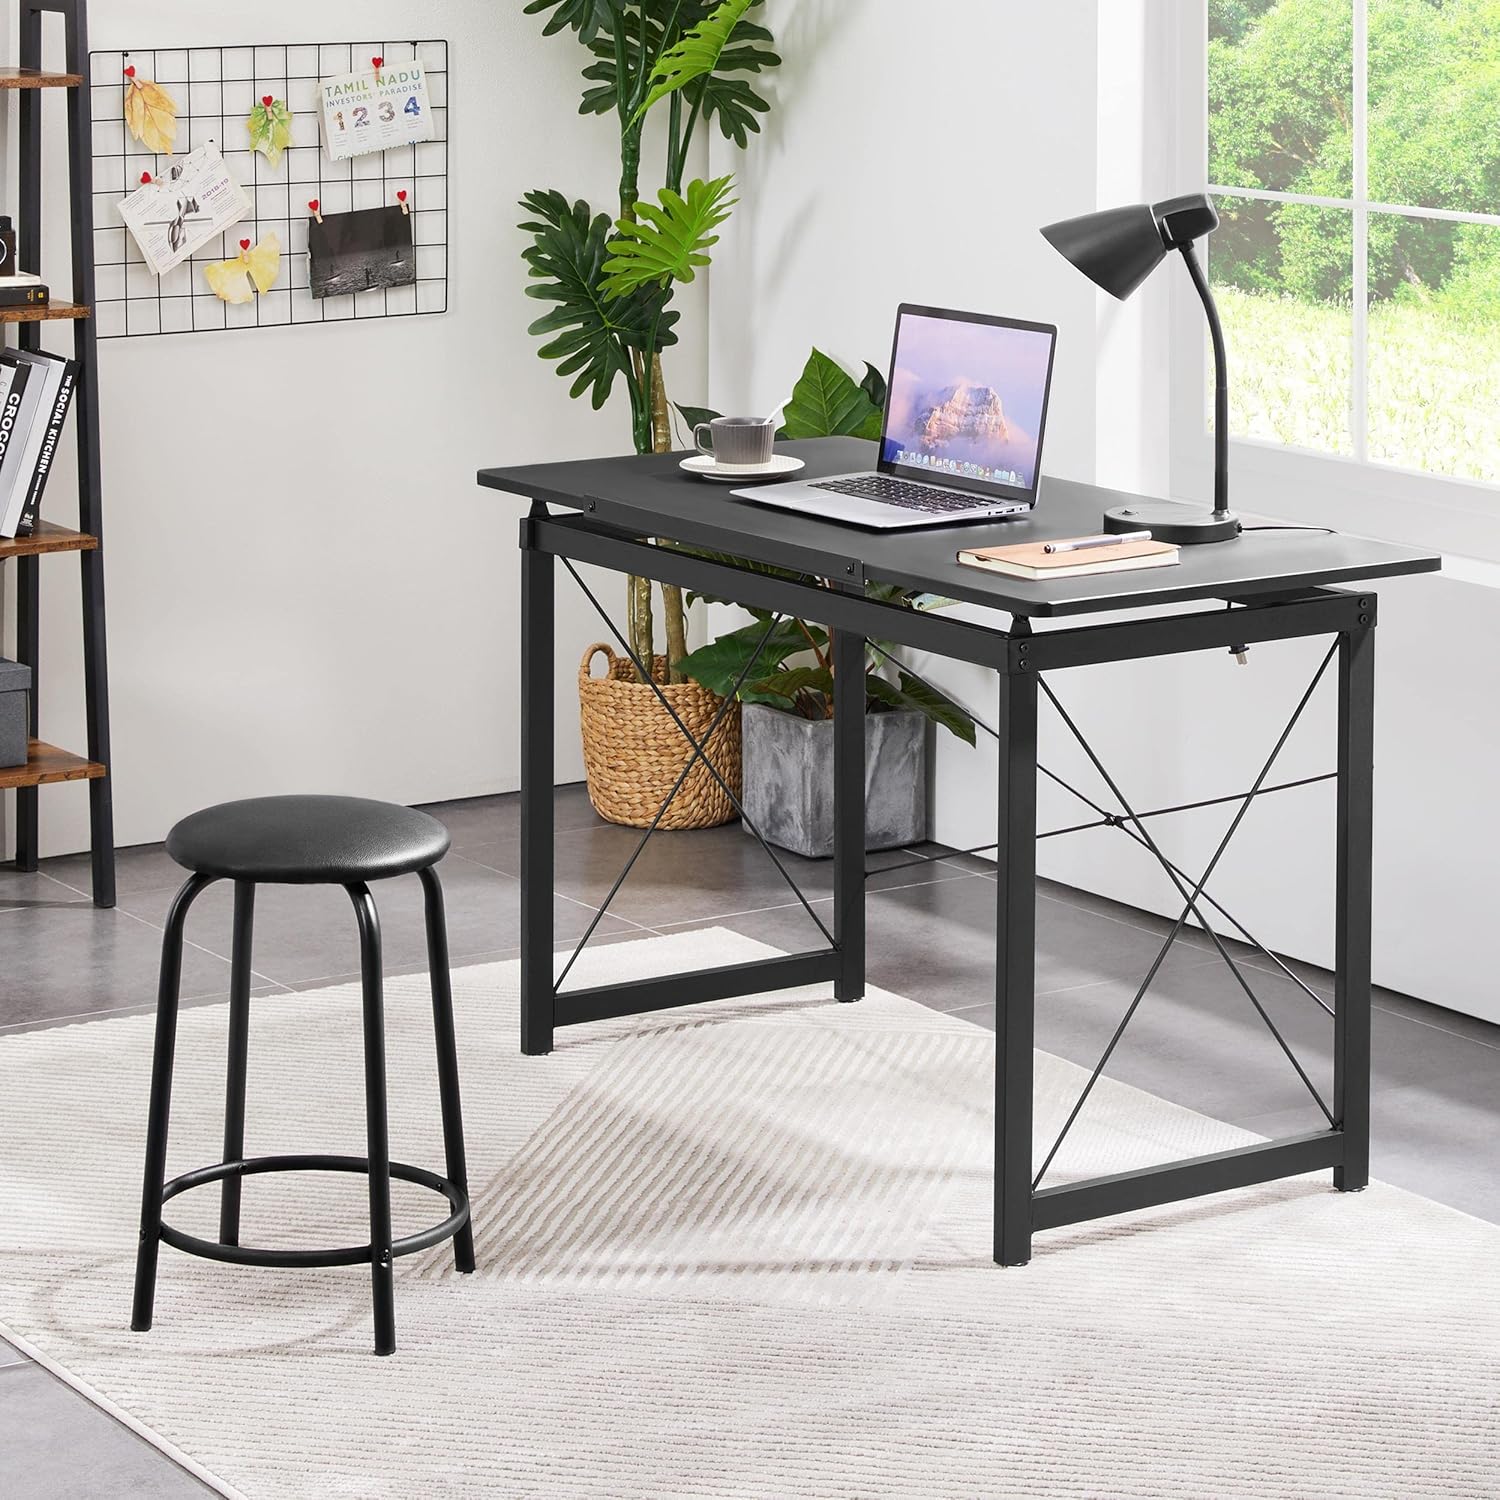
The drafting table configured as a standard desk, demonstrating its versatility for general office or home use, alongside the stool.

A person actively using the drafting table with the tabletop tilted, engaged in drawing, showcasing the ergonomic benefits of the adjustable design.
Konserwacja
- Czyszczenie: Blat i ramę stołu przetrzyj miękką szmatką.amp szmatką. Unikaj stosowania silnych środków chemicznych lub ściernych środków czyszczących, ponieważ mogą one uszkodzić wykończenie.
- Regularne kontrole: Periodically inspect all screws and bolts to ensure they remain tight. Retighten as necessary to maintain stability and safety.
- Unikaj nadmiernej wilgoci: Nie należy wystawiać stołu na długotrwałe działanie nadmiernej wilgoci lub bezpośredniego światła słonecznego, ponieważ może to spowodować odkształcenie lub odbarwienie.
- Smarowanie: If the tabletop adjustment mechanism becomes stiff, a small amount of silicone-based lubricant can be applied to the moving parts.
Rozwiązywanie problemów
| Problem | Możliwa przyczyna | Rozwiązanie |
|---|---|---|
| Stół jest chwiejny/niestabilny | Luźne elementy złączne; Nierówna podłoga | Ensure all screws and bolts are tightened. Adjust the screw-in protective pads on the feet to level the table on uneven surfaces. |
| Tabletop adjustment is stiff | Lack of lubrication; Dust/debris in mechanism | Clean the adjustment mechanism. Apply a small amount of silicone-based lubricant to the moving parts. |
| Parts missing during assembly | Błąd opakowania | Skontaktuj się z obsługą klienta Yaheetech, podając szczegóły zakupu i konkretne brakujące części. |
| Rysy na powierzchni | Improper handling; Sharp objects | Use a soft cloth for cleaning. Avoid placing sharp or abrasive objects directly on the tabletop. Consider using a desk mat. |
Specyfikacje
| Funkcja | Szczegół |
|---|---|
| Marka | Yaheetech |
| Wymiary produktu (dł. x szer. x wys.) | 47.2'' x 23.6'' x (30-40.6)'' (approx. 55.51"D x 23.62"W x 35.83"H) |
| Materiał bazowy | Stal stopowa |
| Najlepszy rodzaj materiału | Plastikowy |
| Rodzaj wykończenia | Malowane proszkowo |
| Funkcja specjalna | Adjustable Tabletop |
| Typ pokoju | Biuro, Dom, Szkoła |
| Wymagany montaż | Tak |
| Liczba szuflad | 2 (implied from product details, though not explicitly visible as drawers in images, often refers to side storage) |
Obsługa klienta
For any questions, concerns, or assistance with your Yaheetech Multi-Functional Drafting Table, please contact our customer support team. Refer to your purchase documentation or the Yaheetech official webwitryna do informacji kontaktowych.
Please have your product model number (B08NFY86ZG) and purchase date ready when contacting support.


