1. Wprowadzenie
Thank you for choosing the Cecotec Ready Warm 1200 Thermal Connected Electric Heater. This advanced heating solution is designed to provide efficient and comfortable warmth for rooms up to 10 m². Featuring 6 heating elements and 900 W of power, it ensures rapid heating. With its intuitive LED display, programmable timer, and convenient Wi-Fi control via your smartphone, managing your home's temperature has never been easier. This manual provides essential information for safe operation, installation, maintenance, and troubleshooting.
2. Ważne instrukcje bezpieczeństwa
Please read all safety warnings and instructions carefully before using this appliance to prevent electric shock, fire, injury, or property damage. Keep this manual for future reference.
- Always ensure the heater is placed on a stable, level surface or securely mounted to a wall.
- Do not cover the heater or block any air vents. Overheating can occur if the heater is covered.
- Keep combustible materials such as furniture, curtains, and paper at least 1 meter (3 feet) away from the front and sides of the heater.
- Nie należy używać grzejnika w łazienkach, pralniach ani podobnych pomieszczeniach, w których może znajdować się woda.
- Odłączaj grzejnik od zasilania, gdy nie jest używany lub przed czyszczeniem.
- This appliance is equipped with an overheating protection system to ensure safety.
- Activate the child lock function to prevent accidental changes to settings by children.
- Nie należy używać grzejnika, jeśli przewód zasilający lub wtyczka są uszkodzone, ani jeśli grzejnik nie działa prawidłowo, został upuszczony lub w jakikolwiek sposób uszkodzony.
- Nie wkładaj żadnych przedmiotów do otworów wentylacyjnych lub wylotowych ani nie pozwól, aby dostały się do nich obce przedmioty, gdyż może to spowodować porażenie prądem, pożar lub uszkodzenie grzejnika.
3. Składniki produktu
The Cecotec Ready Warm 1200 heater consists of the main unit and detachable feet for floor standing.

Rysunek 3.1: Przód view of the Cecotec Ready Warm 1200 Thermal Connected Electric Heater, showcasing its slim design and control panel on the right side.
- Elementy grzewcze: 6 internal elements for efficient heat distribution.
- Panel sterowania: Integrated LED display and touch buttons for operation.
- Przycisk zasilania: Located on the side or bottom for main power control.
- Przewód zasilający: Do podłączenia do gniazdka elektrycznego.
- Feet (optional): Two detachable feet for stable floor placement.
- Wall Mounting Brackets (optional): Do bezpiecznego montażu na ścianie.
4. Konfiguracja i instalacja
The Ready Warm 1200 heater offers flexible installation options: it can be used as a freestanding unit with its feet or securely mounted to a wall.

Rysunek 4.1: Z bliska view of the sturdy feet attached to the base of the heater, providing stability for floor standing.

Rysunek 4.2: The Cecotec Ready Warm 1200 heater positioned in a living room setting, demonstrating its compact size and aesthetic integration into a home environment.
4.1. Floor Standing Installation
- Ostrożnie rozpakuj grzejnik i wszystkie akcesoria.
- Attach the two provided feet to the base of the heater using the screws. Ensure they are securely fastened.
- Place the heater on a firm, level surface, ensuring adequate clearance from walls and furniture as per safety instructions.
- Podłącz przewód zasilający do odpowiedniego gniazdka elektrycznego.
4.2. Montaż na ścianie
(Note: Wall mounting hardware and specific instructions may vary. Refer to the separate wall mounting kit instructions if included.)
- Identify a suitable wall location, ensuring it is clear of electrical wiring, plumbing, and combustible materials.
- Mark the drilling points on the wall according to the provided wall mounting bracket template.
- Wywierć otwory i włóż odpowiednie kołki rozporowe.
- Secure the wall mounting brackets to the wall.
- Carefully hang the heater onto the wall mounting brackets, ensuring it is securely locked in place.
- Podłącz przewód zasilający do odpowiedniego gniazdka elektrycznego.
5. Instrukcja obsługi
5.1. Panel sterowania zamkniętyview
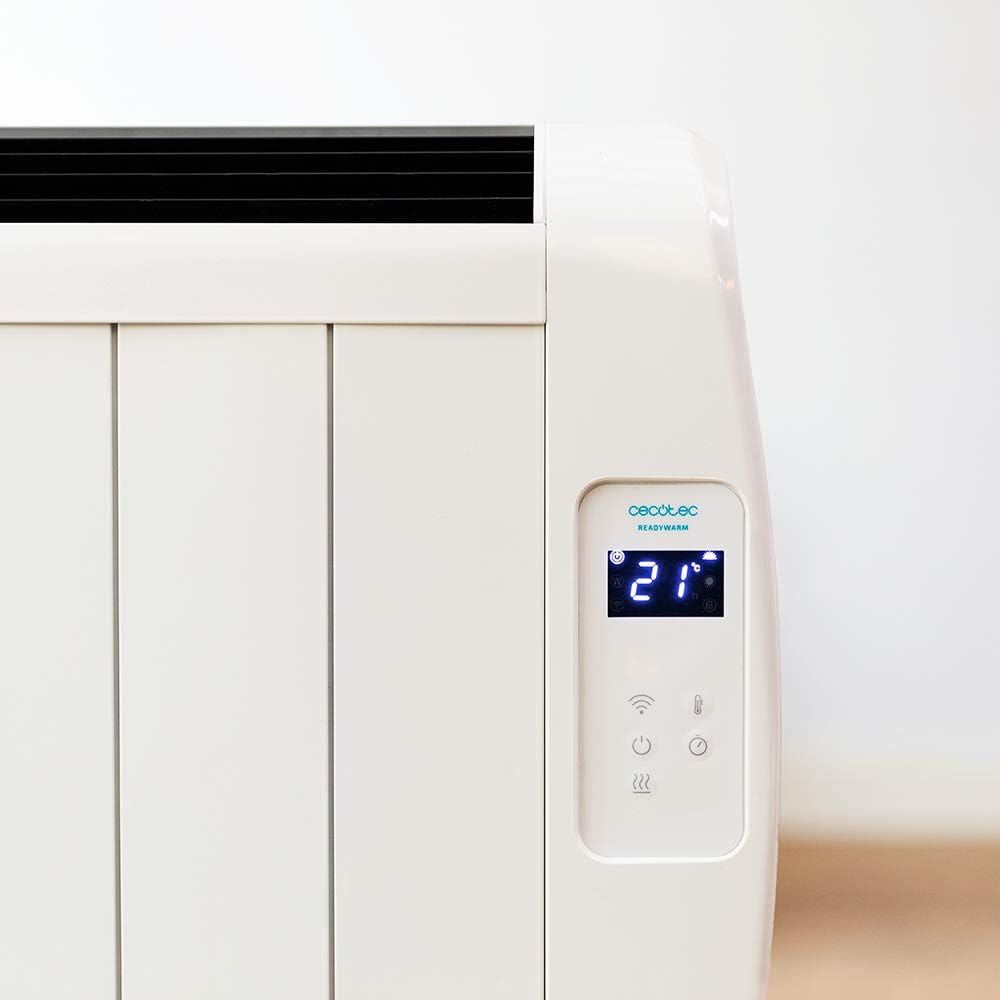
Rysunek 5.1: Szczegółowy view of the heater's LED display, showing the current room temperature (21°C) and various control icons.

Rysunek 5.2: Szczegółowy view of the heater's LED display, showing the timer function set to 4 hours, along with power and Wi-Fi indicators.
The control panel features an LED display and touch-sensitive buttons for easy operation.
- Przycisk zasilania (⏻): Włącza/wyłącza ogrzewanie.
- Przycisk trybu (M): Cycles through available heating modes.
- Temperature/Timer Adjustment Buttons (+ / -): Dostosowuje żądane ustawienia temperatury lub timera.
- Wskaźnik Wi-Fi: Pokazuje stan połączenia Wi-Fi.
- Przycisk blokady rodzicielskiej: Włącza/wyłącza blokadę dziecięcą.
5.2. Podstawowa obsługa
- Ensure the heater is plugged in and the main power switch (if present, usually on the side/bottom) is ON.
- Naciśnij Przycisk zasilania (⏻) on the control panel to turn on the heater. The LED display will illuminate.
- Na wyświetlaczu pojawi się aktualna temperatura w pomieszczeniu.
5.3. Ustawienie temperatury
- While the heater is ON, use the + or - przyciski, aby ustawić żądaną temperaturę.
- Temperaturę można ustawić w zakresie od 5°C do 40°C.
- The heater will automatically maintain the set temperature, turning on and off as needed.
5.4. Wybór trybu
The heater features 3 operating modes. Press the Przycisk trybu (M) to cycle through them. Specific mode details are typically found in the full product manual, but common modes include:
- Tryb komfortowy: Maintains a comfortable, user-defined temperature.
- Tryb ekologiczny: Operates at a lower power setting to save energy while still providing warmth.
- Tryb przeciwzamrożeniowy: Utrzymuje minimalną temperaturę (np. 5°C), aby zapobiec zamarzaniu rur.
5.5. Funkcja timera
The programmable timer allows you to set specific times for the heater to turn ON or OFF.
- Naciśnij Przycisk timera (often integrated with mode or a dedicated icon).
- Użyj + or - buttons to set the desired operating duration or delay.
- Confirm the setting. The heater will operate according to the programmed schedule.
5.6. Wi-Fi Control (Smartphone App)
Control your heater remotely using the dedicated smartphone application.

Rysunek 5.3: A hand holding a smartphone displaying the Cecotec ReadyWarm app interface, showing temperature control and other settings for the heater.
- Download the official Cecotec ReadyWarm app from your smartphone's app store (iOS or Android).
- Zarejestruj konto i zaloguj się.
- Follow the in-app instructions to add your Ready Warm 1200 heater. This typically involves putting the heater into pairing mode (refer to the heater's display or specific app instructions).
- Once connected, you can control all functions, including power, temperature, modes, and timer, from your smartphone.
6. Konserwacja i pielęgnacja
Regularne czyszczenie i prawidłowa pielęgnacja zapewnią długowieczność i wydajną pracę Twojego grzejnika.
- Przed czyszczeniem: Przed przystąpieniem do czyszczenia należy zawsze odłączyć grzejnik od gniazdka elektrycznego i poczekać, aż całkowicie ostygnie.
- Czyszczenie zewnętrzne: Przetrzyj zewnętrzne powierzchnie miękką, damp ściereczką. Nie używaj ściernych środków czyszczących, wosków ani past, ponieważ mogą one uszkodzić wykończenie.
- Usuwanie kurzu: Za pomocą odkurzacza wyposażonego w końcówkę szczotkową usuń kurz z wlotu powietrza i otworów wentylacyjnych.
- Składowanie: Jeśli grzejnik będzie przechowywany przez dłuższy czas, należy odłączyć go od zasilania, dokładnie wyczyścić i przechowywać w chłodnym, suchym miejscu, najlepiej w oryginalnym opakowaniu.
- Nie zanurzać grzejnika w wodzie lub innej cieczy.
7. Rozwiązywanie Problemów
If you encounter any issues with your Cecotec Ready Warm 1200 heater, please refer to the table below for common problems and solutions.
| Problem | Możliwa przyczyna | Rozwiązanie |
|---|---|---|
| Grzejnik nie włącza się. | Not plugged in; main power switch OFF; power outage. | Ensure power cord is securely plugged in. Check main power switch. Verify power supply. |
| Ogrzewanie niespodziewanie przestaje działać. | Zabezpieczenie przed przegrzaniem zostało aktywowane; upłynął limit czasu. | Unplug, allow to cool for 30 minutes, remove any obstructions. Check timer settings. |
| Ogrzewanie nie grzeje skutecznie. | Temperature setting too low; room too large; vents blocked. | Increase desired temperature. Ensure heater is appropriate for room size. Clear any obstructions from vents. |
| Problemy z połączeniem Wi-Fi. | Nieprawidłowe hasło Wi-Fi; router jest za daleko; aplikacja nie jest zaktualizowana. | Re-enter Wi-Fi password. Move heater closer to router. Update app to latest version. Restart router and heater. |
| Na wyświetlaczu pojawia się kod błędu. | Wewnętrzna awaria. | Zanotuj kod błędu i skontaktuj się z obsługą klienta. Nie podejmuj próby naprawy. |
8. Specyfikacje
Technical specifications for the Cecotec Ready Warm 1200 Thermal Connected Electric Heater (Model: 05373).
| Funkcja | Szczegół |
|---|---|
| Numer modelu | 05373 |
| Marka | Cecotec |
| Moc | 900 W |
| Elementy grzewcze | 6 |
| Zalecany rozmiar pokoju | Do 10 m² |
| Wymiary (dł. x szer. x wys.) | Wymiary 62.5 x 11 x 67.5 cm |
| Waga | 4.3 kilogramów |
| Kontrola | LED Display, Touch Buttons, Wi-Fi App Control, Wireless Remote Control |
| Zakres temperatur | 5°C - 40°C |
| Funkcje bezpieczeństwa | Zabezpieczenie przed przegrzaniem, blokada rodzicielska |
| Opcje instalacji | Wall-mounted or Floor-standing (with included feet) |
9. Gwarancja i wsparcie
For information regarding warranty coverage, technical support, or service, please refer to the warranty card included with your product or visit the official Cecotec webwitryny. Nie próbuj samodzielnie naprawiać urządzenia.
For further assistance, please contact Cecotec customer service.


