1. Ważne instrukcje bezpieczeństwa
Please read all instructions carefully before using the appliance and retain for future reference. Always follow basic safety precautions when using electrical appliances.
- Nie zanurzaj urządzenia, przewodu ani wtyczki w wodzie lub innej cieczy.
- Upewnij się, że objętośćtage podana na urządzeniu odpowiada lokalnej objętości sieci zasilającejtage przed połączeniem.
- Należy zachować ścisły nadzór, jeżeli z urządzenia korzystają dzieci lub w ich pobliżu.
- Odłącz od gniazdka, gdy nie jest używany i przed czyszczeniem. Pozostaw do ostygnięcia przed założeniem lub zdjęciem części.
- Nie używaj żadnego urządzenia, jeśli przewód lub wtyczka są uszkodzone, ani po awarii urządzenia lub po jego uszkodzeniu w jakikolwiek sposób.
- Nie ustawiaj urządzenia przy ścianie ani przy innych urządzeniach. Pozostaw co najmniej 10 cm wolnej przestrzeni z tyłu i po bokach oraz 10 cm wolnej przestrzeni nad urządzeniem.
- Nie kładź niczego na urządzeniu.
- Nie należy używać urządzenia do celów innych niż opisane w niniejszej instrukcji.
- Należy zachować szczególną ostrożność podczas przenoszenia urządzenia zawierającego gorący olej lub inne gorące płyny.
- Urządzenie jest przeznaczone wyłącznie do użytku domowego.
2. Koniec produktuview
2.1 Główne cechy
- Large digital touch display for instant cooking mode adjustments.
- Smart knob for easy start/stop and precise time/temperature control.
- Powerful 1800W heating element with rapid hot air circulation for perfect cooking.
- Temperature range: 65-200°C for cooking, 30-80°C for dehydration.
- 8 preset cooking settings for various meals including chicken, seafood, and desserts.
- Spacious 12L cooking capacity with 3 rack levels for family-sized portions.
- Interior light to monitor cooking progress.
- Dishwasher-safe accessories for easy cleaning.
- Sleek black body with cool-touch silver handle.
- EU certified, LFGB food-safe material, PFOA and PTFE free.
2.2 Komponenty i akcesoria
Familiarize yourself with the main unit and included accessories:


Urządzenie jest dostarczane z następującymi akcesoriami:
- 3 x Removable Air Flow Racks
- 1 x Rotisserie Spit and Forks
- 1 x Obrotowy kosz
- 1 x Retrieval Tool
- 1 x Removable Drip Tray
3. Konfiguracja i pierwsze użycie
3.1 Rozpakowanie
- Ostrożnie usuń wszystkie materiały opakowaniowe i etykiety promocyjne z frytkownicy powietrznej.
- Remove all accessories from inside the appliance.
- Zachowaj materiały opakowaniowe w celu późniejszego przechowywania lub utylizacji.
3.2 Czyszczenie przed pierwszym użyciem
- Wytrzyj zewnętrzną część frytkownicy powietrznej czystą,amp płótno.
- Wash all removable accessories (air flow racks, rotisserie spit, rotating basket, drip tray) with warm, soapy water. Rinse thoroughly and dry completely. All accessories are dishwasher safe.
- Nie zanurzaj jednostki głównej w wodzie.
3.3 Umieszczenie
- Umieść frytkownicę na stabilnej, równej, odpornej na ciepło powierzchni.
- Ensure there is at least 10 cm of clear space around the back and sides, and 10 cm above the appliance for proper ventilation.
- Nie należy umieszczać frytkownicy powietrznej w pobliżu materiałów łatwopalnych lub źródeł ciepła.
4. Instrukcja obsługi
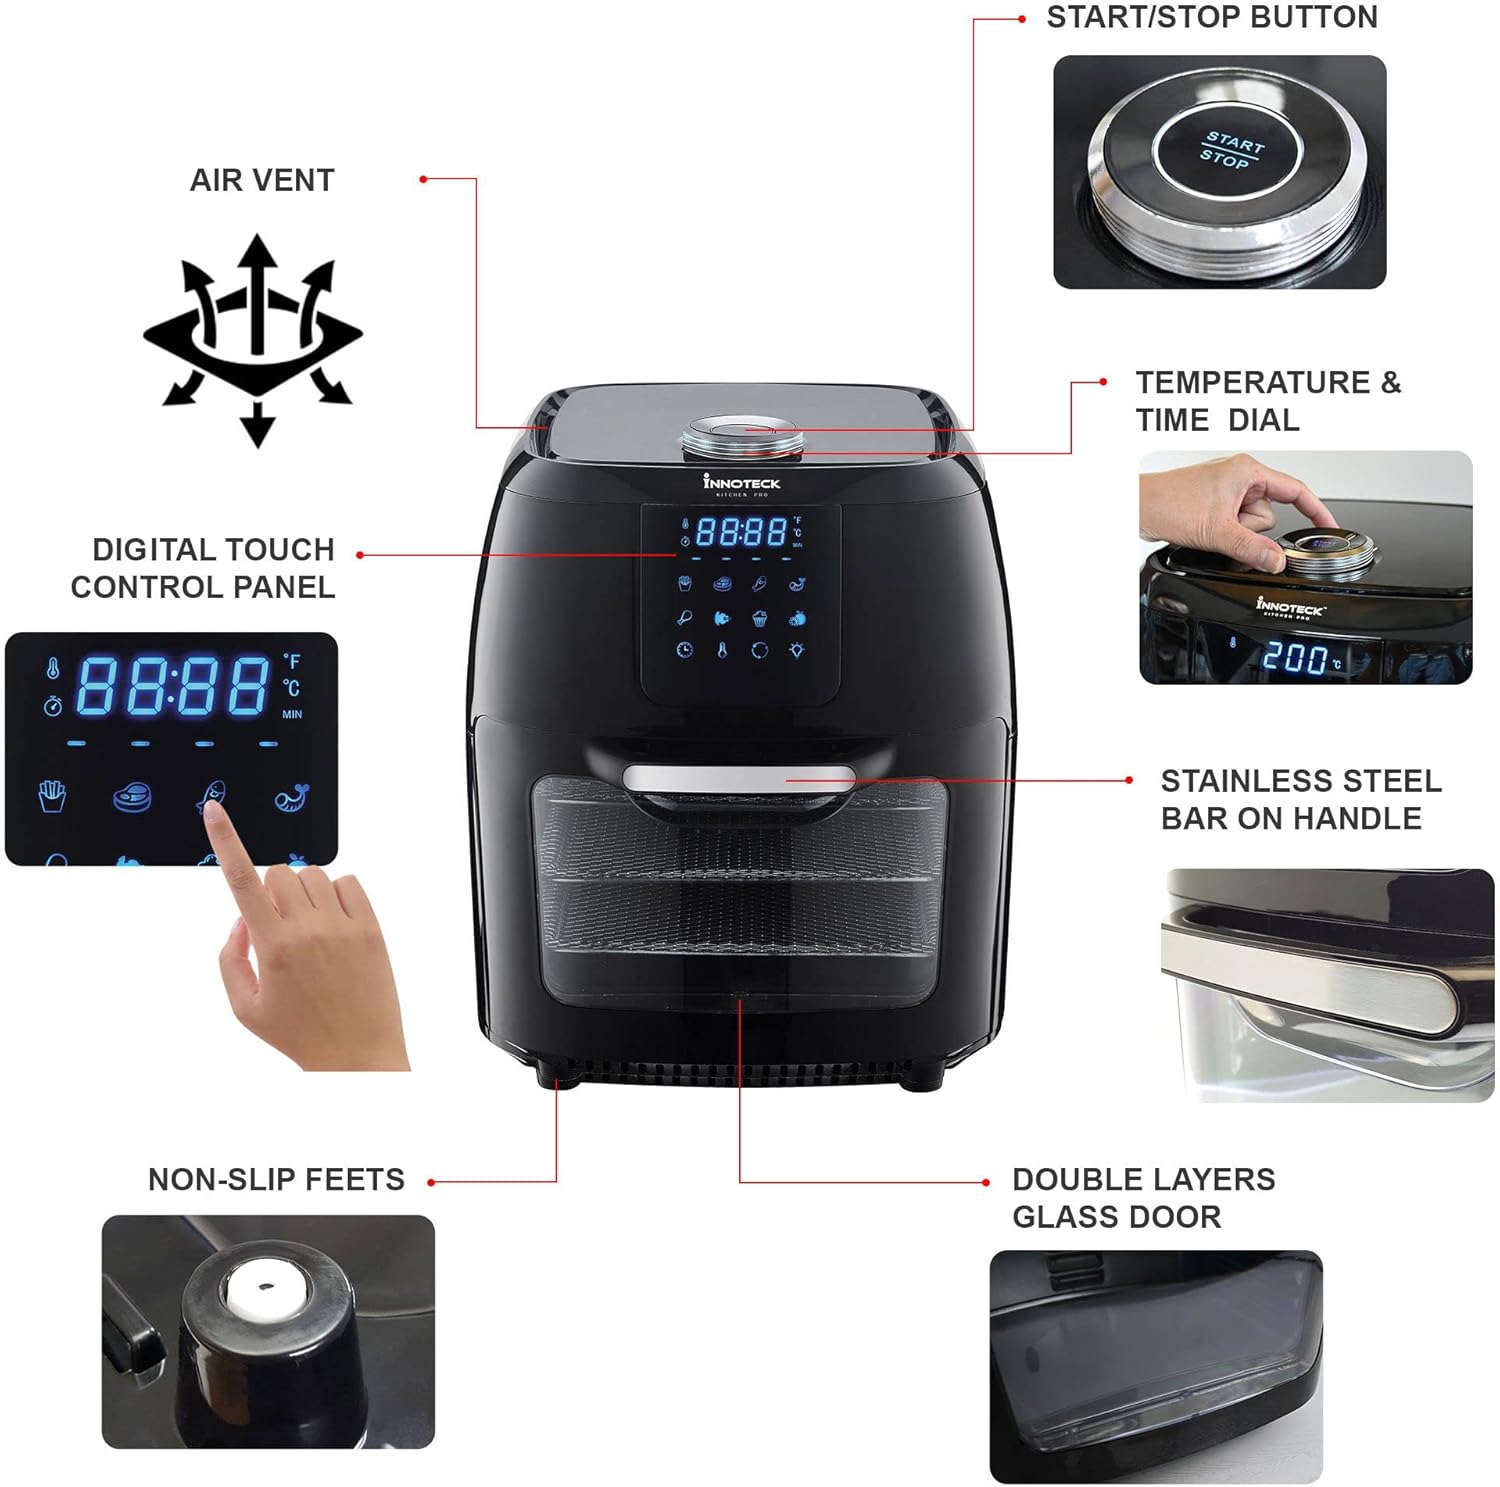
4.1 Cyfrowy panel sterowania
The air fryer features a large digital touch display and a smart knob for intuitive control. Refer to Figure 2.2 for a visual guide.
- Przycisk zasilania: Naciśnij, aby włączyć/wyłączyć urządzenie.
- Predefiniowane ikony: Touch an icon to select a pre-programmed cooking mode (e.g., Fries, Meat, Fish, Shrimp, Chicken, Rotisserie, Bake, Dehydrate).
- Wyświetlacz temperatury/czasu: Pokazuje aktualną temperaturę i pozostały czas gotowania.
- Smart Knob: Rotate to adjust temperature or time. Press to confirm selection or to start/pause cooking.
- Przycisk wewnętrznego światła: Naciśnij, aby włączyć/wyłączyć oświetlenie wnętrza.
- Przycisk Obróć: Activates the rotisserie function for the rotating basket or rotisserie spit.
4.2 Gotowanie z ustawieniami wstępnymi
The air fryer includes 8 optimized cooking presets for convenience:

- Place food inside the air fryer using the appropriate accessory (rack, basket, or spit).
- Dokładnie zamknąć drzwi urządzenia.
- Naciśnij przycisk zasilania, aby włączyć wyświetlacz.
- Touch the desired preset icon on the digital display. The air fryer will automatically set the optimal temperature and time for that food type.
- If desired, you can adjust the preset time or temperature by rotating the smart knob.
- Press the smart knob or the Start/Stop button to begin cooking.
- The interior light can be turned on/off to check cooking progress.
- Po zakończeniu gotowania frytkownica powietrzna wyda sygnał dźwiękowy i automatycznie się wyłączy.
4.3 Gotowanie ręczne
- Place food inside the air fryer and close the door.
- Naciśnij przycisk zasilania.
- Rotate the smart knob to set the desired temperature (65-200°C). Press the knob to confirm.
- Rotate the smart knob again to set the desired cooking time. Press the knob to confirm and start cooking.
4.4 Korzystanie z funkcji rożna
The rotisserie function is ideal for whole chickens or using the rotating basket for fries or nuts.
- Prepare your food and secure it onto the rotisserie spit or place it inside the rotating basket.
- Insert the rotisserie assembly into the air fryer's internal slots.
- Select a cooking preset or set manual temperature and time.
- Press the 'Rotate' button on the control panel to activate the rotation.
- Monitor cooking through the glass door and interior light.
- Once cooking is complete, use the retrieval tool to safely remove the hot rotisserie assembly.
5. Konserwacja i czyszczenie
Regularne czyszczenie zapewni długowieczność i optymalną wydajność Twojej frytkownicy.
- Zawsze odłączaj frytkownicę od zasilania i pozwól jej całkowicie ostygnąć przed czyszczeniem.
- Jednostka główna: Przetrzyj powierzchnię zewnętrzną środkiem adamp płótno. Nie używaj ściernych środków czyszczących ani nie zanurzaj w wodzie.
- Wnętrze: Przetrzyj wnętrze adamp cloth and mild detergent if necessary. For stubborn food residue, use a non-abrasive sponge.
- Akcesoria: All removable accessories (air flow racks, rotisserie spit, rotating basket, drip tray) are dishwasher safe. Alternatively, wash them with warm, soapy water, rinse, and dry thoroughly.
- Taca ociekowa: Empty and clean the drip tray after each use to prevent smoke and odors.
- Przed schowaniem lub ponownym użyciem urządzenia należy upewnić się, że wszystkie części są całkowicie suche.
6. Rozwiązywanie Problemów
If you encounter any issues, please refer to the table below before contacting customer support.
| Problem | Możliwa przyczyna | Rozwiązanie |
|---|---|---|
| Frytownica nie włącza się. | Appliance not plugged in; Power outlet not working; Power button not pressed. | Ensure plug is securely in outlet; Test outlet with another appliance; Press the Power button on the control panel. |
| Jedzenie nie jest ugotowane równomiernie. | Too much food in the basket/on racks; Food not shaken/rotated during cooking; Incorrect temperature/time. | Cook in smaller batches; Shake/rotate food halfway through cooking; Adjust temperature and time as needed. |
| Z urządzenia wydobywa się biały dym. | Grease residue from previous use; Fatty food being cooked. | Clean the drip tray and interior thoroughly; For fatty foods, add a small amount of water to the drip tray to prevent smoke. |
| Jedzenie nie jest chrupiące. | Za mało oleju (jeśli dotyczy); Zbyt niska temperatura; Zbyt krótki czas smażenia. | Lightly coat food with oil; Increase temperature or cooking time. |
7. Specyfikacje
Detailed technical specifications for the Innoteck Kitchen Pro 12L Digital Air Fryer.

| Funkcja | Szczegół |
|---|---|
| Marka | Innoteck |
| Numer modelu | DS-5894 |
| Kolor | Czarny i srebrny |
| Wymiary produktu (dł. x szer. x wys.) | Wymiary 31 x 32 x 39 cm |
| Pojemność | 12 litrów |
| Moc / Wattage | 1800 watów |
| Tomtage | 230 wolty |
| Tworzywo | Aluminium |
| Cechy specjalne | Kontrola temperatury |
| Waga przedmiotu | 9.1 kilograma |
| Zalecane zastosowania | Roasting, Dehydrating, Baking |
| Pierwsza dostępna data | 13 maja 2022 r. |
8. Gwarancja i wsparcie
Your Innoteck Kitchen Pro 12L Digital Air Fryer comes with a standard manufacturer's warranty. Please refer to the warranty card included in your product packaging for specific terms and conditions.
For technical support, troubleshooting assistance, or warranty claims, please contact Innoteck Customer Service:
- Webstrona: Visit the official Innoteck webStrona z odpowiedziami na często zadawane pytania i zasobami pomocy.
- E-mail: Refer to your warranty card for the dedicated support email address.
- Telefon: Contact numbers may vary by region; please check the product packaging or website for local support lines.
When contacting support, please have your model number (DS-5894) and purchase date ready.


