1. Wprowadzenie
Thank you for choosing the Arcam SA10 Class A/B Integrated Amplifier. This manual provides essential information for setting up, operating, and maintaining your amplifier to ensure years of high-quality audio enjoyment. The SA10 is designed to deliver class-leading sound quality, bringing your music to life with its powerful 50W per channel output, high-performance ESS9016K2M Sabre DAC, and low noise floor. It offers a listening experience as close to the artist's original performance as possible.
2. Informacje dotyczące bezpieczeństwa
Przed użyciem urządzenia należy uważnie przeczytać wszystkie instrukcje bezpieczeństwa. Zachowaj tę instrukcję do wykorzystania w przyszłości.
- Nie wystawiać urządzenia na działanie deszczu i wilgoci.
- Nie zasłaniaj żadnych otworów wentylacyjnych. Montaż należy wykonać zgodnie z instrukcją producenta.
- Nie należy instalować w pobliżu źródeł ciepła, takich jak grzejniki, kratki wentylacyjne, piece lub inne urządzenia (w tym amp(lifiers) wytwarzające ciepło.
- Chroń przewód zasilający przed deptaniem i przytrzaśnięciem, zwłaszcza przy wtyczkach, gniazdkach i miejscach, w których wychodzi z urządzenia.
- Stosować wyłącznie dodatki/akcesoria wskazane przez producenta.
- Odłączaj urządzenie od zasilania podczas burzy z piorunami lub jeśli nie używasz go przez dłuższy czas.
- Wszelkie czynności serwisowe należy powierzyć wykwalifikowanemu personelowi serwisowemu. Serwis jest wymagany, gdy urządzenie zostało w jakikolwiek sposób uszkodzone.
- Produkt ten zawiera substancje chemiczne, o których władze stanu Kalifornia wiedzą, że mogą powodować raka, wady wrodzone lub inne szkody reprodukcyjne.
3. Zawartość opakowania
Upon opening the box, please ensure all the following items are present:
- Arcam SA10 Zintegrowany Ampżywsze
- Przewód zasilający AC
- Pilot zdalnego sterowania (w zestawie 2 baterie AAA)
- Instrukcja obsługi (ten dokument)
4. Koniec produktuview
Familiarize yourself with the front and rear panels of your Arcam SA10 ampliyfikator.
4.1 Panel przedni
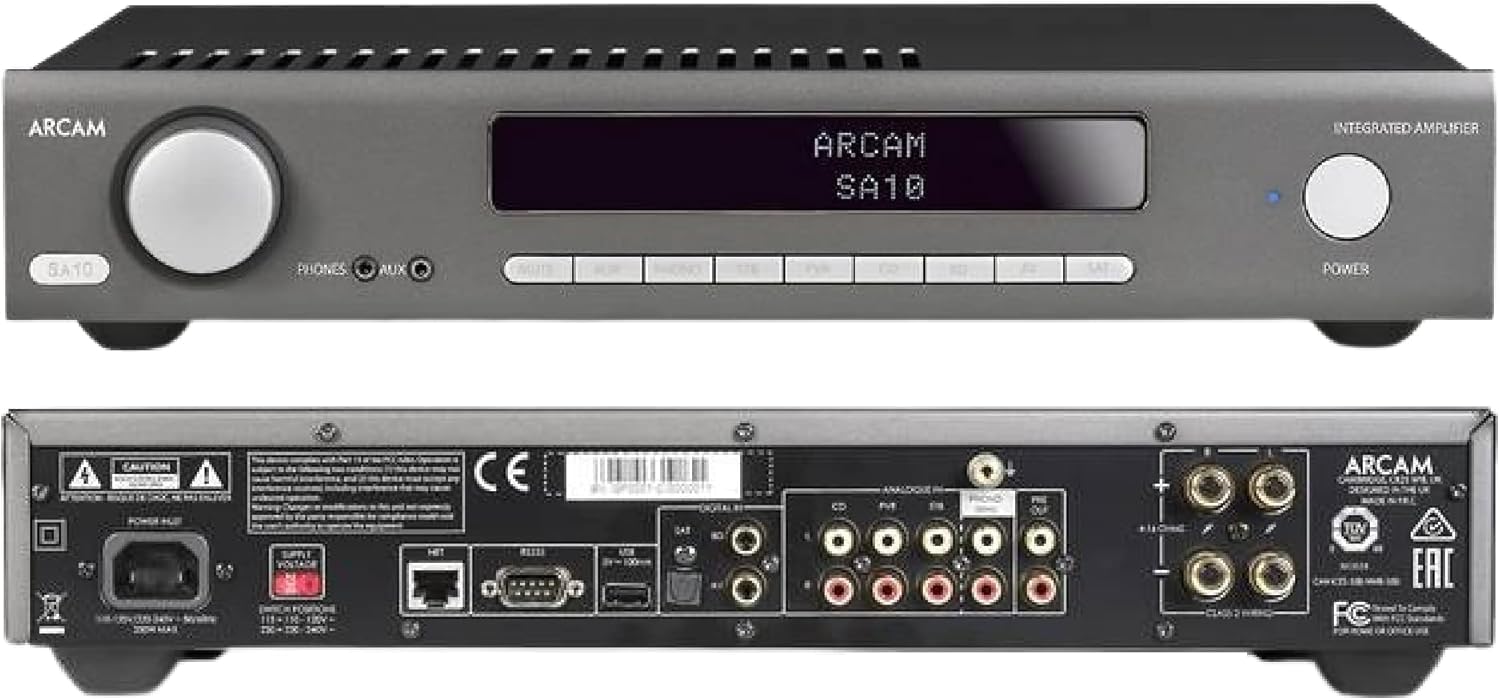
Figure 4.1: Front and Rear Panels of the Arcam SA10. The front panel features a large volume knob on the left, a display screen in the center, input selection buttons below the display, and a power button on the right. Headphone and auxiliary inputs are also present.
- Pokrętło głośności: Reguluje ogólną głośność wyjściową.
- Ekran wyświetlacza: Pokazuje aktualny stan wejścia, poziom głośności i inne informacje o stanie.
- Przyciski wyboru wejścia: Allows selection between various audio sources (CD, Tuner, AV, SAT, etc.).
- Przycisk zasilania: Przełącza amplifier between standby and operational modes.
- Wyjście słuchawkowe: Gniazdo 3.5 mm do podłączenia słuchawek.
- Wejście pomocnicze: 3.5mm jack for connecting portable audio devices.
4.2 Panel tylny
The rear panel provides all the necessary connections for your audio system.
Figure 4.2: Detailed Rear Panel Connections. This view highlights the speaker terminals, analog RCA inputs (including Phono), digital optical and coaxial inputs, and the power inlet.
- Terminale głośnikowe: Connect your passive speakers (left and right channels).
- Analog Inputs (RCA): Multiple stereo RCA inputs for connecting analog audio sources like CD players, tuners, or other line-level devices.
- Phono Input (RCA): Dedicated input for turntables with moving magnet (MM) cartridges.
- Wejścia cyfrowe:
- Optyczny (Toslink): For digital audio sources like TVs or game consoles.
- Współosiowy: For digital audio sources like CD players or network streamers.
- Wyjście wstępne: Do podłączenia do zewnętrznego źródła zasilania amplifier lub aktywny subwoofer.
- Port USB: For firmware updates or service.
- Port Ethernet: For network control and future updates.
- Wejście zasilania prądem zmiennym: Łączy ampzasilacz do sieci elektrycznej.
5. Konfiguracja
5.1 Umieszczenie
Place the Arcam SA10 on a stable, level surface away from direct sunlight, heat sources, and excessive moisture. Ensure adequate ventilation around the unit to prevent overheating. Do not place other components directly on top of the ampliyfikator.
5.2 Podłączanie głośników
Connect your passive speakers to the speaker terminals on the rear panel. Ensure correct polarity (+ to + and - to -) for both left and right channels. Use high-quality speaker cables for optimal sound performance.
5.3 Podłączanie źródeł dźwięku

Figure 5.3: The Arcam SA10 offers convenient connections including Toslink optical, two digital coaxial inputs, and three stereo analog RCA inputs, plus a dedicated phono input.
- Źródła analogowe: Connect CD players, tuners, or other line-level devices to the RCA analog inputs (CD, Tuner, AV, SAT).
- Obrotnica: Connect a turntable with a moving magnet (MM) cartridge to the dedicated PHONO input.
- Źródła cyfrowe: Connect digital audio sources using either the optical (Toslink) or coaxial digital inputs.
- Portable Devices: Use the 3.5mm AUX input on the front panel for quick connection of portable media players.
5.4 Połączenie zasilania
Once all audio connections are made, connect the supplied AC power cord to the AC power inlet on the rear panel of the amplifier, a następnie do odpowiedniego gniazdka ściennego.
6. Instrukcja obsługi
6.1 Włączanie/wyłączanie
Naciśnij MOC button on the front panel or the remote control to switch the amplifier on or into standby mode. The blue LED next to the power button indicates operational status.
6.2 Wybór wejścia
Use the input selection buttons on the front panel or the remote control to choose your desired audio source. The selected input will be displayed on the front panel screen.
6.3 Regulacja głośności
Obróć duży TOM knob on the front panel clockwise to increase volume and counter-clockwise to decrease it. Alternatively, use the volume up/down buttons on the remote control.
6.4 Korzystanie ze słuchawek
Plug your headphones into the 3.5mm TELEFONY jack on the front panel. Connecting headphones will automatically mute the main speaker outputs.
6.5 Zdalne sterowanie i sterowanie aplikacją

Figure 6.5: Control your SA10 with the included remote or via UPnP audio and basic functions using the FREE MusicLife App on your iPad, iPhone, or Android device.
The included remote control provides full functionality for the SA10. Ensure the supplied AAA batteries are correctly inserted. For advanced control and UPnP audio streaming, download the free Arcam MusicLife App from your device's app store (available for iOS and Android).
7. Konserwacja
To maintain the appearance and performance of your Arcam SA10:
- Wytrzyj powierzchnie zewnętrzne miękką, suchą i niepozostawiającą włókien szmatką.
- Nie należy używać środków czyszczących o właściwościach ściernych, wosków ani rozpuszczalników.
- Ensure the ventilation grilles are free from dust and obstructions.
- Disconnect the power cord from the wall outlet before cleaning.
8. Rozwiązywanie Problemów
If you experience issues with your Arcam SA10, refer to the following common problems and solutions:
| Problem | Możliwa przyczyna | Rozwiązanie |
|---|---|---|
| Brak zasilania | Przewód zasilający nie jest podłączony; gniazdko elektryczne jest uszkodzone. | Upewnij się, że przewód zasilający jest prawidłowo podłączony. Spróbuj użyć innego gniazdka elektrycznego. |
| Brak dźwięku | Wybrano nieprawidłowe wejście; kable głośnikowe poluzowane; zbyt niski poziom głośności; włączono wyciszenie. | Select correct input. Check speaker cable connections. Increase volume. Deactivate mute. |
| Zniekształcony dźwięk | Source signal too high; speaker impedance mismatch; faulty cables. | Reduce source output level. Ensure speakers are compatible (8 ohms recommended). Check/replace cables. |
| Pilot nie działa | Batteries depleted or incorrectly inserted; obstruction between remote and ampliyfikator. | Wymień baterie. Upewnij się, że bieguny są prawidłowe. Usuń przeszkody. |
If the problem persists, please contact Arcam customer support or your authorized dealer.
9. Specyfikacje
Key technical specifications for the Arcam SA10 Integrated AmpLiyfikator:

Figure 9.1: The Arcam SA10 delivers 50 watts per channel, features 5 analog inputs (including phono), 3 digital inputs, a 32-bit DAC, and boasts a low total harmonic distortion + noise of 0.003%.
- Moc wyjściowa: 50W per channel (8 ohms, 20-20,000 Hz, at 0.5% THD)
- AmpRodzaj lifikacji: Klasa A/B
- Konwerter cyfrowo-analogowy (DAC): 32-bit ESS9016K2M Sabre DAC
- Wejścia analogowe: 5 (including 1 dedicated Phono input for Moving Magnet cartridges)
- Wejścia cyfrowe: 3 (1 Optical Toslink, 2 Coaxial)
- Całkowite zniekształcenia harmoniczne + szum: 0.003%
- Wymiary (szer. x gł. x wys.): 17.05 x 12.72 x 3.43 cala (433 x 323 x 87 mm)
- Waga: 2.03 funtów (0.92 kg)
- Kontrola: Full I/P control, Remote Control, MusicLife App compatibility
- Baterie do pilota: 2 AAA (w zestawie)
10. Gwarancja i wsparcie
Arcam products are designed and manufactured to the highest standards. For information regarding warranty coverage, technical support, or service, please refer to the warranty card included with your product or visit the official Arcam webZachowaj dowód zakupu na wypadek roszczeń gwarancyjnych.


