Wstęp
The NEXX X-Com 2 is a communication system designed for seamless integration with NEXX X.Vilitur and NEXX X.Vilijord helmets. This system allows riders to connect with their technology and communicate with up to 8 other riders over a distance of up to 1.6 kilometers (1.0 mile) in open terrain. It features Bluetooth 4.1, advanced audio distribution, noise cancellation, and an integrated FM radio.
Zawartość opakowania
Przed rozpoczęciem instalacji należy sprawdzić, czy wszystkie komponenty są obecne:
- 1 x X-Com 2 Main Module
- 1 x Pilot zdalnego sterowania
- Sprzęt montażowy (np. clamps, adhesive mounts) - (Assumed)
- Speakers and Microphone Kit - (Assumed)
- USB Charging Cable - (Assumed)
- Instrukcja obsługi (ten dokument)
Produkt ponadview
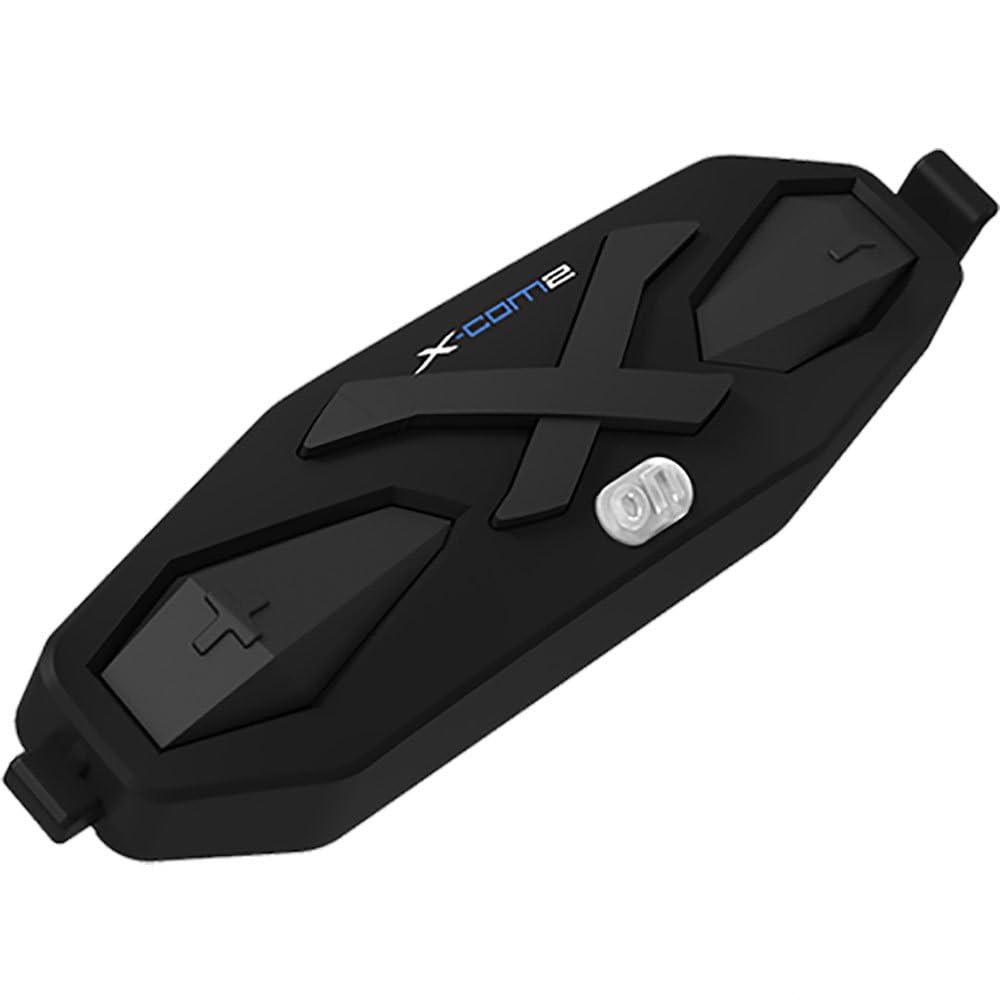
Rysunek 1: The NEXX X-Com 2 main module. This black, elongated unit features a prominent 'X' design, the 'X-Com2' logo, and several tactile buttons for operation, including a central power/function button and volume/navigation controls.
Main Module Components:
- Przycisk zasilania/funkcji: Central button for powering on/off, pairing, and accessing main functions.
- Przycisk zwiększania głośności/następnego utworu: Typically located on one side, used to increase volume or navigate forward.
- Przycisk zmniejszania głośności/poprzedniego utworu: Typically located on the opposite side, used to decrease volume or navigate backward.
- Port ładowania: Do podłączenia kabla ładującego USB.
- Porty głośnikowe/mikrofonowe: For connecting the helmet's audio components.
Konfiguracja i instalacja
1. Mounting the Main Module:
- Identify the designated mounting area on your NEXX X.Vilitur or X.Vilijord helmet, usually on the left side.
- Wybierz pomiędzy clamp mount or adhesive mount based on your helmet type and preference.
- Securely attach the mounting bracket to the helmet.
- Slide the X-Com 2 main module onto the mounted bracket until it clicks into place.
2. Installing Speakers and Microphone:
- Carefully remove the helmet's interior padding to access the ear pockets.
- Place the speakers into the designated ear pockets, ensuring they are centered over your ears.
- Route the microphone boom towards your mouth, securing it within the helmet's chin bar area.
- Connect the speaker and microphone cables to the corresponding ports on the X-Com 2 main module.
- Reinstall the helmet's interior padding, ensuring cables are neatly tucked away and do not interfere with comfort or safety.
Instrukcja obsługi
Włączanie/wyłączanie:
- Włączanie: Press and hold the Power/Function button for approximately 2 seconds until you hear an audible prompt.
- Wyłączone: Press and hold the Power/Function button for approximately 5 seconds until you hear an audible prompt.
Parowanie Bluetooth:
- With the X-Com 2 powered off, press and hold the Power/Function button for 7 seconds until the LED flashes red and blue, indicating pairing mode.
- On your mobile device, enable Bluetooth and search for "NEXX X-Com 2".
- Wybierz urządzenie do sparowania. Komunikat głosowy potwierdzi pomyślne sparowanie.
Funkcjonalność domofonu:
- The X-Com 2 supports intercom communication with up to 8 riders.
- Inicjowanie interkomu: Briefly press the Intercom button (if available, or a specific combination of main buttons) to connect with the last paired intercom.
- Zakończenie interkomu: Ponownie naciśnij krótko przycisk Intercom.
- Refer to the full manual for detailed instructions on multi-rider intercom pairing and group management.
Radio FM:
- Włączanie/wyłączanie radia FM: Double-tap the Power/Function button.
- Stacje skanowania: Press the Volume Up or Volume Down button to scan for the next available station.
- The unit supports 10 preset station memory.
Regulacja głośności:
- Press the Volume Up button to increase audio volume.
- Press the Volume Down button to decrease audio volume.
Konserwacja
- Czyszczenie: Użyj miękkiego, damp cloth to wipe the main module. Do not use harsh chemicals or abrasive cleaners.
- Ładowanie: Charge the device using the provided USB cable. A full charge takes approximately 2.5 hours. Avoid overcharging.
- Składowanie: Store the X-Com 2 in a cool, dry place when not in use. If storing for extended periods, charge the battery every few months to maintain its lifespan.
- Pielęgnacja baterii: The unit uses a Lithium Polymer Battery. Do not expose to extreme temperatures.
Rozwiązywanie problemów
| Problem | Możliwa przyczyna | Rozwiązanie |
|---|---|---|
| Urządzenie nie włącza się. | Bateria jest rozładowana. | Ładuj urządzenie przez co najmniej 30 minut. |
| Nie można sparować z telefonem. | Device not in pairing mode; Bluetooth on phone is off; too many paired devices. | Ensure device is in pairing mode (flashing red/blue). Turn phone's Bluetooth off and on. Delete old Bluetooth connections on phone. |
| Problemy z połączeniem interkomowym. | Poza zasięgiem, zakłócenia, nieprawidłowe parowanie. | Ensure riders are within 1.6 km (1.0 mile) in open terrain. Move away from sources of strong electromagnetic interference. Re-pair intercom units. |
| Słaba jakość dźwięku / szum. | Microphone not positioned correctly; excessive wind noise; Advanced Noise Control not active. | Adjust microphone closer to mouth. Ensure helmet vents are closed if causing excessive wind noise. Verify Advanced Noise Control is enabled (automatic). |
Specyfikacje
- Model: 09SEN99200099999X-COM2
- Wersja Bluetooth: 4.1
- BluetoothProfiles: Profesjonalny zestaw słuchawkowyfile (HSP), Profesjonalny zestaw głośnomówiącyfile (HFP), zaawansowana dystrybucja dźwięku Profile (A2DP), pilot audio-wideo Profile (AVRCP)
- Intercom Working Distance: Up to 1.6 kilometers (1.0 mile) in open terrain
- Max Intercom Riders: Obsługuje do 8 osób
- Redukcja szumów: zaawansowana kontrola hałasu
- Kodek: Wbudowany kodek SBC
- Częstotliwość radiowa FM: 76 ~ 108MHz (10 preset station memory)
- Czas rozmowy: 10 godziny
- Czas ładowania: 2.5 godziny
- Typ baterii: Bateria litowo-polimerowa
- Temperatura pracy: -10°C ~ 55°C (-14°F ~ 131°F)
- Main Module Weight: 100 g (3.53 uncji)
- Wymiary produktu: 8 x 7 x 8 cala
- Waga przedmiotu: 1.01 funta
Gwarancja i wsparcie
For specific warranty information and detailed support, please refer to the official NEXX website or contact NEXX customer service directly. Keep your proof of purchase for warranty claims.
NEXX Official Webstrona: www.nexx-kaski.com (Uwaga: To jest symbol zastępczy URLproszę zweryfikować faktyczną wersję oficjalną website for NEXX products)
Obsługa klienta: Refer to the contact information provided on the NEXX official webmiejscu lub w opakowaniu produktu.


