1. Wprowadzenie i informacje dotyczące bezpieczeństwa
Thank you for choosing the AL-KO Highline 51.9 SP-H Petrol Lawn Mower. This manual provides essential instructions for the safe and efficient operation, maintenance, and troubleshooting of your new lawn mower. Please read this manual thoroughly before initial use and keep it for future reference.
1.1 Ogólne ostrzeżenia dotyczące bezpieczeństwa
- Przeczytaj instrukcję: Przed przystąpieniem do użytkowania maszyny należy zawsze przeczytać i zrozumieć całą instrukcję obsługi.
- Środki ochrony osobistej (PPE): Wear appropriate safety gear, including sturdy footwear, long trousers, and hearing protection.
- Utrzymuj czystość: Ensure that other persons, especially children and pets, are kept at a safe distance from the operating area.
- Obsługa paliwa: Handle fuel with extreme care. Petrol is highly flammable. Refuel outdoors and do not smoke while refueling.
- Działanie na zboczu: Exercise extreme caution when operating on slopes. Mow across the face of slopes, never up and down.
- Kontrola: Before each use, inspect the machine for damaged parts, loose fasteners, or fuel leaks.
2. Koniec produktuview
The AL-KO Highline 51.9 SP-H is a robust petrol lawn mower designed for efficient lawn care. It features a 51 cm cutting width, a powerful 3.2 kW engine, and a self-propelled drive system for effortless operation. Key functionalities include central cutting height adjustment, mulching, and side discharge.
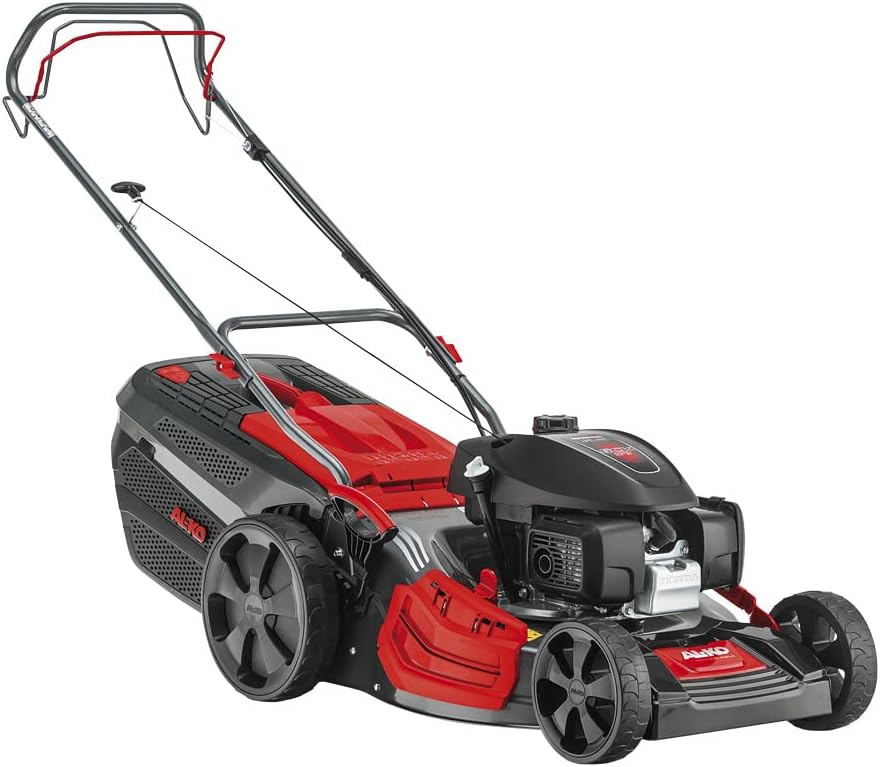
Figure 2.1: AL-KO Highline 51.9 SP-H Petrol Lawn Mower, front-side view.
2.1 Główne cechy
- Szerokość cięcia: 51 cm for efficient coverage of large areas.
- Moc silnika: 3.2 kW for reliable performance.
- Samobieżny: Wheel drive for reduced effort during operation.
- Centralna regulacja wysokości koszenia: Easy adjustment from 30 mm to 80 mm.
- 4INONE Function: Mowing, catching, mulching, and side discharge capabilities.
3. Konfiguracja i wstępne przygotowanie
3.1 Rozpakowanie i montaż
- Ostrożnie wyjąć wszystkie elementy z opakowania.
- Unfold and secure the handle assembly using the provided fasteners. Ensure all cables are routed correctly and not pinched.
- Assemble the grass catcher according to the instructions and attach it to the mower.

Figure 3.1: Mower showing the 4INONE function label, indicating versatility.
3.2 Initial Checks and Fueling
- Olej silnikowy: Before first use, check the engine oil level. If necessary, add suitable 4-stroke engine oil up to the 'MAX' mark on the dipstick. Refer to the engine manual for oil specifications.
- Paliwo: Fill the fuel tank with fresh, unleaded petrol (minimum 95 RON). Do not overfill. Ensure the fuel cap is securely tightened.
- Świeca: Verify that the spark plug cable is securely connected to the spark plug.
4. Instrukcja obsługi
4.1 Uruchamianie i zatrzymywanie silnika
- Startowy: Ensure the spark plug cable is connected. Push the primer bulb (if equipped) 3-5 times. Hold the engine brake lever (safety bar) against the handle. Pull the starter cord firmly until the engine starts.
- Zatrzymanie: Zwolnij dźwignię hamulca silnikowego. Silnik zatrzyma się automatycznie.
4.2 Regulacja wysokości koszenia
The cutting height can be centrally adjusted using a single lever. This mower offers 7 cutting height positions from 30 mm to 80 mm.
- Upewnij się, że silnik jest wyłączony i ostrze przestało się obracać.
- Locate the central cutting height adjustment lever, typically on the side of the mower deck.
- Pociągnij dźwignię na zewnątrz i ustaw ją na żądaną wysokość. Zwolnij dźwignię, aby zablokować ją w tej pozycji.

Rysunek 4.1: Strona view of the mower, illustrating its profile and handle position.
4.3 Techniki koszenia
- Aby uzyskać najlepsze rezultaty, koś trawę, gdy jest sucha.
- Avoid cutting more than one-third of the grass height at a time.
- Aby uzyskać równomierne cięcie, każdą warstwę należy lekko na siebie nakładać.
- Change mowing direction regularly to prevent matting of the grass.
4.4 Funkcja mulczowania
The mulching function finely chops grass clippings and returns them to the lawn as natural fertilizer. To engage mulching:
- Wyjmij pojemnik na trawę.
- Insert the mulching plug into the discharge opening.
- Ensure the mulching plug is securely in place before starting the engine.
4.5 Side Discharge Function
For areas with very tall grass where catching is not desired, the side discharge function can be used.
- Remove the grass catcher and mulching plug.
- Attach the side discharge chute to the side opening of the mower deck.
- Ensure the chute is securely attached before operation.

Figure 4.2: Illustration of MAXAIRFLOW technology, enhancing grass collection and mulching performance.
5. Konserwacja
Regular maintenance ensures the longevity and optimal performance of your AL-KO lawn mower. Always switch off the engine, disconnect the spark plug cap, and allow the engine to cool before performing any maintenance.
5.1 Po każdym użyciu
- Czyszczenie: Clean the mower deck, grass catcher, and wheels of grass clippings and dirt. Use a brush or a damp cloth. Do not use high-pressure cleaners.
- Kontrola: Check for any loose screws, nuts, or damaged parts. Tighten or replace as necessary.
5.2 Pielęgnacja ostrzy
The cutting blade should be inspected regularly for wear, damage, or imbalance. A dull or damaged blade can lead to an uneven cut and increased engine strain.
- Ostrzenie: Have the blade sharpened by a qualified service technician.
- Wymiana: Replace severely damaged or unbalanced blades with genuine AL-KO spare parts.
5.3 Konserwacja silnika
Refer to the separate engine manual for detailed maintenance schedules and procedures for the engine components.
- Filtr powietrza: Regularnie czyść lub wymieniaj filtr powietrza, szczególnie w warunkach dużego zapylenia.
- Świeca: Sprawdzaj i czyść świecę zapłonową co roku. Wymień, jeśli jest zużyta.
- Wymiana oleju: Change the engine oil after the first 5 operating hours, then annually or every 50 operating hours.
5.4 Przechowywanie
- Dokładnie wyczyść kosiarkę.
- Drain the fuel tank or add a fuel stabilizer if storing for more than 30 days.
- Store the mower in a dry, well-ventilated area, protected from frost and direct sunlight.
6. Rozwiązywanie Problemów
This section provides solutions for common issues you might encounter. For problems not listed here or if solutions do not resolve the issue, contact AL-KO customer support or a qualified service center.
| Problem | Możliwa przyczyna | Rozwiązanie |
|---|---|---|
| Silnik nie uruchamia się | No fuel; Spark plug cable loose; Engine brake lever not engaged; Dirty spark plug; Old fuel. | Add fresh fuel; Connect spark plug cable; Hold engine brake lever; Clean/replace spark plug; Drain and refill with fresh fuel. |
| Nierównomierny wynik cięcia | Tępe lub uszkodzone ostrze; Niewłaściwa wysokość koszenia; Zbyt szybkie koszenie. | Sharpen/replace blade; Adjust cutting height; Mow at a slower pace. |
| Nadmierne wibracje | Bent or unbalanced blade; Loose engine mounting bolts. | Inspect and replace blade if bent/unbalanced; Check and tighten all bolts. |
| Silnik traci moc | Dirty air filter; Clogged fuel filter; Low oil level. | Clean/replace air filter; Clean/replace fuel filter; Check and top up oil. |
7. Specyfikacje techniczne
| Funkcja | Specyfikacja |
|---|---|
| Model | Highline 51.9 SP-H |
| Numer części | 119884 |
| Moc silnika | 3.2 kW |
| Szerokość cięcia | 51 cm |
| Regulacja wysokości koszenia | Centralny, 7 pozycji |
| Minimalna wysokość cięcia | 30 mm |
| Maksymalna wysokość cięcia | 80 mm |
| Waga | 36.3 kilogramów |
| Poziom mocy dźwięku | 98dB |
| Tworzywo | Stal stopowa, tworzywo sztuczne |
| Typ napędu | Self-propelled (wheel drive) |
| Funkcje | Mowing, Catching, Mulching, Side Discharge |
8. Gwarancja i wsparcie
Your AL-KO Highline 51.9 SP-H Petrol Lawn Mower is covered by a manufacturer's warranty. Please refer to the warranty card included with your product for specific terms, conditions, and duration. Keep your proof of purchase for warranty claims.
8.1 Obsługa klienta
For technical assistance, spare parts, or service, please contact your authorized AL-KO dealer or visit the official AL-KO website for contact information in your region. When contacting support, please have your model number (119884) and serial number ready.


