Wstęp
The Perel EDIN305N is a 230V 16A 3600W DIN-rail mount digital weekly timer designed for indoor use. This device allows for precise, programmable control of electrical circuits, enabling automatic switching ON and OFF of connected appliances or lighting systems over a weekly cycle. It features a clear digital display and multiple programming options to suit various scheduling needs.
Środki ostrożności
OSTRZEŻENIE: Electrical installation should only be performed by a qualified electrician. Incorrect wiring can lead to electric shock, fire, or damage to the device and connected equipment. Always disconnect power at the main circuit breaker before installation or maintenance.
- Ensure the power supply matches the device's specifications (230V~50Hz).
- Nie należy przekraczać maksymalnego obciążenia 16A / 3600W.
- This device is designed for indoor use only. Avoid exposure to moisture, dust, or extreme temperatures.
- Nie próbuj samodzielnie otwierać ani naprawiać urządzenia. Wszelkie prace serwisowe zleć wykwalifikowanemu personelowi.
- Przechowywać w miejscu niedostępnym dla dzieci.
Produkt ponadview
The Perel EDIN305N digital timer consists of a main body with a digital display, control buttons, and terminal blocks for electrical connections. A transparent cover protects the display and buttons.
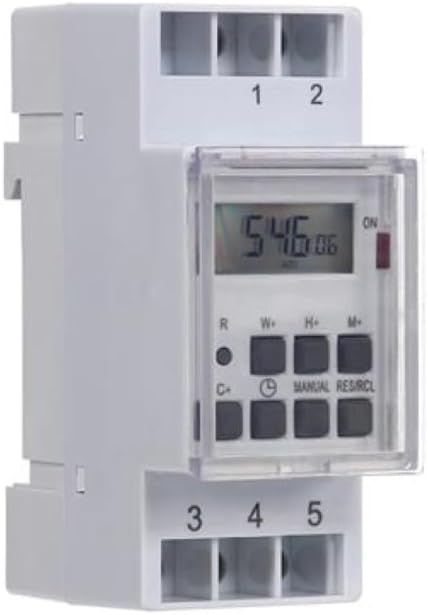
Rysunek 1: Przód view of the Perel EDIN305N Digital Weekly Timer. The image displays the LCD screen, control buttons (R, W+, H+, M+, C+, Clock, Manual, RES/RCL), and numbered terminal blocks (1, 2 at the top, 3, 4, 5 at the bottom).
Przyciski sterujące:
- R: Reset button (recessed).
- W+: Weekday setting.
- H+: Ustawianie godziny.
- M+: Minute setting.
- C+: Clear program.
- Ikona zegara: Used to set current time and day, and to exit programming mode.
- PODRĘCZNIK: Manual override for ON/AUTO/OFF modes.
- RES/RCL: Reset/Recall program.
Bloki zaciskowe:
- 1, 2: Power supply input (N, L).
- 3, 4, 5: Output terminals for controlled circuit (Common, Normally Open, Normally Closed).
Dane techniczne
| Parametr | Wartość |
|---|---|
| Numer modelu | EDIN305N |
| Tomtage | 230 V~50 Hz |
| Maksymalny prąd | 16A |
| Maksymalna moc | 3600 W |
| Liczba ustawień | 7 (ON/OFF programs) |
| Typ montażu | Szyna DIN |
| Wymiary (dł. x szer. x wys.) | 2.36 x 3.54 x 1.57 cala (60 x 90 x 40 mm) |
| Waga | 0.12 kg (4.2 uncji) |
| Tworzywo | Plastikowy |
| Kolor | Biały |
| Wymagane baterie | No (internal battery for memory backup) |
Instalacja
1. Montaż
The Perel EDIN305N is designed for DIN-rail mounting. Securely attach the timer to a standard 35mm DIN-rail within an electrical enclosure. Ensure sufficient space for wiring and ventilation.
2. Okablowanie
WAŻNY: Ensure power is disconnected at the main circuit breaker before proceeding with wiring. Follow local electrical codes and regulations.
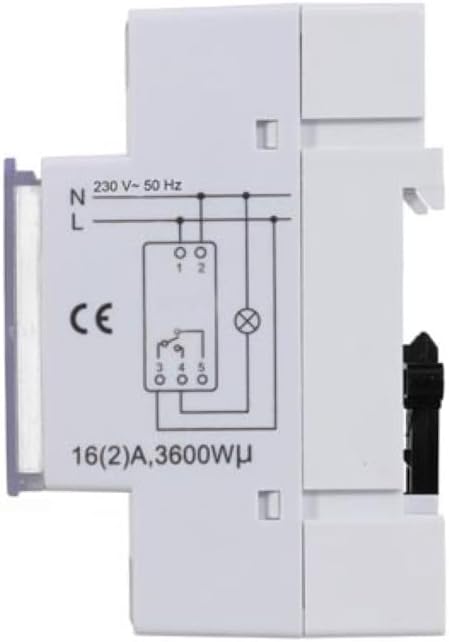
Rysunek 2: Strona view of the Perel EDIN305N Digital Weekly Timer showing the electrical wiring diagram. It illustrates connections for Neutral (N), Live (L), and the output contacts (1, 2, 3, 4, 5) for controlling a load.
Refer to the wiring diagram (Figure 2) and the terminal block labels on the device:
- Connect the Neutral (N) wire of your 230V AC supply to terminal 1.
- Connect the Live (L) wire of your 230V AC supply to terminal 2.
- For the controlled circuit:
- Terminal 3: Common contact for the relay output.
- Terminal 4: Normally Open (NO) contact. The circuit connected here will be ON when the timer is active.
- Terminal 5: Normally Closed (NC) contact. The circuit connected here will be OFF when the timer is active.
- Connect the load (e.g., light, appliance) between the Live (L) supply and either terminal 4 (for NO operation) or terminal 5 (for NC operation), with terminal 3 connected to the Live (L) supply. Alternatively, connect the load between terminal 4 or 5 and the Neutral (N) supply, with terminal 3 connected to the Live (L) supply. Consult a qualified electrician for specific load wiring configurations.
Początkowa konfiguracja i obsługa
1. Włączanie i resetowanie
After wiring and restoring power, the display will illuminate. If the display is blank or shows erratic characters, press the recessed R (Reset) button using a pointed non-metallic object (e.g., a pen tip). This will clear all settings and restore default values.
2. Ustawianie aktualnego czasu i dnia
- Naciśnij i przytrzymaj Ikona zegara przycisk.
- Podczas trzymania Ikona zegara naciśnij przycisk W+ to set the current day of the week (1=Monday, 7=Sunday).
- Podczas trzymania Ikona zegara naciśnij przycisk H+ aby ustawić aktualną godzinę (0-23).
- Podczas trzymania Ikona zegara naciśnij przycisk M+ aby ustawić aktualną minutę (0-59).
- Uwolnij Ikona zegara przycisk. Czas i dzień są teraz ustawione.
3. Programowanie cykli włączania/wyłączania
Timer obsługuje do 7 programów WŁ./WYŁ. Każdy program składa się z czasu WŁ. i czasu WYŁ.
- Naciśnij Ikona zegara button once to enter programming mode. The display will show "1 ON".
- Naciskać W+ to select the day(s) for this program. You can choose a single day, a block of days (e.g., Mon-Fri), or all days.
- Naciskać H+ to set the ON hour for program 1.
- Naciskać M+ to set the ON minute for program 1.
- Naciśnij Ikona zegara Naciśnij przycisk ponownie. Na wyświetlaczu pojawi się komunikat „1 OFF”.
- Repeat steps 2-4 to set the OFF day(s), hour, and minute for program 1.
- To set additional programs (2-7), press the Ikona zegara button to cycle through "2 ON", "2 OFF", etc., and repeat the setting process.
- Po ustawieniu wszystkich żądanych programów naciśnij przycisk PODRĘCZNIK Naciśnij przycisk, aby wyjść z trybu programowania i powrócić do wyświetlania bieżącego czasu.
4. Sterowanie ręczne
Naciśnij PODRĘCZNIK Naciskaj przycisk wielokrotnie, aby przełączać się między trybami pracy:
- NA: Wyjście jest cały czas włączone, nadpisując wszystkie programy.
- AUTOMATYCZNY: Timer działa zgodnie z zaprogramowanymi cyklami WŁ./WYŁ.
- OFF: Wyjście jest cały czas WYŁĄCZONE, nadpisując wszystkie programy.
Upewnij się, że timer jest ustawiony na AUTOMATYCZNY do zaprogramowanego działania.
5. Clearing Programs
To clear a specific program:
- Enter programming mode by pressing the Ikona zegara button until the desired program number (e.g., "3 ON") is displayed.
- Naciśnij C+ button. This will clear both the ON and OFF times for that specific program.
- Repeat for other programs as needed.
- Naciskać PODRĘCZNIK aby wyjść z trybu programowania.
To clear all programs and reset the device, use the recessed R Przycisk (Reset).
Konserwacja
- Czyść urządzenie miękką, suchą ściereczką. Nie używaj środków czyszczących o właściwościach ściernych ani rozpuszczalników.
- Ensure the transparent cover is closed to protect the display and buttons from dust and splashes.
- Regularly check electrical connections for tightness, especially in high-vibration environments.
Rozwiązywanie problemów
| Problem | Możliwa przyczyna | Rozwiązanie |
|---|---|---|
| Wyświetlacz jest pusty. | Brak zasilania; wewnętrzny akumulator rozładowany. | Check power connections (terminals 1 & 2). Ensure main power is ON. If power is present, press the R (Reset) button. The internal battery recharges when connected to power. |
| Timer nie włącza się/wyłącza zgodnie z zaprogramowaniem. | Incorrect program settings; timer in manual ON/OFF mode. | Verify program settings (time, day, ON/OFF). Ensure the timer is in AUTOMATYCZNY tryb, naciskając PODRĘCZNIK przycisk. |
| Connected appliance not receiving power. | Incorrect wiring; appliance fault; timer fault. | Check wiring according to Figure 2. Test the appliance directly. If wiring and appliance are fine, the timer may be faulty. |
| Buttons unresponsive or display erratic. | Software glitch; low internal battery. | Naciśnij wgłębienie R (Reset) button. Ensure the timer has been connected to power for at least 24 hours to fully charge the internal battery. |
Sprzedaż
Do not dispose of this product with general household waste. This electronic device contains materials that can be recycled. Please dispose of it at a designated collection point for electrical and electronic equipment waste, in accordance with local regulations.
Gwarancja i wsparcie
Perel products are manufactured to high quality standards. For warranty information, technical support, or service inquiries, please refer to the documentation provided with your purchase or contact your local Perel distributor or retailer. Please have your model number (EDIN305N) and purchase details ready when contacting support.


