1. Wprowadzenie
Thank you for choosing the hygger Ultra Quiet Submersible Mini Water Pump, Model HG-939. This manual provides essential information for the safe and efficient operation, installation, and maintenance of your new water pump. Please read these instructions thoroughly before use and retain them for future reference.
2. Koniec produktuview
The hygger HG-939 is a compact and versatile submersible water pump designed for various water features. Its ultra-quiet operation and adjustable flow rate make it suitable for small to medium-sized aquariums, fish tanks, pet water fountains, terrarium waterfalls, tabletop fountains, and hydroponic systems. The pump is engineered for durability and ease of maintenance.

Figure 1: The hygger Mini Water Pump, demonstrating its compact size when held in a hand.

Rysunek 2: Examples of the pump's versatile applications in different water environments.
3. Specyfikacje
| Atrybut | Wartość |
|---|---|
| Numer modelu | HG-939 |
| Wymiary (dł. x szer. x wys.) | 2.4" x 1.7" x 2" (6.1 cm x 4.3 cm x 5.1 cm) |
| Źródło zasilania | Elektryczny przewodowy |
| Tomtage | Prąd zmienny 110-120 V/60 Hz |
| Cotage | 3 watów |
| Maksymalna szybkość przepływu | 53 GPH (200 L/H) |
| Maksymalna wysokość podnoszenia | 1.7 stopy (50 cm) |
| Długość przewodu zasilającego | 6 stóp (1.8 metry) |
| Tworzywo | Plastikowy |
| Kolor | Czarny |
| Zakres temperatury wody | Not over 95℉ (35℃) |
4. Zawartość opakowania
- 1 x hygger Mini Water Pump (Model HG-939)
- 1 x 5/16 inch (8mm) Nozzle
- 1 x 1/2 inch (13mm) Nozzle
Note: Tubing is not included and must be purchased separately.

Rysunek 3: Wszystkie elementy zawarte w opakowaniu produktu.
5. Instrukcje konfiguracji
- Wybierz dyszę: Select either the 5/16 inch or 1/2 inch nozzle based on your desired water flow and tubing size. Attach the chosen nozzle firmly to the pump's outlet.
- Attach Tubing (Optional): If required for your application (e.g., fountain, hydroponics), connect appropriate tubing to the attached nozzle. Ensure a secure fit to prevent leaks.
- Umieszczenie: Position the pump in your water feature. The pump is designed to be fully submersible. Ensure the water inlet is completely submerged in water at all times during operation. The three suction cups on the bottom allow for secure horizontal or vertical placement against a smooth surface.
- Podłączenie zasilania: Route the 6ft waterproof power cord safely to a suitable electrical outlet (AC 110-120V/60Hz). Ensure your hands are dry before plugging in the pump.
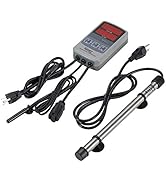
Figure 4: Proper pump placement for full submersion, horizontally or vertically.
6. Instrukcja obsługi
- Włączanie: Once the pump is correctly installed and fully submerged, plug it into the electrical outlet. The pump will begin operating immediately.
- Dostosuj natężenie przepływu: The pump features an adjustable flow rate knob located on the front. Rotate the knob from 0 to 180 degrees to increase or decrease the water flow to your desired level.
- Monitoruj poziom wody: Regularly check the water level in your feature to ensure the pump remains fully submerged. Continuous operation without sufficient water can damage the pump.

Figure 5: The adjustable flow rate knob allows customization of water output.
7. Konserwacja
Regular cleaning is crucial for maintaining the pump's efficiency and extending its lifespan. The pump is designed for easy disassembly without tools.
- Odłącz zasilanie: Przed przystąpieniem do prac konserwacyjnych należy zawsze odłączyć pompę od gniazdka elektrycznego.
- Demontować: Gently pull apart the pump's six main components. Refer to Figure 6 for a visual guide.
- Czyste komponenty: Rinse all parts under clean water. Use a soft brush or cloth to remove any accumulated debris, algae, or mineral deposits from the impeller, housing, and nozzles. Pay special attention to the water inlet area.
- Ponowny montaż: Once all parts are clean, reassemble the pump by hand. Ensure all components fit snugly.
- Temperatura wody: Ensure the water temperature does not exceed 95℉ (35℃) to prevent damage to the pump.

Figure 6: Easy disassembly of the pump for thorough cleaning.
8. Rozwiązywanie Problemów
If your pump is not operating as expected, please check the following:
- Brak zasilania: Ensure the pump is securely plugged into a functional electrical outlet. Check if the outlet has power.
- Low Flow/No Flow:
- Verify the water level is sufficient and the pump's inlet is fully submerged.
- Check for blockages in the impeller, nozzles, or tubing. Clean as per the Maintenance section.
- Ensure the flow adjustment knob is not set to minimum.
- Nadmierny hałas:
- Upewnij się, że pompa jest całkowicie zanurzona i nie zasysa powietrza.
- Check for debris around the impeller that might be causing vibration.
- Ensure the pump is securely attached with suction cups and not vibrating against the tank/feature wall.
9. Gwarancja i wsparcie
The hygger Mini Water Pump Model HG-939 comes with a ONE YEAR free warranty from the date of purchase. If you encounter any issues or have questions regarding your product, please do not hesitate to contact hygger customer support. We are available to assist you anytime.
Aby uzyskać pomoc, odwiedź stronę Sklep hygger na Amazonie lub zapoznaj się z danymi kontaktowymi dołączonymi do zakupionego produktu.


