Produkt ponadview
The PPLEE Emergency Weather Radio is a versatile and essential device designed for emergency preparedness and outdoor activities. It integrates multiple functions including AM/FM/SW/NOAA weather radio reception, a powerful flashlight, a reading lamp, an SOS alarm, and a power bank for charging mobile devices. With five different power sources, this radio ensures reliable operation even during prolonged power outagt.j.

Figure 1: The PPLEE Emergency Weather Radio, showcasing its compact design and smartphone charging capability.
Informacje dotyczące bezpieczeństwa
Ostrzeżenie:
- Do not listen to the radio while charging to prevent crackly radio static.
- Avoid prolonged exposure to water. The device is IPX6 water-resistant but not designed for submersion.
Pierwsze kroki
Zawartość opakowania
Sprawdź, czy w opakowaniu znajdują się wszystkie elementy:
- 1x PPLEE Emergency Weather Radio with 5000mAh Built-in Rechargeable Battery
- 1x Portable Handy Braid Belt
- 1x Carabiner & Compass
- Kabel ładowania USB 1x
- 1x Instrukcja obsługi (ten dokument)
Początkowe ładowanie
Before first use, it is recommended to fully charge the radio's internal 5000mAh battery using the USB charging method.
- Connect the provided USB charging cable to the radio's DC IN 5V port.
- Podłącz drugi koniec kabla USB do standardowego zasilacza USB (nie ma go w zestawie) lub do portu USB komputera.
- The charging indicator light will illuminate. The radio is fully charged when the indicator light changes or turns off (refer to the radio's specific charging indicator behavior).
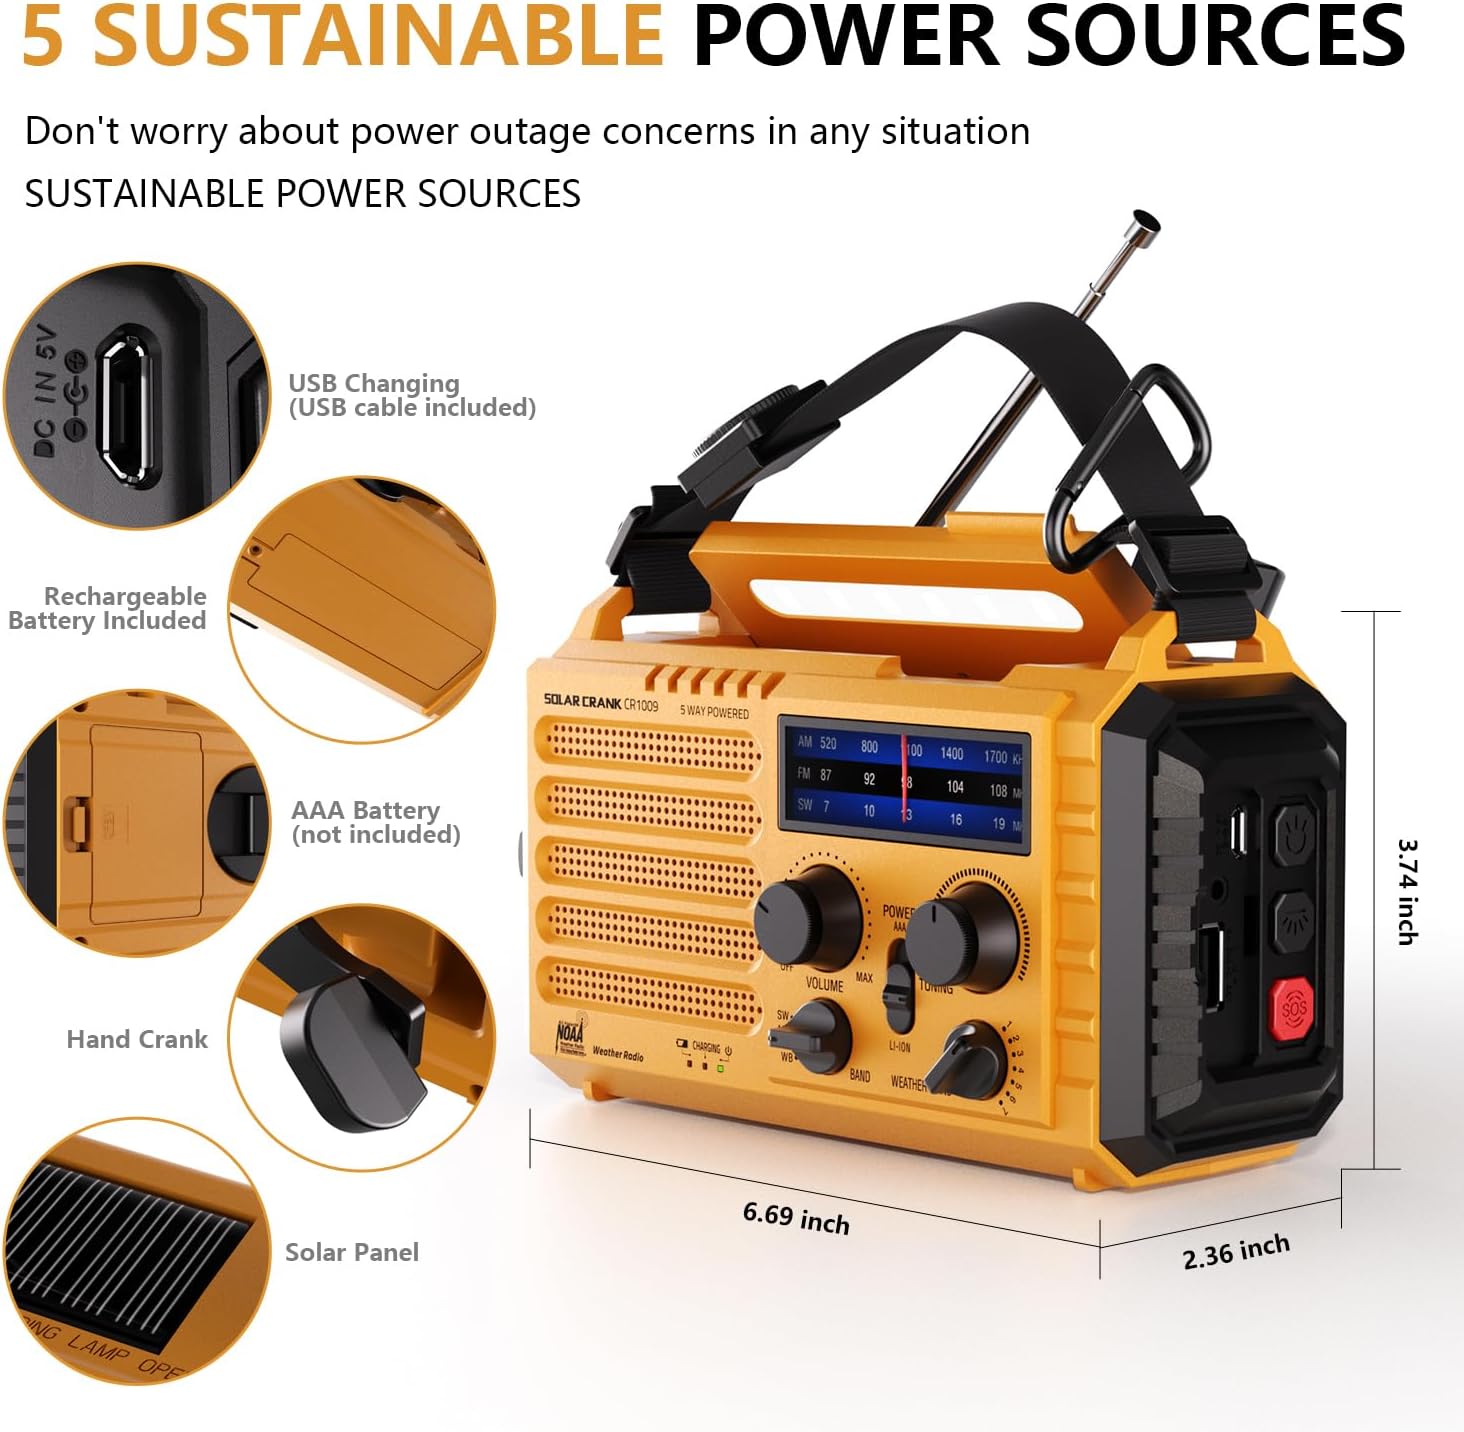
Figure 2: Illustration of the five sustainable power sources for the radio.
Instrukcja obsługi
Zasilanie radia
The radio offers five methods for power:
- Wbudowana bateria 5000mAh z możliwością ładowania: The primary power source.
- USB Input (5V): For charging the internal battery via a USB cable.
- Korba ręczna: Rotate the hand crank clockwise or counter-clockwise at a steady pace (approx. 130-150 RPM) to generate power. One minute of cranking can provide several minutes of radio use or flashlight operation.
- Panel słoneczny: Place the radio in direct sunlight to charge the internal battery. This method is primarily for maintaining charge or slow charging.
- 3x AAA Batteries (Not Included): Insert three AAA batteries into the designated compartment for an alternative power source.
Radio Functions (AM/FM/SW/NOAA)
Aby obsługiwać radio:
- Włącz MOC/GŁOŚNOŚĆ knob clockwise to turn on the radio and adjust the volume.
- Select the desired band (AM, FM, SW, or WB for NOAA Weather Band) using the ZESPÓŁ przełącznik wyboru.
- Rozłóż antenę teleskopową, aby uzyskać optymalny odbiór, szczególnie w pasmach FM i SW.
- Obróć STROJENIE knob to find your desired station. The frequency display will show the current tuning.
- For NOAA Weather Band (WB), select one of the 7 available channels to find your local weather station.

Figure 3: Frequency ranges for AM, FM, SW, and NOAA Weather Band.

Figure 4: The radio provides clear AM/FM reception for entertainment and information.
Gniazdo słuchawkowe
A 3.5mm headphone jack is provided for private listening. Insert standard headphones (not included) into the jack located on the side of the radio.

Figure 5: The 3.5mm headphone jack allows for personal listening without disturbing others.
Latarka i czytanie Lamp
- Flesz: Press the dedicated flashlight button on the side of the radio to turn on the 3W LED flashlight. Press again to cycle through brightness levels or turn off.
- Czytanie Lamp: Flip up the solar panel on top of the radio to reveal the 2.5W LED reading lamp. Zapewnia światło otoczenia do czytania lub ogólnego oświetlenia.

Figure 6: The radio features a powerful flashlight and a convenient reading lamp.
Funkcja alarmu SOS
W nagłych wypadkach należy aktywować alarm SOS:
- Naciśnij SOS button (usually red) on the side of the radio.
- The radio will emit a loud siren sound (116dB) and a flashing red light to attract attention.
- Press the SOS button again to deactivate the alarm.

Figure 7: The SOS alarm provides a loud siren and flashing light for emergency signaling.
Power Bank Function (Charging External Devices)
The built-in 5000mAh battery can be used to charge external USB-powered devices:
- Connect your smartphone or other small electronic device to the radio's USB OUT port using your device's charging cable.
- The radio will begin charging your device.
- This feature is particularly useful during power outages to keep essential communication devices operational.

Figure 8: The radio functions as a power bank to charge mobile phones and other small electronics.
Pielęgnacja i konserwacja
- Czyszczenie: Wytrzyj radio miękką ściereczką.amp płótno. Nie używaj ostrych środków chemicznych ani ściernych środków czyszczących.
- Składowanie: Store the radio in a cool, dry place away from direct sunlight and extreme temperatures. If storing for an extended period, ensure the internal battery is charged to about 50-70% to prolong its lifespan.
- Pielęgnacja baterii: Regularly charge the internal battery, even if not in use, to prevent deep discharge.
- Wodoodporność: While the radio is IPX6 water-resistant, it is not waterproof. Do not submerge it in water. Protect it from heavy rain or prolonged exposure to moisture.
Rozwiązywanie problemów
| Problem | Możliwa przyczyna | Rozwiązanie |
|---|---|---|
| Radio się nie włącza. | Battery is depleted; Power knob is off. | Charge the internal battery via USB, hand crank, or solar. Ensure the POWER/VOLUME knob is turned on. Check if AAA batteries are inserted correctly and have charge. |
| Słaby odbiór radia. | Antena nie jest wysunięta; Słaby sygnał; Zakłócenia. | Fully extend the telescopic antenna. Try repositioning the radio. Tune slowly to find the clearest signal. |
| Latarka/Czytanie lamp nie działa. | Battery is depleted; Lamp/flashlight button not pressed correctly. | Charge the internal battery. Ensure the respective button is pressed firmly. |
| Nie można ładować urządzeń zewnętrznych. | Radio battery is too low; Incorrect cable; Device not compatible. | Ensure the radio's internal battery has sufficient charge. Use the correct USB cable for your device. The radio is designed for small electronic devices. |
| Alarm SOS nie aktywuje się. | SOS button not pressed correctly. | Press the SOS button firmly. |
Specyfikacje
| Funkcja | Szczegół |
|---|---|
| Numer modelu | PPLEE-1009-Y |
| Wymiary produktu | 6.69 x 3.74 x 2.36 cala (17 x 9.5 x 6 cm) |
| Waga przedmiotu | 1 funta (0.45 kg) |
| Battery Type (Internal) | Akumulator litowo-jonowy 5000 mAh |
| Obsługa zewnętrznej baterii | 3 baterie AAA (brak w zestawie) |
| Źródła zasilania | Hand Crank, Solar Panel, USB Input (5V), Internal Rechargeable Battery, AAA Batteries |
| Pasma radiowe | AM, FM, fala krótka (SW), pasmo pogodowe NOAA (WB) |
| Moc latarki | Dioda LED 3W |
| Czytanie Lamp Moc | Dioda LED 2.5W |
| SOS Alarm Decibel | 116dB |
| Łączność | USB (for charging in/out), 3.5mm Headphone Jack |
| Odporność na wodę | IPX6 (odporność na zachlapanie) |
Gwarancja i wsparcie
For product support, technical assistance, or warranty inquiries, please contact the manufacturer:
Producent: PPLEE E-COMMERCE CO.,LTD
Please refer to the contact information provided with your purchase or visit the official PPLEE webna tej stronie znajdziesz najnowsze informacje dotyczące pomocy technicznej.


