1. Wprowadzenie
This manual provides comprehensive instructions for the setup, operation, and maintenance of your Drawmer CMC2 Compact Monitor Controller. Please read this manual thoroughly before using the device to ensure proper functionality and to maximize its performance.
2. Informacje dotyczące bezpieczeństwa
- Zasilanie: Use only the factory-supplied 15V DC power supply. Using an incorrect power supply may damage the unit and void the warranty.
- Wentylacja: Zapewnij odpowiednią wentylację wokół urządzenia. Nie blokuj otworów wentylacyjnych.
- Wilgoć: Nie wystawiaj urządzenia na działanie deszczu, wilgoci ani nadmiernej wilgotności.
- Czyszczenie: Przed czyszczeniem odłącz zasilanie. Użyj suchej, miękkiej ściereczki. Nie używaj płynów ani aerozoli czyszczących.
- Serwisowanie: Wszelkie prace serwisowe należy zlecać wykwalifikowanemu personelowi. Nie należy podejmować prób samodzielnego otwierania ani naprawy urządzenia.
3. Zawartość opakowania
Sprawdź, czy w przesyłce znajdują się następujące elementy:
- Drawmer CMC2 Compact Monitor Controller
- 15V DC Power Supply Unit
- Instrukcja obsługi (ten dokument)
4. Koniec produktuview
4.1 Elementy sterujące na panelu przednim
The front panel provides all primary controls for audio monitoring and source selection.

Rycina 4.1: Przód view of the Drawmer CMC2 Compact Monitor Controller, showing all knobs and buttons for input selection, speaker selection, master volume, headphone control, and mix check functions.
- AUX INPUT Knob: Adjusts the level of the auxiliary input.
- SOURCE SELECT Buttons (I/P1, I/P2, AUX): Wybiera aktywne źródło sygnału wejściowego audio.
- SPEAKER SELECT Buttons (A, B, SUB): Activates the selected speaker outputs.
- Pokrętło MASTER VOLUME: Controls the overall output level to the selected speakers.
- Przycisk wyciszenia: Mutes all speaker outputs.
- HEADPHONE Knob: Reguluje głośność wyjścia słuchawkowego.
- MIX CHECK Buttons (ØREV, MONO, DIM): Provides phase reverse, mono sum, and dim functions for mix analysis.
- AUX INPUT (3.5mm Jack): Front panel auxiliary input for portable devices.
- HEADPHONE Output (6.35mm Jack): Front panel headphone output.
4.2 Połączenia panelu tylnego
The rear panel houses all audio input and output connectors, along with the power input.

Rysunek 4.2: Tył view of the Drawmer CMC2 Compact Monitor Controller, displaying the DC power input, speaker outputs (Mono/Sub, R-B-L, R-A-L), and inputs (R-2-L, R-1-L).
- DC=15V Input: Podłącz tutaj dołączony zasilacz 15 V DC.
- Przycisk zasilania: Toggles the unit's power on/off.
- SPEAKER OUTPUTS (MONO/SUB, R-B-L, R-A-L): Balanced XLR outputs for connecting up to two pairs of stereo monitors (A and B) and a mono subwoofer.
- INPUTS (R-2-L, R-1-L): Balanced XLR inputs for two stereo audio sources.
5. Konfiguracja
Follow these steps to set up your CMC2 controller:
- Podłączenie zasilania: Connect the supplied 15V DC power adapter to the 'DC=15V' input on the rear panel. Plug the adapter into a suitable power outlet. Do not power on the unit yet.
- Połączenia wejściowe:
- Connect your primary audio source (e.g., audio interface, mixer) to the 'INPUTS R-1-L' using balanced XLR cables.
- Connect a secondary audio source to the 'INPUTS R-2-L' using balanced XLR cables.
- For portable devices, connect to the front panel 'AUX INPUT' (3.5mm jack) or the rear panel RCA auxiliary inputs (if available on your model, refer to specific product documentation).
- Połączenia głośnikowe:
- Connect your main studio monitors to the 'SPEAKER OUTPUTS R-A-L' using balanced XLR cables.
- If using a second pair of monitors, connect them to 'SPEAKER OUTPUTS R-B-L'.
- If using a subwoofer, connect it to the 'SPEAKER OUTPUTS MONO/SUB'.
- Podłączenie słuchawek: If desired, connect your headphones to the front panel 'HEADPHONE' 6.35mm jack.
- Włączanie: Once all connections are secure, press the power switch on the rear panel to turn on the CMC2.
6. Instrukcja obsługi
This section details the functions of the CMC2's controls.
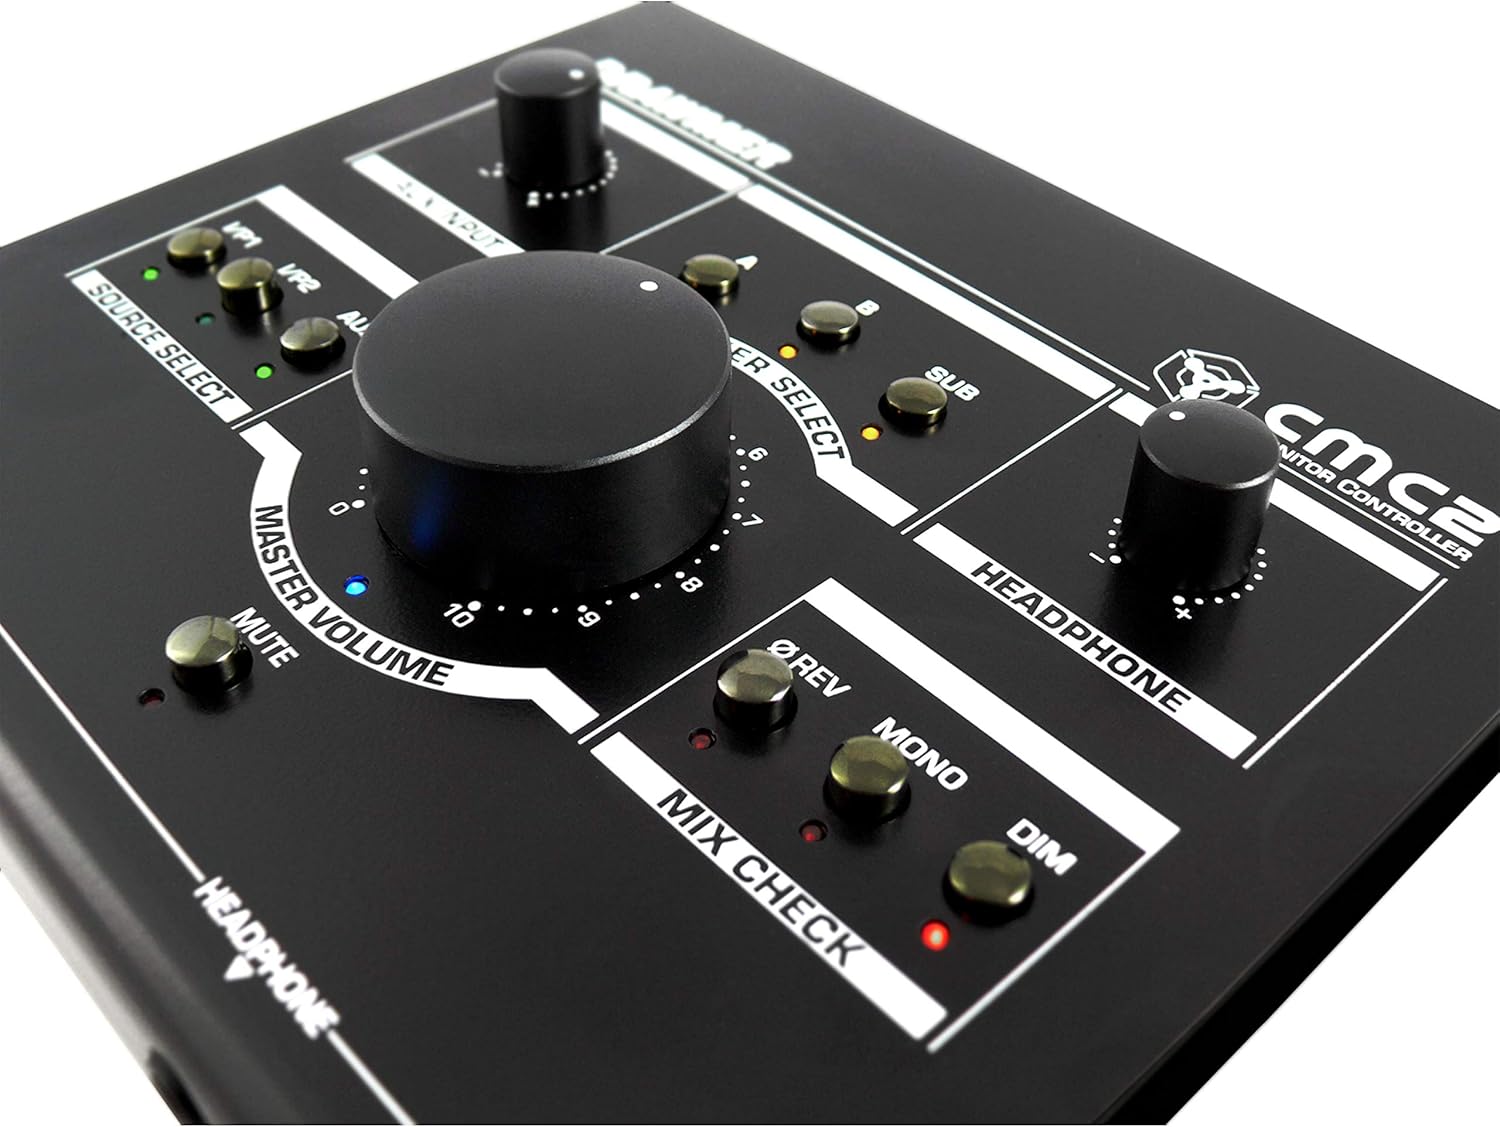
Rysunek 6.1: Zbliżenie view of the Drawmer CMC2 front panel, highlighting the master volume, source select, speaker select, headphone, and mix check controls.
6.1 Wybór źródła
- Naciśnij I/P1 button to select the audio source connected to Input 1.
- Naciśnij I/P2 button to select the audio source connected to Input 2.
- Naciśnij AUX button to select the auxiliary input (front panel 3.5mm jack).
- Only one source can be active at a time. The LED next to the selected button will illuminate.
6.2 Wybór głośników
- Naciśnij A button to route the selected source to Speaker Output A.
- Naciśnij B button to route the selected source to Speaker Output B.
- Naciśnij ZASTĄPIĆ button to route the selected source to the Subwoofer Output.
- Multiple speaker outputs can be active simultaneously (e.g., A and SUB). The LEDs indicate active outputs.
6.3 Regulacja głośności
- Obróć duży GŁOŚNOŚĆ knob clockwise to increase the output level to the selected speakers, and counter-clockwise to decrease it.
- Obróć SŁUCHAWKI knob to adjust the listening level for connected headphones.
- Obróć WEJŚCIE AUX knob to adjust the input level of the auxiliary source.
6.4 Mix Check Functions
- Naciśnij ØREV button to reverse the phase of the right channel, useful for checking phase compatibility.
- Naciśnij MONONUKLEOZA button to sum the stereo signal to mono, allowing you to check for mono compatibility issues in your mix.
- Naciśnij CIEMNY button to temporarily reduce the output volume by a fixed amount, useful for quick listening level changes without losing your main volume setting.
6.5 Funkcja wyciszenia
- Naciśnij NIEMY button to instantly silence all active speaker outputs. The LED will illuminate when mute is active. Press again to unmute.
7. Konserwacja
The Drawmer CMC2 is designed for reliable operation with minimal maintenance.
- Czyszczenie: Utrzymuj urządzenie w czystości, przecierając je suchą, miękką i niepozostawiającą włókien ściereczką. Unikaj stosowania środków czyszczących o działaniu ściernym i rozpuszczalników.
- Środowisko: Operate the unit in a clean, dry environment, away from direct sunlight, heat sources, and excessive dust.
- Wentylacja: Aby zapobiec przegrzaniu, należy upewnić się, że otwory wentylacyjne nie są zasłonięte.
8. Rozwiązywanie Problemów
If you encounter issues with your CMC2, refer to the following common problems and solutions:
- Brak zasilania:
- Ensure the 15V DC power adapter is securely connected to the unit and a working power outlet.
- Check that the rear panel power switch is in the 'ON' position.
- Brak wyjścia audio:
- Verify that the correct input source (I/P1, I/P2, or AUX) is selected and its LED is illuminated.
- Ensure that at least one speaker output (A, B, or SUB) is selected and its LED is illuminated.
- Check that the MASTER VOLUME knob is turned up and the MUTE button is not active (LED off).
- Confirm all audio cables are securely connected to both the CMC2 and your speakers/audio sources.
- Przetestuj różne kable i źródła dźwięku, aby wyizolować problem.
- Zniekształcony dźwięk:
- Zmniejsz poziom wejściowy źródła dźwięku.
- Lower the MASTER VOLUME on the CMC2.
- Sprawdź, czy kable audio nie są uszkodzone.
- Headphone Output Not Working:
- Ensure headphones are fully plugged into the front panel jack.
- Adjust the HEADPHONE volume knob.
- Test with a different pair of headphones.
If the problem persists, contact Drawmer customer support or your authorized dealer for assistance.
9. Specyfikacje
| Nazwa modelu | CMC2 |
| Marka | Rysownik |
| Zalecane zastosowania | Monitorowanie dźwięku |
| Technologia łączności | XLR, RCA (Auxiliary) |
| Tryb wyjścia audio | Stereofoniczny |
| Typ głośnika | Monitor |
| Wymiary produktu | 13 x 9 x 3 cala (33 x 22.86 x 7.62 cm) |
| Waga przedmiotu | 3 funtów (1.36 kg) |
| Producent | Rysownik |
10. Gwarancja i wsparcie
The Drawmer CMC2 Compact Monitor Controller is covered by a manufacturer's warranty. Please refer to the warranty card included with your product or visit the official Drawmer webSzczegółowe warunki gwarancji można znaleźć na naszej stronie.
For technical support, service, or further inquiries, please contact your authorized Drawmer dealer or the Drawmer customer support team through their official channels.


