1. Wprowadzenie
The LAUNCH CR319 is a handheld On-Board Diagnostics II (OBD2) code reader designed to assist in diagnosing vehicle engine issues. It provides access to various diagnostic functions to help users identify and clear trouble codes, monitor vehicle performance data, and check emission readiness status. This manual provides detailed instructions for the proper use and maintenance of your CR319 device.
2. Koniec produktuview
2.1 Główne cechy
- Pełne funkcje OBD2: Obsługuje wszystkie 10 trybów testowych OBD2.
- Biblioteka wyszukiwania DTC: Built-in database with over 3000 code definitions.
- Wsparcie wielojęzyczne: Dostępne w języku angielskim, portugalskim, rosyjskim, włoskim, hiszpańskim, francuskim i niemieckim.
- Podłącz i graj: No batteries or charger required; powered directly from the vehicle's OBD2 port.
- Kompaktowa konstrukcja: Łatwy w obsłudze i przechowywaniu.
2.2 Komponenty urządzenia
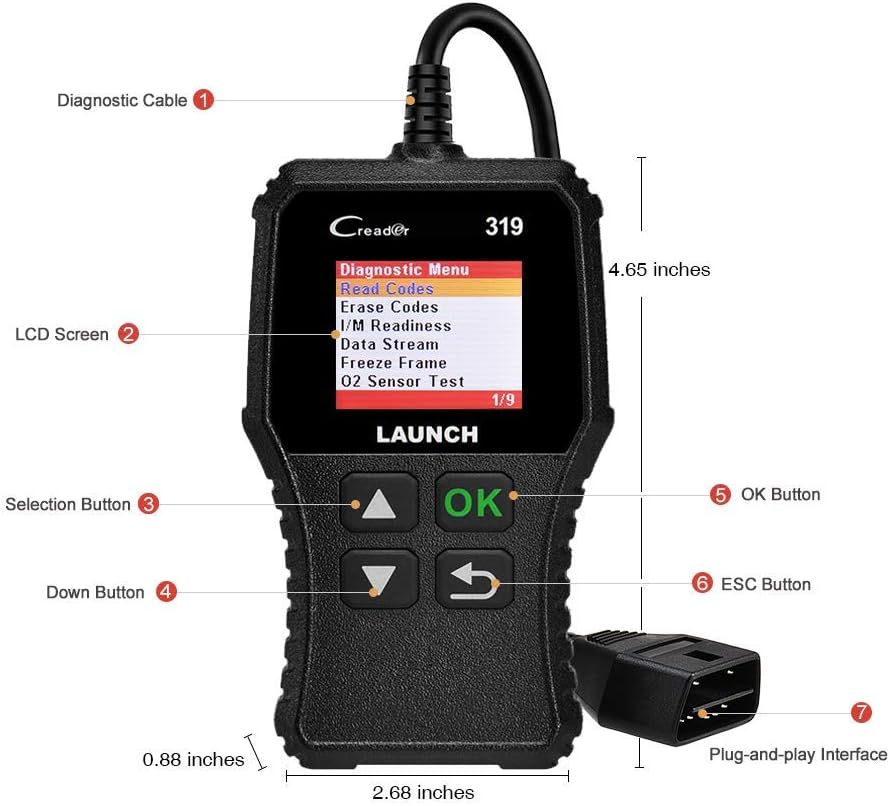
The image above illustrates the main components of the LAUNCH CR319 OBD2 Scanner. Key parts include the Diagnostic Cable (1) for connecting to the vehicle, the LCD Screen (2) for displaying information, Selection Buttons (3) for navigation, the Down Button (4), the OK Button (5) for confirmation, the ESC Button (6) to return to the previous screen, and the Plug-and-Play Interface (7) which is the OBD2 connector.
3. Konfiguracja
- Zlokalizuj port OBD2: Port OBD2 zazwyczaj znajduje się pod deską rozdzielczą po stronie kierowcy pojazdu. Jeśli nie możesz go znaleźć, zapoznaj się z instrukcją obsługi pojazdu.
- Podłącz skaner: Plug the CR319's diagnostic cable connector firmly into the vehicle's OBD2 port. The device will power on automatically.
- Uruchom pojazd: Turn the vehicle's ignition to the 'ON' position (engine off) or start the engine, depending on the diagnostic function you intend to perform.
4. Instrukcja obsługi
After connecting the CR319 to your vehicle, the main menu will appear. Use the Up/Down selection buttons to navigate through the options and the OK button to confirm a selection. The ESC button returns to the previous screen.
4.1 Przeczytaj kody
Ta funkcja odczytuje kody usterek diagnostycznych (DTC) z komputera pojazdu. Kody te wskazują na konkretne problemy wykryte przez system autodiagnostyczny pojazdu.
- Z menu głównego wybierz 'Diagnose'.
- Wybierać „Odczyt kodów”.
- The scanner will display any stored, pending, or permanent codes along with their descriptions.
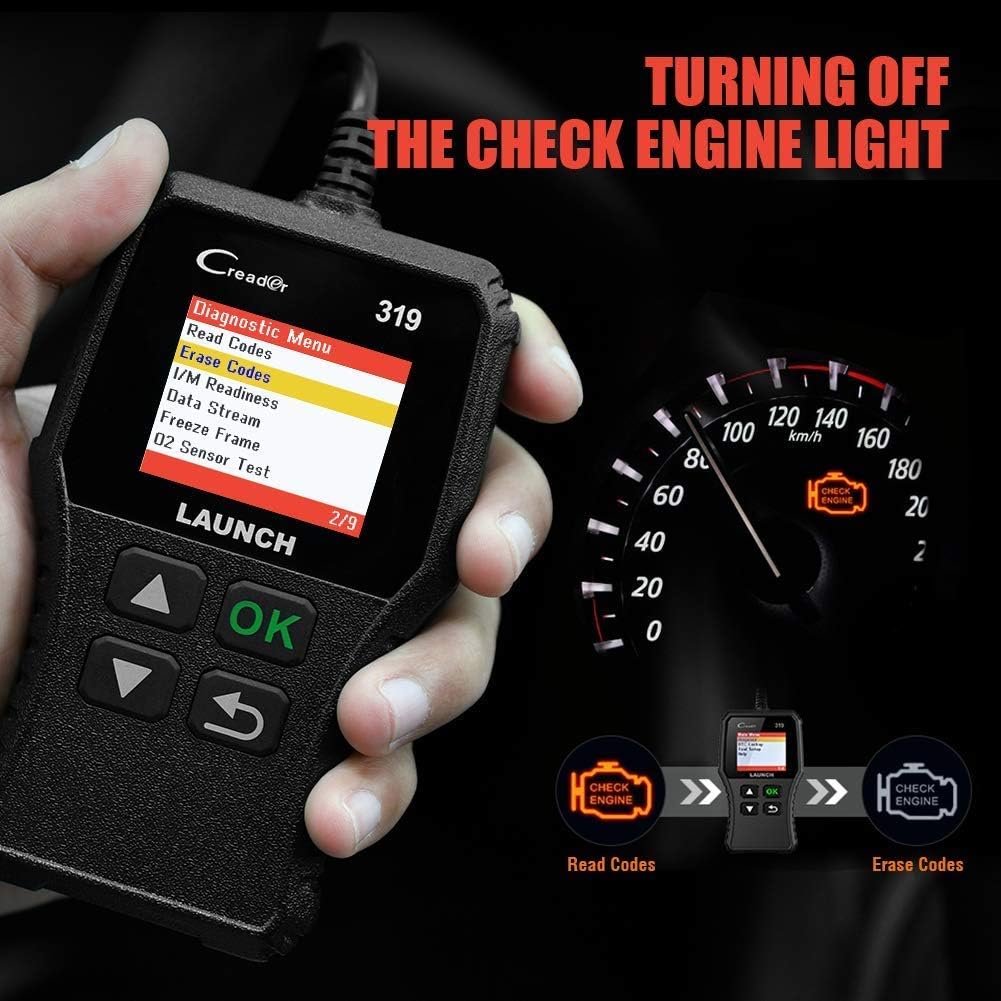
4.2 Wyczyść kody
This function erases DTCs from the vehicle's computer and turns off the Check Engine Light (MIL). Ensure any underlying issues are resolved before clearing codes, as they may reappear.
- Z menu głównego wybierz 'Diagnose'.
- Wybierać „Usuń kody”.
- Potwierdź czynność po wyświetleniu monitu. Kontrolka Check Engine powinna zgasnąć.
4.3 Gotowość I/M
Funkcja ta sprawdza stan systemów monitorujących emisję spalin pojazdu, aby ustalić, czy są one gotowe do przeprowadzenia testu emisji.
- Z menu głównego wybierz 'Diagnose'.
- Wybierać Gotowość I/M.
- The screen will display the status of various monitors (e.g., Misfire Monitor, Fuel System Monitor). 'OK' or 'Complete' indicates the monitor has run and passed; 'INC' or 'Incomplete' means the monitor has not yet run or completed its diagnostic cycle.
4.4 Strumień danych (dane na żywo)

This function displays real-time operational data from the vehicle's engine control unit (ECU). This data can include engine RPM, vehicle speed, oxygen sensor readings, coolant temperature, and more.
- Z menu głównego wybierz 'Diagnose'.
- Wybierać Strumień danych.
- Use the Up/Down buttons to scroll through the various data parameters.
4.5 Zablokuj klatkę
When an emission-related fault occurs, the vehicle's computer records a snapshot of operating conditions at the time of the fault. This data is called Freeze Frame data.
- Z menu głównego wybierz 'Diagnose'.
- Wybierać 'Freeze Frame'.
- Review zarejestrowane parametry pozwalają zrozumieć warunki, w jakich wystąpiła usterka.
4.6 Wyszukiwanie DTCTC

This feature allows you to manually enter a Diagnostic Trouble Code and view its definition from the scanner's internal database.
- Z menu głównego wybierz „Wyszukiwanie DTC”.
- Use the navigation buttons to input the desired DTC.
- Naciskać 'OK' Do view the code definition.
4.7 Other OBD2 Functions
The CR319 also supports the following OBD2 functions, accessible through the 'Diagnose' menu:
- Test czujnika O2: Retrieves oxygen sensor monitor test results for the most recently completed tests.
- Test układu EVAP (tryb 8): Rozpoczyna test układu kontroli emisji par paliwa.
- Test monitora pokładowego (tryb 6): Pobiera wyniki testów komponentów i układów układu napędowego związanych z emisją, które nie są monitorowane w sposób ciągły.
- Informacje o pojeździe: Wyświetla numer identyfikacyjny pojazdu (VIN), identyfikator kalibracji (CALID) i numer weryfikacyjny kalibracji (CVN).
5. Zgodność

The LAUNCH CR319 OBD2 Scanner is compatible with most American, European, and Asian vehicles manufactured from 1996 and newer that are OBDII-compliant. It supports all standard OBDII protocols, including KWP2000, ISO9141, J1850 VPW, J1850 PWM, and CAN (Controller Area Network).
5.1 Supported Vehicles
- 12V Gasoline cars.
- Vehicles compliant with OBDII standards (1996 US-based, 2000 EU-based, and newer Asian cars).
5.2 Not Supported Vehicles
- Diesel cars.
- 24V Heavy duty vehicles.
- Hybrid vehicles.
- Electric vehicles.
6. Specyfikacje
| Funkcja | Specyfikacja |
|---|---|
| Model | CR319 |
| Wyświetlacz | Kolorowy wyświetlacz LCD |
| Objętość operacyjnatage | 9-18 V (przez port OBD2) |
| Obsługiwane protokoły | KWP2000, ISO9141, J1850 VPW, J1850 PWM, CAN |
| Wymiary (dł. x szer. x wys.) | 1.5 x 6 x 10.8 cala |
| Waga | 7.4 uncji |
| Temperatura pracy | 0°C do 50°C (32°F do 122°F) |
| Temperatura przechowywania | -20°C do 70°C (-4°F do 158°F) |
| Obsługiwane języki | English, Portuguese, Russian, Italian, Spanish, French, German |
7. Rozwiązywanie Problemów
7.1 Urządzenie się nie włącza
- Ensure the diagnostic cable is securely connected to the vehicle's OBD2 port.
- Sprawdź, czy zapłon pojazdu jest w pozycji „ON” i czy silnik pracuje.
- Sprawdź bezpiecznik portu OBD2 pojazdu (sprawdź instrukcję obsługi pojazdu).
7.2 Błąd komunikacji z pojazdem
- Confirm the vehicle is OBDII-compliant (generally 1996 and newer for gasoline vehicles).
- Ensure the diagnostic cable is properly connected.
- Turn off the ignition, wait 10 seconds, then turn it back to 'ON' and try again.
- If possible, test the scanner on another compatible vehicle to rule out a device malfunction.
7.3 Codes Cannot Be Cleared
- Upewnij się, że zapłon pojazdu jest w pozycji „ON” (silnik wyłączony).
- If the underlying fault that triggered the code is still present, the code may not clear or will reappear immediately. Address the vehicle's issue first.
8. Konserwacja
- Czyszczenie: Do czyszczenia urządzenia używaj miękkiej, suchej ściereczki. Unikaj środków czyszczących o właściwościach ściernych i rozpuszczalników.
- Składowanie: Przechowuj skaner w czystym i suchym miejscu, z dala od ekstremalnych temperatur i bezpośredniego światła słonecznego.
- Pielęgnacja kabli: Do not pull the cable forcefully or bend it sharply. Inspect the cable for damage before each use.
9. Gwarancja i wsparcie
For warranty information, technical support, or service inquiries, please contact LAUNCH customer support. Refer to the product packaging or the official LAUNCH webna naszej stronie znajdziesz najnowsze dane kontaktowe.


