1. Wprowadzenie
This manual provides detailed instructions for the safe installation, operation, and maintenance of the BESTTEN 20 Amp Decorator Receptacle Outlet. This product is designed for residential and commercial applications, offering a reliable and durable electrical connection point. Please read this manual thoroughly before installation and retain it for future reference.

Image 1.1: BESTTEN 20 Amp Decorator Receptacle Outlet with included wallplate.
2. Informacje dotyczące bezpieczeństwa
WARNING: RISK OF ELECTRIC SHOCK OR FIRE. IMPROPER INSTALLATION CAN RESULT IN SERIOUS INJURY OR DEATH.
- Instalację powinien wykonać wykwalifikowany elektryk lub osoba mająca wiedzę na temat instalacji elektrycznych.
- Przed przystąpieniem do instalacji lub serwisowania gniazdka należy zawsze wyłączyć zasilanie za pomocą wyłącznika automatycznego lub skrzynki bezpiecznikowej.
- Use only 12 AWG solid copper wire for connections to this 20 Amp pojemnik.
- Upewnij się, że wszystkie połączenia przewodów są solidne i właściwie zaizolowane.
- Do not exceed the specified electrical ratings (20A/125V/2500W).
- Urządzenie jest przeznaczone wyłącznie do użytku wewnątrz pomieszczeń.
3. Zawartość opakowania
Każda paczka zawiera następujące elementy:
- NAJLEPSZE 20 Amp Decorator Receptacle Outlet(s)
- Decorator Wallplate(s)
- Śruby montażowe
4. Specyfikacje
| Funkcja | Specyfikacja |
|---|---|
| Numer modelu | USP1-20-B-10PK |
| Ocena elektryczna | 20 A/125 V/2500 W |
| Tworzywo | Poliwęglan Termoplastyczny |
| Kolor | Biały |
| Typ okablowania | Side Wiring Only |
| Wskaźnik drutu | 12 AWG Solid Copper Wire |
| Certyfikaty | Na liście UL/cUL |
| Wymiary produktu (wylot) | 4.06" H x 1.29" W x 0.98" D (10.3cm H x 3.28cm W x 2.51cm D) |
| Product Dimensions (Wallplate) | 4.5" dł. x 2.75" szer. (11.4 cm dł. x 6.98 cm szer.) |

Image 4.1: Detailed dimensions of the receptacle and wallplate.
5. Instrukcje instalacji
Follow these steps carefully to install your BESTTEN 20 Amp Decorator Receptacle Outlet:
- Wyłącz zasilanie: Locate the circuit breaker or fuse that controls the outlet you are replacing or installing. Turn off the power completely. Verify power is off using a voltagtester.
- Remove Old Outlet (if applicable): Unscrew and carefully pull the old outlet from the wall box. Disconnect the wires, noting which wire was connected to which terminal (hot, neutral, ground).
- Przygotuj przewody: Strip approximately 0.5 inches (1.27 cm) of insulation from the ends of the electrical wires (hot, neutral, ground). Ensure the wire ends are straight.
- Podłącz przewody:
- Połącz black (hot) wire to the brass-colored screw terminals.
- Połącz white (neutral) wire to the silver-colored screw terminals.
- Połącz green or bare copper (ground) wire to the green screw terminal.
This receptacle supports side wiring only. Insert the straight wire end into the clamp under the screw terminal and tighten the screw securely. Only 12 AWG solid copper wire is permitted for this 20 Amp pojemnik.
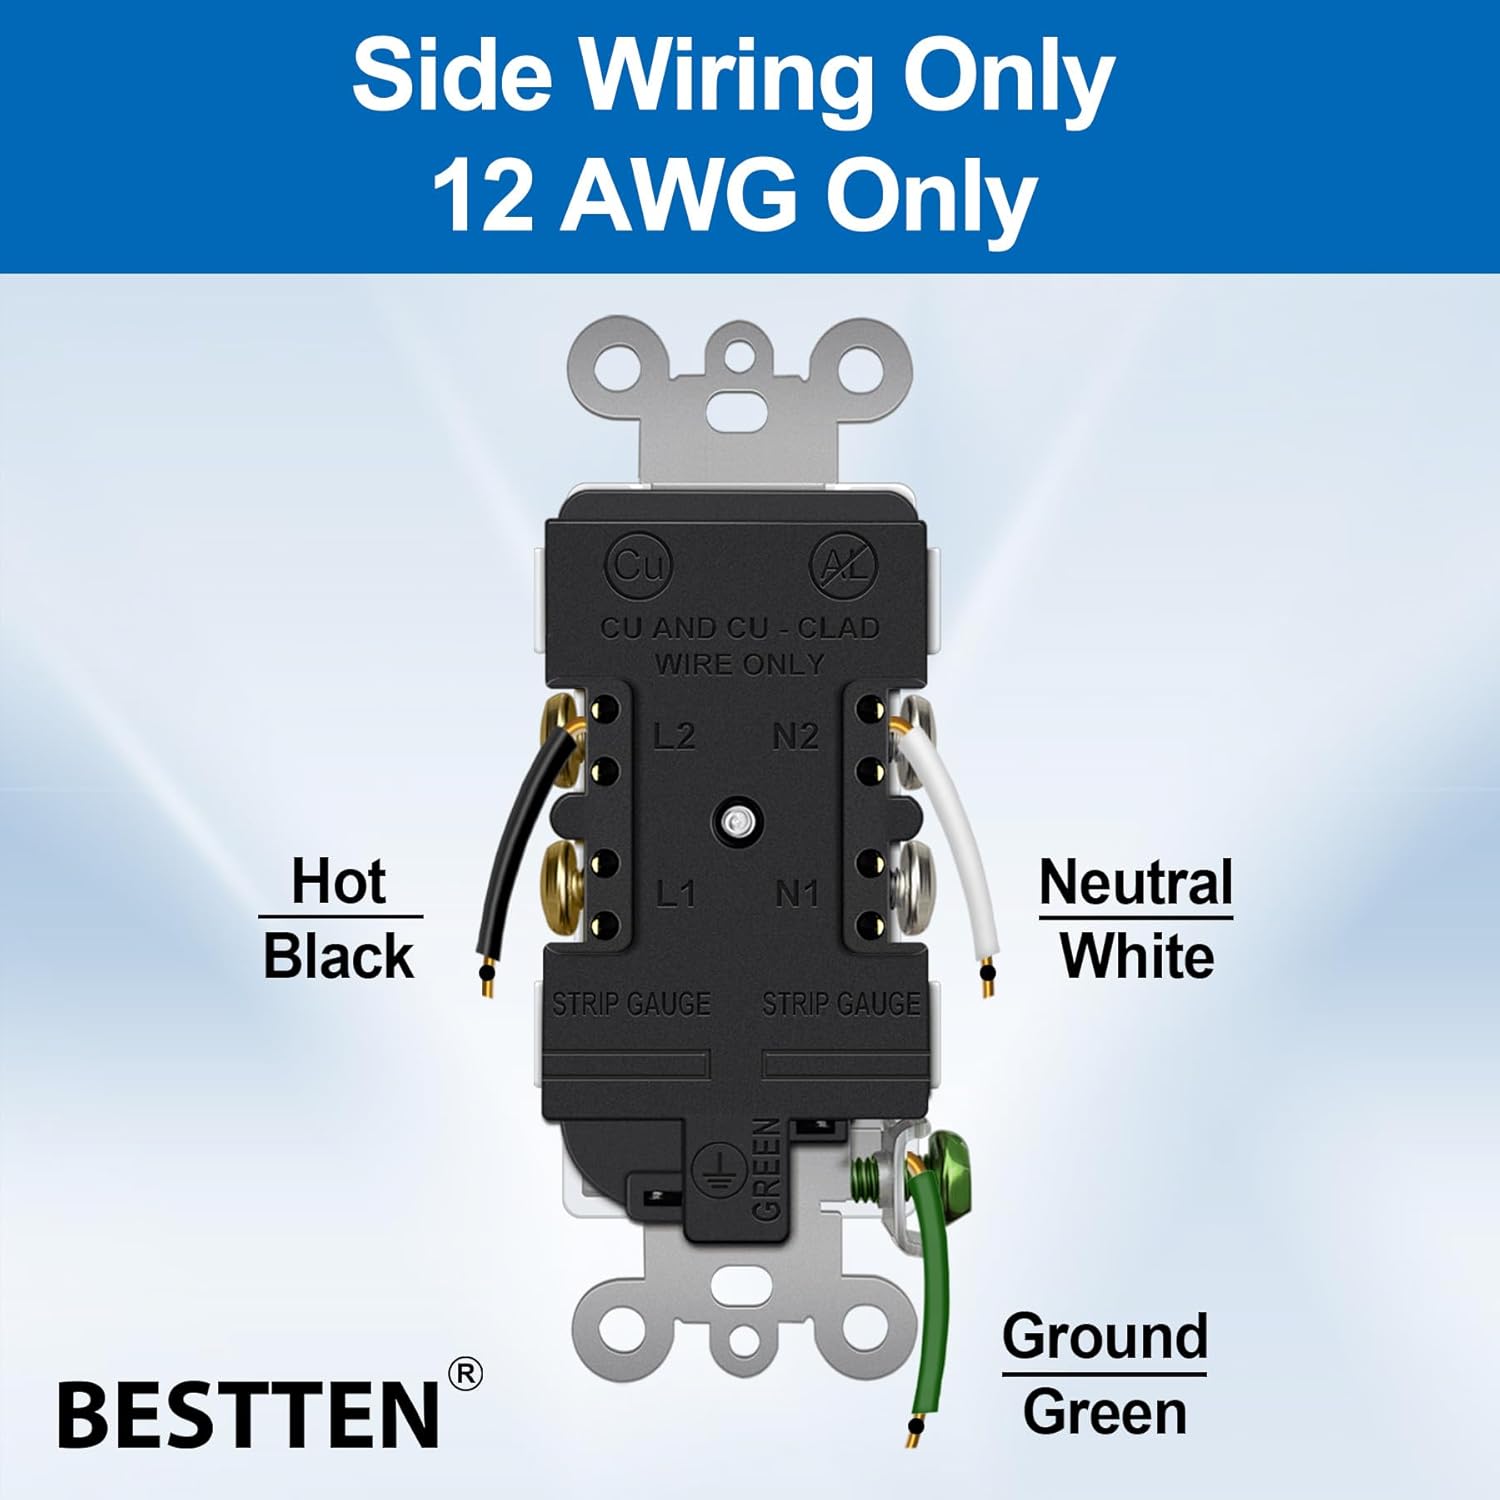
Image 5.1: Wiring diagram illustrating side wiring connections for hot (black), neutral (white), and ground (green) wires.
- Break-Off Tabs (Optional for Split Receptacles): If you require a split receptacle (two separate circuits for the top and bottom outlets), use pliers to break off the small metal tab connecting the two brass-colored (hot) terminals. Similarly, you can break off the tab connecting the two silver-colored (neutral) terminals if needed for specific wiring configurations.

Image 5.2: Illustration of breaking off the metal tab for split circuit functionality.
- Montaż gniazdka: Carefully push the wired outlet back into the wall box. Use the provided mounting screws to secure the outlet to the wall box. The break-off plaster ears can be used for flush alignment.
- Zainstaluj płytkę ścienną: Attach the decorator wallplate over the installed outlet using the provided screws.
- Przywróć zasilanie: Turn the power back on at the circuit breaker or fuse box. Test the outlet with a known working device.
6. Działanie
The BESTTEN 20 Amp Decorator Receptacle Outlet functions as a standard electrical outlet. Once properly installed and powered, it provides two points for connecting electrical devices. Insert appliance plugs firmly into the receptacles. Ensure that the total current draw of all connected devices does not exceed the outlet's rating of 20 Amps.

Image 6.1: The receptacle outlet seamlessly integrated into a kitchen environment.
7. Konserwacja
The BESTTEN 20 Amp Decorator Receptacle Outlet requires minimal maintenance. To ensure optimal performance and safety:
- Regularly inspect the outlet and wallplate for any signs of damage, cracks, or discoloration.
- Clean the surface with a soft, dry cloth. Avoid using abrasive cleaners or solvents.
- If the outlet feels warm to the touch, or if there are any unusual sounds or smells, immediately disconnect power at the circuit breaker and consult a qualified electrician.

Image 7.1: The durable polycarbonate construction ensures long-lasting performance.
8. Rozwiązywanie Problemów
| Problem | Możliwa przyczyna | Rozwiązanie |
|---|---|---|
| Outlet is not providing power. |
|
|
| W gnieździe jest ciepło. |
|
|
| Plug is difficult to insert. | New outlet, tight contacts. | This is normal for new outlets to ensure a secure connection. It should ease with repeated use. |
9. Gwarancja i wsparcie
BESTTEN products are manufactured with quality and durability in mind. For warranty information or technical support, please visit the official BESTTEN webOdwiedź stronę internetową lub skontaktuj się bezpośrednio z działem obsługi klienta. Zachowaj paragon zakupu na wypadek reklamacji.
Producent: NAJLEPSZE
Webstrona: BESTTEN Official Store on Amazon


