1. Wprowadzenie i koniecview
The Laserliner CoatingTest-Master 082.150A is a precision instrument designed for non-destructive measurement of coating thicknesses on various metal surfaces. It utilizes both magnetic induction and eddy current principles to accurately determine the thickness of non-metallic layers.
This device is capable of measuring non-magnetic coatings such as paint and zinc on steel, as well as insulating coatings like paint and anodized layers on non-ferrous metals. It features automatic identification of the base material (ferrous/ferromagnetic or non-ferrous/non-ferromagnetic), an internal memory for 400 measured values, and options for one-point and two-point calibration. Data transfer and evaluation are facilitated via a USB interface. The illuminated display provides Min/Max/Avg readings for comprehensive analysis.

Figure 1: Laserliner CoatingTest-Master 082.150A device.
2. Zawartość opakowania
Po otwarciu opakowania należy sprawdzić, czy zawiera ono wszystkie poniższe elementy:
- Laserliner CoatingTest-Master 082.150A device
- Ochronne etui transportowe
- Kabel USB do transmisji danych
- Calibration foils/plates (for one-point and two-point calibration)
- Instrukcja obsługi (ten dokument)
- Software CD (for data evaluation)
- Baterie (jeśli są dołączone)

Figure 2: Contents of the CoatingTest-Master package.
3. Konfiguracja
3.1 Instalacja baterii
The CoatingTest-Master requires batteries for operation. Locate the battery compartment on the back of the device. Insert the specified battery type (e.g., AAA batteries) ensuring correct polarity as indicated inside the compartment. Close the battery cover securely.
3.2 Włączanie/wyłączanie
Naciśnij i przytrzymaj Moc button (usually marked with a power symbol ⏻) to turn the device on. The display will illuminate. To turn off the device, press and hold the Moc Naciśnij przycisk ponownie, aż wyświetlacz się wyłączy.
4. Instrukcja obsługi
4.1 Pomiar podstawowy
To perform a basic coating thickness measurement:
- Upewnij się, że urządzenie jest włączone.
- Place the small measuring head firmly and perpendicularly onto the surface to be measured. The device will automatically detect the base material (ferrous or non-ferrous).
- The coating thickness reading will be displayed on the screen in micrometers (µm).
- Lift the measuring head from the surface to prepare for the next measurement.
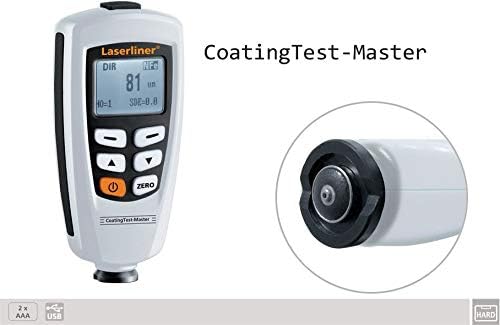
Figure 3: The device features a small measuring head for pinpoint accuracy.
4.2 Kalibracja
For accurate measurements, especially when measuring different types of coatings or base materials, calibration is essential. The CoatingTest-Master supports one-point and two-point calibration.
4.2.1 Kalibracja jednopunktowa
This method uses a single known thickness to adjust the device. Refer to the on-screen prompts or specific manual section for detailed steps on using the provided calibration foils.
4.2.2 Kalibracja dwupunktowa
This method uses two known thicknesses (e.g., zero and a specific thickness) for more precise calibration across a range. Follow the device's on-screen instructions for this procedure.
4.3 Zarządzanie danymi
The device has an internal memory for up to 400 measured values. Use the navigation buttons to review stored data. To transfer data to a computer, connect the device via the provided USB cable and use the accompanying software for evaluation.
4.4 Funkcje wyświetlacza
The illuminated display shows the current measurement, and can also cycle through Minimum (Min), Maximum (Max), and Average (Avg) values of a series of measurements. Consult the device's on-screen menu for accessing these display modes.
5. Konserwacja
Proper maintenance ensures the longevity and accuracy of your CoatingTest-Master.
- Czyszczenie: Wipe the device with a soft, dry cloth. Do not use abrasive cleaners or solvents. Ensure the measuring head is kept clean and free of debris.
- Składowanie: When not in use, store the device in its protective carrying case in a dry, dust-free environment, away from extreme temperatures and direct sunlight.
- Wymiana baterii: Replace batteries promptly when the low battery indicator appears on the display to avoid interruption of measurements and potential data loss.
6. Rozwiązywanie Problemów
| Problem | Możliwa przyczyna | Rozwiązanie |
|---|---|---|
| Urządzenie nie włącza się. | Rozładowane lub nieprawidłowo zainstalowane baterie. | Sprawdź biegunowość baterii; wymień baterie. |
| Niedokładne odczyty. | Device not calibrated; dirty measuring head; incorrect measurement technique. | Perform calibration; clean measuring head; ensure proper contact with surface. |
| USB data transfer failure. | Incorrect cable connection; software not installed or running; driver issues. | Ensure secure USB connection; install/reinstall software and drivers; try a different USB port. |
7. Specyfikacje
| Funkcja | Szczegół |
|---|---|
| Zasada pomiaru | Magnetic Induction (FE) / Eddy Current (NFe) |
| Measuring Range (FE) | 0 - 1250 μm |
| Accuracy (FE) | 0–850 µm: ±(3% + 1 µm); 850–1250 µm: ±5% |
| Measuring Range (NFe) | 0 - 1250 μm |
| Accuracy (NFe) | 0–850 µm: ±(3% + 1 µm); 850–1250 µm: ±5% |
| Base Material Identification | Automatic (Ferrous / Non-Ferrous) |
| Pamięć | 400 zmierzonych wartości |
| Kalibrowanie | One-point and Two-point |
| Interfejs | USB |
| Wyświetlacz | Illuminated, Min/Max/Avg display |
8. Gwarancja i wsparcie
Laserliner products are manufactured with high quality standards. For information regarding warranty coverage, technical support, or service, please refer to the warranty card included with your product or visit the official Laserliner webZachowaj paragon jako dowód zakupu na wypadek ewentualnych roszczeń gwarancyjnych.
For further assistance, you may contact Laserliner customer service through their official channels. Contact details are typically available on the manufacturer's webmiejscu lub w opakowaniu produktu.


