1. Wprowadzenie
The Teltonika TRB140 is a compact, fast, and powerful industrial LTE Cat 4 gateway. It is designed for industrial applications where robust and reliable connectivity is essential. This device provides Ethernet connectivity with 4G LTE backup, making it suitable for various IoT solutions, remote monitoring, and industrial automation.
2. Informacje dotyczące bezpieczeństwa
- Przed przystąpieniem do prac konserwacyjnych lub instalacyjnych należy zawsze odłączyć zasilanie.
- Aby zapobiec przegrzaniu, należy zapewnić odpowiednią wentylację.
- Nie wystawiaj urządzenia na działanie wilgoci, ekstremalnych temperatur ani bezpośredniego światła słonecznego.
- Use only the power adapter provided or specified by Teltonika.
- Installation should be performed by qualified personnel in accordance with local regulations.
3. Zawartość opakowania
Sprawdź, czy w przesyłce znajdują się następujące elementy:
- Teltonika TRB140 Gateway
- 1 x LTE antenna (magnetic mount, SMA male)
- Jednostka zasilająca
- Kabel Ethernetowy
- SIM ejector pin or Hex key (for SIM card access)
- Szybki przewodnik
4. Urządzenie ponadview
The TRB140 features a robust design with essential ports and indicators for industrial deployment.

Rycina 4.1: Przód view of the Teltonika TRB140 showing power input, Ethernet port, and device information.

Rysunek 4.2: Tył view of the Teltonika TRB140 showing the USB port, mobile antenna connector, reset button, and SIM card access panel.
4.1. Panel przedni

Rysunek 4.3: Szczegółowy view of the power input and Ethernet port on the TRB140.
- Power Input (9-30V): Łączy się z zasilaniem.
- Port Ethernet: Standard RJ45 port for wired network connection.
4.2. Panel tylny
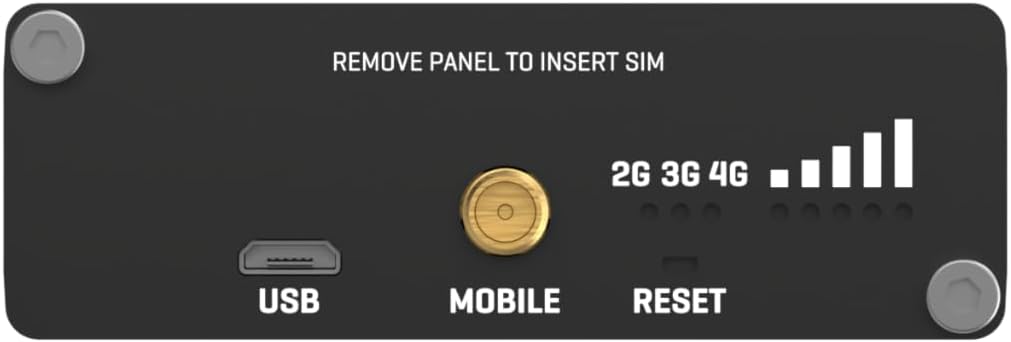
Rysunek 4.4: Szczegółowy view of the USB port, mobile antenna connector, reset button, and SIM card access panel on the TRB140.
- Port USB: For future functionality or specific configurations.
- Mobile Antenna Connector: SMA connector for the 4G LTE antenna.
- Przycisk resetowania: Służy do przywracania ustawień fabrycznych lub ponownego uruchamiania urządzenia.
- Gniazdo karty SIM: Located behind a removable panel, for inserting a Nano-SIM card.
- Wskaźniki LED: Signal strength and network status indicators.
5. Konfiguracja
5.1. Instalacja karty SIM
- Using the provided hex key, unscrew the two hex bolts on the rear panel to remove the SIM card access panel.
- Insert your Nano-SIM card into the SIM slot. Ensure the SIM card is correctly oriented as indicated on the device.
- Reattach the SIM card access panel and secure it with the hex bolts.
5.2. Podłączenie anteny
- Connect the supplied LTE antenna to the Mobile antenna connector on the rear panel.
- Position the antenna for optimal signal reception. The magnetic base allows for flexible placement.
5.3. Podłączenie zasilania
- Connect the power adapter to the power input terminal on the front panel of the TRB140.
- Plug the power adapter into a suitable power outlet. The device will power on automatically.
5.4. Połączenie Ethernet
- Connect one end of the Ethernet cable to the Ethernet port on the TRB140.
- Podłącz drugi koniec kabla Ethernet do komputera lub przełącznika sieciowego.
5.5. Wstępny dostęp
Once powered on and connected via Ethernet, you can access the device's WebInterfejs użytkownika (Web User Interface) for configuration:
- Otwórz web przeglądarki na podłączonym komputerze.
- Wprowadź domyślny adres IP: 192.168.2.1
- Use the default login credentials: Username: administracja, Hasło: Administrator01
- You will be prompted to change the password upon first login for security reasons.
6. Obsługa
6.1. WebUI Navigation
Ten WebUI provides comprehensive control over the TRB140's functions. Key sections include:
- Status: Nadview of device status, network connection, and signal strength.
- Sieć: Configure WAN (Mobile), LAN, VPN, Firewall settings.
- Usługi: Manage various services like SMS utilities, DDNS, etc.
- System: Device administration, firmware updates, backup/restore, user management.
6.2. Mobile Connection Setup
To establish a 4G LTE connection:
- Przejdź do Network > Mobile sekcja w WebUI.
- Ensure the mobile data is enabled.
- Configure the APN (Access Point Name) settings according to your mobile operator's requirements. This is often auto-detected but may need manual entry.
- Save changes and wait for the device to connect to the mobile network. Monitor the signal strength LEDs and the status page.
6.3. Wskaźniki LED
The LEDs on the device provide visual feedback on its operational status:
- Dioda LED zasilania: Indicates power status (On: device powered, Off: no power).
- Diody LED siły sygnału: Multiple LEDs indicate the strength of the mobile signal. More LEDs lit means stronger signal.
- Network Type LEDs (2G/3G/4G): Indicates the current mobile network technology in use.
- Ethernet Link/Activity LEDs: On the Ethernet port, indicate link status and data activity.
7. Konserwacja
7.1. Aktualizacje oprogramowania sprzętowego
Regularly check for and apply firmware updates to ensure optimal performance, security, and access to new features. Firmware can be updated via the WebInterfejs użytkownika pod System > Oprogramowanie układowe.
7.2. Czyszczenie
Clean the device periodically with a soft, dry cloth. Do not use liquid cleaners or solvents.
7.3. Zagadnienia środowiskowe
Ensure the device operates within its specified temperature and humidity ranges to maintain reliability and longevity.
8. Rozwiązywanie Problemów
8.1. Brak połączenia internetowego
- Verify SIM card is correctly inserted and active.
- Sprawdź ustawienia APN w WebUI (Network > Mobile).
- Ensure the antenna is properly connected and positioned for good signal strength.
- Check mobile signal strength LEDs. If signal is weak, try repositioning the antenna.
- Sprawdź, czy Twój abonament komórkowy jest aktywny i zawiera dostępne dane.
8.2. Brak dostępu WebUI
- Ensure your computer is directly connected to the TRB140 via Ethernet.
- Sprawdź, czy ustawienia IP Twojego komputera są ustawione na automatyczne uzyskiwanie adresu IP (DHCP).
- Confirm you are using the correct default IP address (192.168.2.1).
- Spróbuj wyczyścić pamięć podręczną przeglądarki lub użyć innej przeglądarki.
- If the password was changed and forgotten, a factory reset may be necessary.
8.3. Przywracanie ustawień fabrycznych
Aby przywrócić urządzenie do domyślnych ustawień fabrycznych:
- Upewnij się, że urządzenie jest włączone.
- Locate the Reset button on the rear panel.
- Press and hold the Reset button for approximately 10 seconds until all LEDs start blinking.
- Puść przycisk. Urządzenie uruchomi się ponownie z domyślnymi ustawieniami fabrycznymi.
9. Specyfikacje
| Funkcja | Specyfikacja |
|---|---|
| Nazwa modelu | TRB140 |
| Numer modelu przedmiotu | TRB140003000 |
| Marka | Teltonika |
| Wymiary produktu | 10 x 2 x 2.7 cala |
| Waga przedmiotu | 4.7 uncji (134 grama) |
| Technologia łączności | Wired (4G LTE via SIM) |
| System operacyjny | RouterOS (Teltonika RutOS based on OpenWrt) |
| Moc wejściowa | 9-30V DC |
| Moduł mobilny | 4G (LTE Cat 4) / 3G / 2G |
| Sieć Ethernetowa | 1 port Ethernet 10/100 Mb/s |
| Miejsca na karty SIM | 1 x Nano SIM |
| Złącza antenowe | 1 x SMA dla LTE |
| Temperatura pracy | -40 °C do 75 °C |
| Mieszkania | Aluminium |
10. Gwarancja
Teltonika Networks products are covered by a manufacturer's warranty. The specific terms and duration of the warranty may vary by region and product. For detailed warranty information, please refer to the official Teltonika Networks webodwiedź witrynę lub skontaktuj się z lokalnym dystrybutorem.
11. Wsparcie
For further assistance, technical documentation, firmware downloads, and support resources, please visit the official Teltonika Networks Wiki and support portal:
You may also contact your product reseller or Teltonika Networks customer support directly for specific inquiries.


