1. Wprowadzenie
Thank you for choosing the Antec P101S Silent Performance Mid-Tower PC Case. This manual provides essential information for the proper installation, operation, and maintenance of your new computer case. Please read this manual thoroughly before beginning assembly to ensure optimal performance and longevity of your system.
The Antec P101S is engineered for quiet computing, featuring sound-dampening panels and efficient cooling solutions, making it ideal for users who prioritize a silent and high-performance computing environment.
2. Główne cechy
- Cicha praca: Equipped with sound-dampening top, front, and side panels for quiet computing.
- Extensive Drive Bays: Supports 11 drive bays, including 1 x 5.25" ODD bay, 8 x 3.5" HDD/2.5" SSD removable bays, and 2 x dedicated 2.5" SSD bays.
- Zaawansowane chłodzenie: Includes 4 pre-installed 120/140mm cooling fans (3 front, 1 rear). Supports up to 4 fan mounts with a maximum of 360mm radiator support for enhanced cooling.
- Wygodny panel wejścia/wyjścia: Features power/reset buttons, a fan speed controller (High/Stop/Low), Audio/Mic ports, 2 x USB 2.0, and 2 x USB 3.0 ports with white LED lighting.
- Broad Motherboard Compatibility: Supports E-ATX, ATX, Micro-ATX, and ITX motherboards.
- Generous Component Clearance: Accommodates CPU coolers up to 180mm, graphics cards up to 450mm, and PSUs up to 290mm in length.
3. Zawartość opakowania
Sprawdź, czy w przesyłce znajdują się wszystkie elementy:
- Antec P101S Mid-Tower PC Case
- 3 x 120mm Front Fans (Pre-installed)
- 1 x 140mm Rear Fan (Pre-installed)
- Accessory Box (screws, cable ties, user manual)
4. Koniec komponentuview
Familiarize yourself with the various parts of your Antec P101S case.

Figure 1: Front, Back, Left, and Right views of the Antec P101S case, illustrating its external design and panel layout.

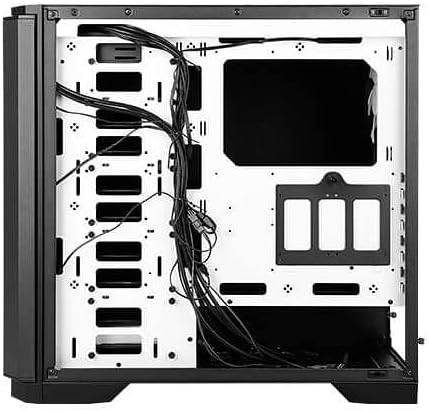
Rysunek 2: Wnętrze view of the Antec P101S, showing the spacious layout, drive bays, and fan mounts.

Figure 3: Close-up of the top I/O panel, highlighting the power, reset, fan speed controller, audio, USB 2.0, and USB 3.0 ports.
5. Konfiguracja i instalacja
Follow these steps to install your components into the Antec P101S case.
5.1 Przygotowanie sprawy
- Zdejmij panele boczne: Unscrew the thumbscrews on the rear of the side panels and slide them backward to remove.
- Dostęp do wnętrza: The interior is now accessible for component installation.
5.2 Instalacja płyty głównej
- Montaż elementów dystansowych: Ensure the correct motherboard standoffs are installed for your motherboard form factor (ATX, Micro-ATX, ITX, E-ATX).
- Place Motherboard: Carefully align your motherboard with the standoffs and I/O shield opening.
- Bezpieczna płyta główna: Fasten the motherboard with the provided screws.
5.3 Instalacja napędu
The P101S offers versatile drive mounting options.
5.3.1 3.5" HDD / 2.5" SSD Removable Bays

Figure 4: Illustration of the various drive bay locations within the Antec P101S case.
- Remove Drive Tray: Pull out an empty 3.5" drive tray from the drive cage.
- Install Drive: For a 3.5" HDD, flex the tray and insert the drive. For a 2.5" SSD, secure it to the bottom of the tray with screws.
- Włóż ponownie tackę: Slide the loaded tray back into the drive cage until it clicks into place.
5.3.2 Dedicated 2.5" SSD Bays
Two dedicated 2.5" SSD mounts are located behind the motherboard tray.
- Bezpieczny dysk SSD: Attach your 2.5" SSD to the dedicated mounting bracket using screws.
- Wspornik montażowy: Secure the bracket with the SSD to the chassis behind the motherboard tray.
5.3.3 5.25" ODD Bay
- Remove Front Bezel: Gently remove the 5.25" bay cover from the front bezel.
- Insert ODD: Slide your optical disc drive into the bay from the front until it aligns with the screw holes.
- Secure ODD: Fasten the ODD with screws.
5.4 Instalacja karty graficznej i karty rozszerzeń
- Zdejmij osłony gniazd PCIe: Unscrew and remove the necessary PCIe slot covers from the rear of the case.
- Włóż kartę: Carefully insert your graphics card or other expansion card into the appropriate PCIe slot on the motherboard.
- Karta bezpieczna: Fasten the card with screws.
5.5 Instalacja zasilacza (PSU).
- Stanowisko PSU: Wsuń zasilacz do przeznaczonego dla niego przedziału w dolnej tylnej części obudowy.
- Bezpieczny zasilacz: Fasten the PSU to the rear of the chassis with screws.
5.6 Zarządzanie kablami
Rysunek 5: Tył view of the motherboard tray, showing cable routing channels and tie-down points for organized cable management.
Utilize the cable routing holes and tie-down points behind the motherboard tray to organize cables for improved airflow and aesthetics.
6. Obsługa obudowy komputera
6.1 Włączanie/wyłączanie zasilania
Press the large power button on the top I/O panel to turn your system on or off.
6.2 Sterowanie prędkością wentylatora
Use the fan speed controller switch on the top I/O panel to adjust the speed of the pre-installed fans:
- Wysoki: Maximum fan speed for optimal cooling.
- Niski: Reduced fan speed for quieter operation.
- Zatrzymać: Fans are turned off.
7. Konserwacja
7.1 Czyszczenie filtrów przeciwpyłowych
Regularly clean the dust filters located at the front, top, and bottom of the case to maintain optimal airflow and prevent dust buildup. The front filter is easily removable for cleaning.
7.2 Ogólne czyszczenie
Use a soft, dry cloth to clean the exterior of the case. For stubborn marks, a slightly damp Można użyć ściereczki, a następnie wysuszyć. Unikać środków czyszczących o działaniu ściernym i rozpuszczalników.
8. Rozwiązywanie Problemów
- System się nie włącza: Double-check all power connections, including the 24-pin ATX, 8-pin CPU, and GPU power cables. Ensure the PSU switch is in the 'On' position.
- Wentylatory nie kręcą się: Verify that the fan speed controller on the I/O panel is not set to 'Stop'. Check fan connections to the motherboard or fan hub.
- Przegrzanie: Ensure all fans are spinning correctly and dust filters are clean. Verify proper component installation and thermal paste application.
- Porty USB nie działają: Check the internal USB header connections from the I/O panel to the motherboard.
9. Specyfikacje
| Funkcja | Szczegół |
|---|---|
| Nazwa modelu | P101S Silent |
| Typ sprawy | Średnia wieża |
| Zgodność płyty głównej | E-ATX, ATX, Micro-ATX, ITX |
| Wymiary (dł. x szer. x wys.) | 20.74 x 9.13 x 19.92 cala |
| Waga przedmiotu | 26.1 funta |
| Tworzywo | Stal stopowa |
| Zatoki napędowe | 1 x 5.25" ODD, 8 x 3.5" HDD/2.5" SSD, 2 x 2.5" SSD |
| Fabrycznie zainstalowane wentylatory | 3 x 120mm Front, 1 x 140mm Rear |
| Wsparcie chłodnicy | Front: Up to 360mm, Rear: Up to 140mm |
| Maksymalna wysokość chłodnicy procesora | 180mm |
| Maksymalna długość GPU | 450mm |
| Maksymalna długość zasilacza | 290mm |
| Przednie porty we / wy | 2 x USB 2.0, 2 x USB 3.0, Audio/Mic, Power, Reset, Fan Speed Controller |
10. Gwarancja i wsparcie
For warranty information and technical support, please refer to the official Antec website or contact your local Antec distributor. Keep your proof of purchase for warranty claims.
Antec Official Webstrona: www.antec.com


