1. Wprowadzenie
Thank you for choosing the Grifema G14001 Removable Kitchen Faucet. This manual provides essential information for the safe and efficient installation, operation, and maintenance of your new kitchen faucet. Please read these instructions carefully before installation and keep them for future reference.
2. Informacje dotyczące bezpieczeństwa
- Przed rozpoczęciem jakichkolwiek prac instalacyjnych lub konserwacyjnych należy zawsze zakręcić dopływ wody.
- Upewnij się, że wszystkie połączenia są solidne, aby zapobiec wyciekom.
- Jeśli masz wątpliwości co do jakiegokolwiek etapu instalacji, skonsultuj się z wykwalifikowanym hydraulikiem.
- Do not use abrasive cleaners or harsh chemicals on the faucet's finish, as this may damage it.
3. Zawartość opakowania
Przed rozpoczęciem instalacji sprawdź, czy wszystkie komponenty są obecne:
- 1 x Grifema G14001 Kitchen Faucet
- 1 x Mixer tap washer kit
- 2 x 40 cm Connection Hoses (Hot and Cold)
- Mounting hardware (gasket, fixing nut, etc.)

Rysunek 3.1: All components included in the Grifema G14001 package. This image displays the main faucet body, two flexible connection hoses, a washer kit, and various mounting hardware pieces.
4. Specyfikacje
| Funkcja | Szczegół |
|---|---|
| Numer modelu | G14001 |
| Marka | GRIFEMA |
| Tworzywo | Mosiądz, Plastik |
| Skończyć | Chrom |
| Kolor | Srebrny |
| Metoda instalacji | Montaż powierzchniowy |
| Liczba uchwytów | 1 |
| Liczba wymaganych otworów | 1 |
| Przepływ | 2.2 litrów na minutę |
| Długość węża | 40 centymetrów |
| Wymiary produktu (dł. x szer. x wys.) | Wymiary 7.5 x 30 x 68 cm |
| Waga | 3.26 kilograma |
| Funkcja specjalna | Rotatable Spout, Pull-out Spray |

Rysunek 4.1: Dimensional drawing of the Grifema G14001 faucet, showing key measurements for height, reach, and base width.
5. Setup / Installation
Follow these steps for proper installation of your Grifema G14001 kitchen faucet. Ensure the main water supply is turned off before starting.
- Przygotuj otwór krasowy: Ensure your sink has a single mounting hole with a diameter of approximately Ø35mm.
- Włóż kran: Place the faucet body into the mounting hole on your sink or countertop. Ensure the base gasket is correctly positioned.
- Zabezpiecz kran: From underneath the sink, slide the rubber gasket and metal washer onto the threaded shank of the faucet. Secure it tightly with the fixing nut.
- Podłącz węże wodne: Connect the hot (H) and cold (C) water supply hoses to the corresponding inlets on the faucet and to your hot and cold water supply lines. Ensure connections are hand-tightened, then use a wrench for a final quarter turn, being careful not to overtighten.
- Attach Pull-Out Hose Weight: Attach the counterweight to the pull-out spray hose underneath the sink. This ensures the spray head retracts smoothly.
- Test szczelności: Turn on the main water supply and check all connections for leaks. Operate the faucet to ensure proper water flow and temperature control.
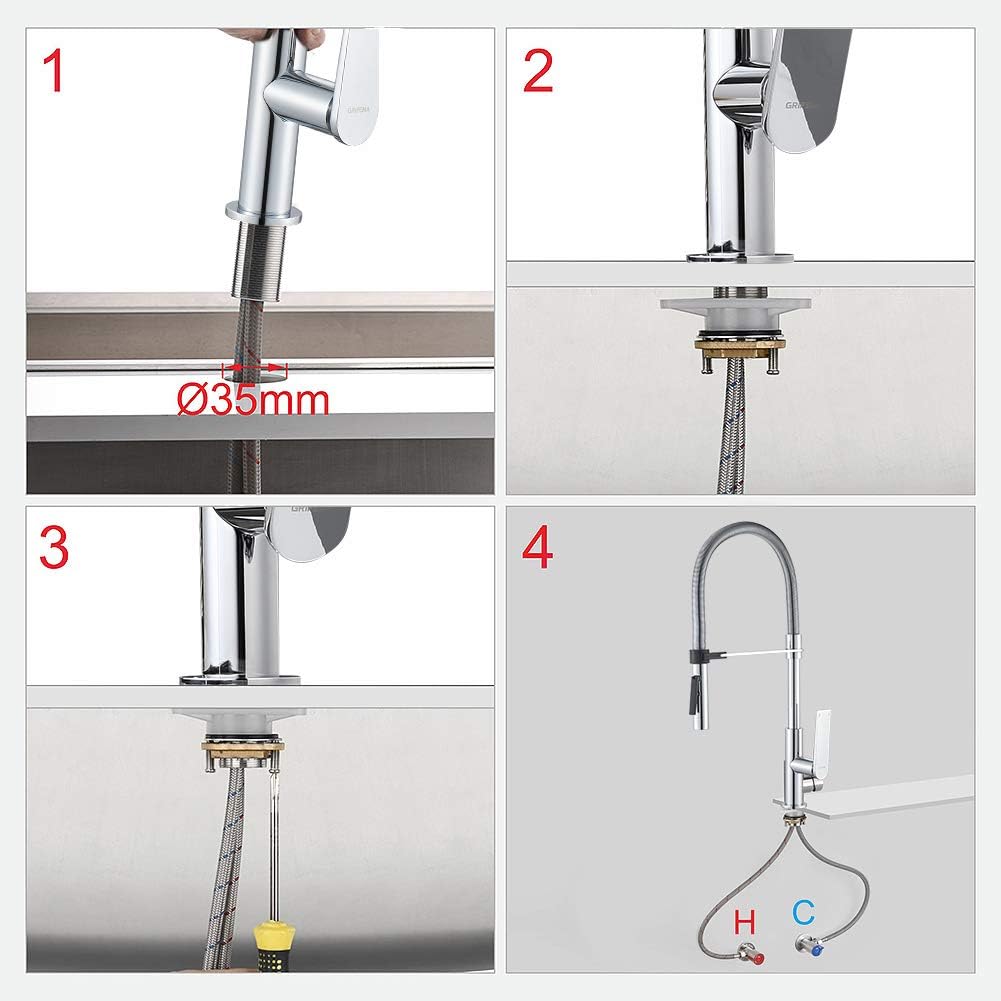
Rysunek 5.1: Step-by-step visual guide for installing the Grifema G14001 kitchen faucet, showing the insertion into the sink hole, securing the base, and connecting the water lines.
6. Instrukcja obsługi
Your Grifema G14001 faucet is designed for ease of use and versatility.
- Kontrola przepływu i temperatury wody: The single lever handle controls both water flow and temperature. Lift the handle to increase flow, and move it left for hot water or right for cold water.
- Podwójny tryb natrysku: The pull-out spray head features two distinct spray modes. Press the button on the spray head to switch between a powerful shower jet and a steady aerated stream.
- Flexible Pull-Out Hose: The ultra-flexible hose simplifies daily tasks, providing extended reach and greater operating space within your sink area.
- Obrót o 360 stopni: The faucet spout can rotate 360 degrees, offering maximum flexibility and convenience for various sink configurations and tasks.

Rysunek 6.1: The Grifema G14001 faucet demonstrating its two spray modes: a concentrated stream and a wide spray pattern.
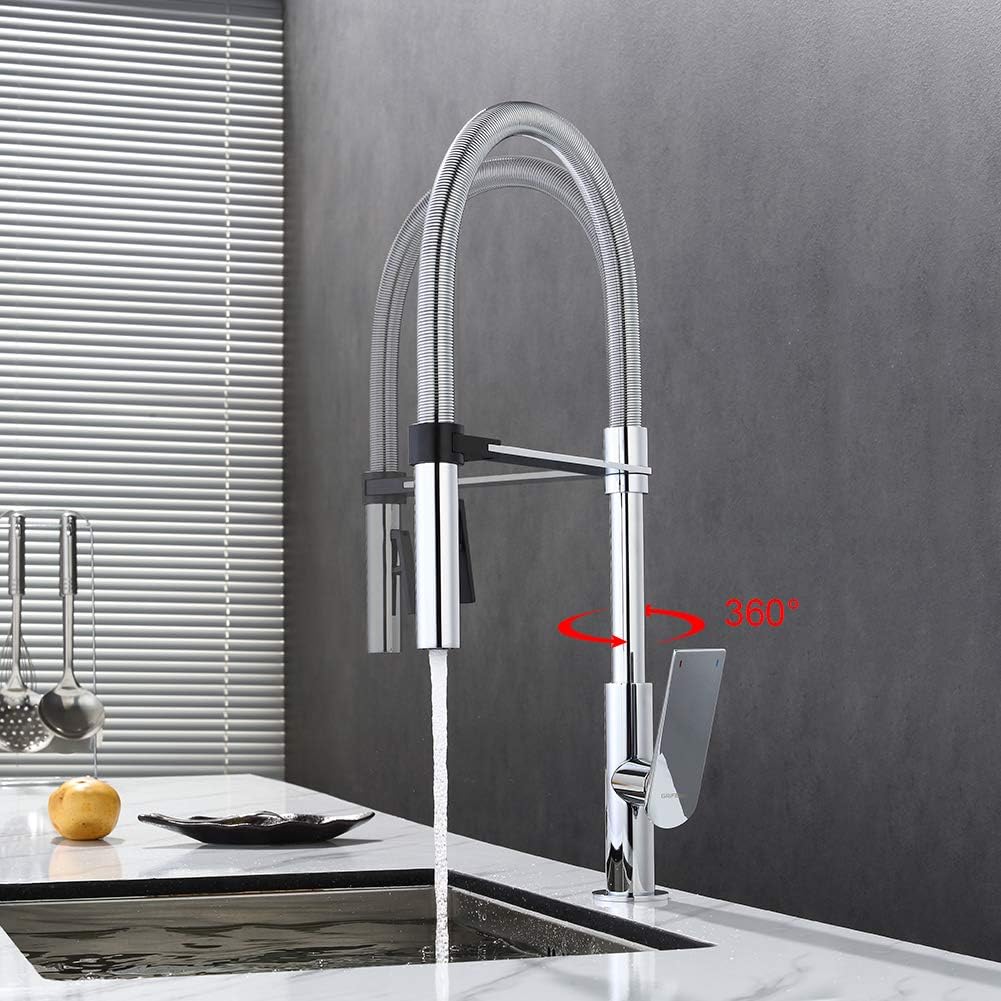
Rysunek 6.2: The Grifema G14001 faucet illustrating its 360-degree rotatable spout for enhanced flexibility.
7. Konserwacja
Proper care will ensure the longevity and appearance of your Grifema G14001 faucet.
- Czyszczenie wykończenia: Clean the faucet regularly with a soft cloth and mild soap and water. Rinse thoroughly and dry with a soft cloth to prevent water spots. Avoid abrasive cleaners, ammonia, bleach, or acid-based cleaners, as these can damage the chrome finish.
- Czyszczenie aeratora: If water flow becomes restricted, the aerator may be clogged. Unscrew the aerator from the spray head, clean any debris or mineral deposits, and rinse thoroughly before reattaching.
- Wkład ceramiczny: The faucet is equipped with a durable ceramic cartridge designed for long-term, drip-free performance. No regular maintenance is typically required for the cartridge itself.

Rysunek 7.1: The Grifema G14001 faucet highlighting its water-saving aerator, which can be removed for cleaning.
8. Rozwiązywanie Problemów
W tej sekcji znajdziesz informacje o typowych problemach i ich rozwiązaniach.
| Problem | Możliwa przyczyna | Rozwiązanie |
|---|---|---|
| Niski przepływ wody | Zatkany napowietrzacz lub zanieczyszczenia w przewodach wodnych. | Clean the aerator (see Section 7). Check water supply valves are fully open. |
| Wycieki na połączeniach | Luźne połączenia lub uszkodzone podkładki. | Ensure all connections are tightened properly. Replace washers if damaged. |
| Spray Mode Not Switching | Debris in spray head mechanism or faulty switch. | Remove and clean the spray head. If the issue persists, contact customer support. |
| Kapiący kran | Zużyty wkład ceramiczny. | While the ceramic cartridge is designed for durability, if dripping occurs, it may need replacement. Contact customer support for assistance. |
| Wysuwana dysza natryskowa nie chowa się | Counterweight improperly positioned or obstructed. | Check the position of the counterweight on the hose underneath the sink. Ensure it moves freely and is not obstructed. |
9. Gwarancja i wsparcie
GRIFEMA products are manufactured to high-quality standards. For warranty information or technical support, please refer to the warranty card included with your product or visit the official GRIFEMA website. Please have your model number (G14001) and purchase date available when contacting support.


