Produkt ponadview
The Lux Pro Model P111 is a non-programmable thermostat designed for straightforward and reliable temperature control in your home. It offers essential features for managing your heating and cooling systems with ease.

Figure 1: Lux Pro P111 Non-Programmable Thermostat. This image displays the front view of the thermostat, showing its LCD screen, fan and system mode switches, and temperature adjustment buttons.
- Łatwa instalacja: Designed for simple setup with clear instructions.
- Operacja nieprogramowalna: Provides direct temperature control without complex scheduling.
- Podwójna moc: Operates on 2 AA alkaline batteries (included) or 24-volt system power.
- Podświetlany wyświetlacz: Posiada łatwy w obsłudzeview backlight for clear temperature readings.
- Ochrona sprzętu: Includes a selectable 5- or 2-minute time delay to safeguard your HVAC equipment.
- Adjustable Limits: Allows setting of heating and cooling temperature limits.
- Opcje wyświetlania temperatury: Switch between Fahrenheit (℉) or Celsius (℃) display.

Figure 2: Key Features of Lux Pro P111 Thermostat. This graphic highlights features such as Keyboard Lockout, Adjustable Heating and Cooling Limits, Back-Lit Display, Dual Power, and a 5-Year Limited Warranty.
Zgodność systemu
The Lux Pro P111 thermostat is designed for compatibility with various HVAC systems. Please review the following compatibility chart to ensure it meets your system requirements.

Figure 3: System Compatibility Chart. This chart details which heating and cooling systems are compatible (e.g., Gas/Oil/Electric Furnace, Heat Pump without Auxiliary Heat, 2-wire Hydronic, 750 Millivolt, Gas Fireplaces, Single Stage Cooling) and which are not (e.g., Heat Pump Multistage, Radiant Ceiling Heat, Electric Baseboards, 3-wire Hydronic, Multistage systems, Portable space heaters, Plug-in air conditioners).
Konfiguracja i instalacja
Proper installation is crucial for the optimal performance of your thermostat. If you are unsure about any steps, it is recommended to consult a qualified HVAC technician.
1. Wymagania dotyczące zasilania
The P111 thermostat can be powered by two (2) AA alkaline batteries or by a 24-volt system. Batteries are included for convenience and reliable operation.
2. Schematy połączeń
Refer to the following diagrams for common wiring configurations. Ensure power to your HVAC system is turned off at the circuit breaker before beginning any wiring.
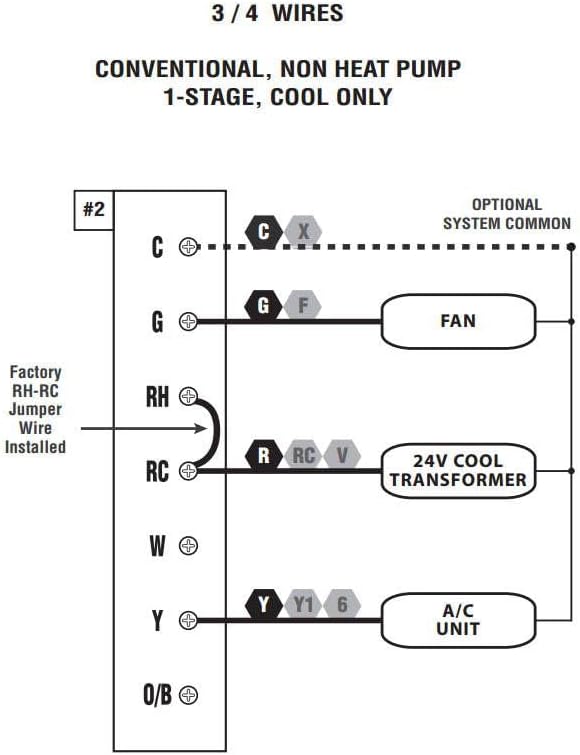
Figure 4: Wiring Diagram for 3/4 Wires. This diagram illustrates the wiring for a conventional, non-heat pump, 1-stage, cool-only system, showing connections for C (optional system common), G (FAN), RH (24V COOL TRANSFORMER), RC (24V COOL TRANSFORMER), and Y (A/C UNIT). A factory RH-RC jumper wire is installed.

Figure 5: Wiring Diagram for 4/5 Wires. This diagram shows the wiring for a conventional, non-heat pump, 1-stage ciepło i 1-stage cool system, with connections for C (optional system common), G (FAN), RH (24V TRANSFORMER), RC (24V TRANSFORMER), W (HEATER), and Y (A/C UNIT). A factory RH-RC jumper wire is installed.

Figure 6: Wiring Diagram for 5/6 Wires. This diagram illustrates the wiring for a conventional, non-heat pump, 1-heat / 1-cool system with two transformers, showing connections for C (optional system common), G (FAN), RH (24V HEAT TRANSFORMER), RC (24V COOL TRANSFORMER), W (HEATER), and Y (A/C UNIT). The factory RH-RC jumper wire must be removed for this configuration.
3. Montaż
The thermostat is designed for wall mounting. Use the provided screws and wall anchors for secure installation. Ensure the thermostat is level for accurate temperature readings.
Instrukcja obsługi
The Lux Pro P111 thermostat features an intuitive control panel for easy operation.

Figure 7: Control Panel Diagram. This diagram labels the key components of the thermostat's front panel: Fan Mode Switch (Fan Auto/On), System Mode Switch (Heat/Off/Cool), LCD Display Screen, SET Button, and UP and DOWN Buttons.
1. System Mode Switch
- CIEPŁO: Aktywuje system ogrzewania.
- OFF: Wyłącza systemy ogrzewania i chłodzenia.
- FAJNE: Aktywuje układ chłodzenia.
2. Fan Mode Switch
- AUTOMATYCZNY: Wentylator pracuje wyłącznie wtedy, gdy aktywnie działa układ ogrzewania lub chłodzenia.
- NA: Wentylator pracuje nieprzerwanie, niezależnie od tego, czy włączony jest system ogrzewania, czy chłodzenia.
3. Regulacja temperatury
Użyj UP (▲) I W DÓŁ (▼) buttons to set your desired temperature. The current temperature will be displayed prominently on the LCD screen.
4. Aktywacja podświetlenia
Press any button to activate the backlight for improved visibility in low-light conditions. The backlight will automatically turn off after a short period of inactivity.
5. Temperature Display (Fahrenheit/Celsius)
The thermostat allows you to switch between Fahrenheit (℉) and Celsius (℃) temperature displays. Refer to the full instruction manual for specific steps on how to change this setting, typically found in the advanced settings menu.
6. Equipment Protection Time Delay
The thermostat features a selectable 5- or 2-minute time delay for equipment protection. This delay prevents short cycling of your heating and cooling system, which can extend the lifespan of your equipment. This setting is usually configured during initial setup or in advanced settings.
7. Blokada klawiatury
To prevent unauthorized adjustments, the thermostat includes a keypad lockout feature. Consult the detailed manual for instructions on how to activate and deactivate this function.
Konserwacja
1. Wymiana baterii
When the battery indicator appears on the display, replace the two (2) AA alkaline batteries. Ensure proper polarity when inserting new batteries. The thermostat retains settings during battery replacement.
2. Czyszczenie
Wyczyść zewnętrzną część termostatu miękką,amp ściereczką. Nie używaj środków czyszczących ani rozpuszczalników o działaniu ściernym, ponieważ mogą one uszkodzić wykończenie lub elementy wewnętrzne.
Rozwiązywanie problemów
If you encounter issues with your Lux Pro P111 thermostat, consider the following common solutions:
- Brak wyświetlacza lub wskaźnika niskiego poziomu baterii: Wymień baterie na nowe baterie alkaliczne AA.
- System nie odpowiada (ogrzewanie/chłodzenie):
- Check that the system mode switch is set to HEAT or COOL.
- Ensure the fan mode switch is set to AUTO or ON.
- Verify that the circuit breaker for your HVAC system is not tripped.
- Confirm that the wiring connections are secure and correct according to the installation diagrams.
- Allow for the equipment protection time delay (5 or 2 minutes) to elapse before the system activates.
- Nieprawidłowy odczyt temperatury: Upewnij się, że termostat nie jest wystawiony na bezpośrednie działanie promieni słonecznych, przeciągów ani źródeł ciepła, które mogłyby wpłynąć na jego czujnik.
- Klawiatura nie reaguje: Check if the keypad lockout feature is active. Refer to the manual for deactivation steps.
W przypadku powtarzających się problemów zapoznaj się z pełną instrukcją obsługi lub skontaktuj się z działem obsługi klienta.
Specyfikacje
| Funkcja | Szczegół |
|---|---|
| Marka | LUKS |
| Nazwa modelu | P111 |
| Wymiary produktu | 4" gł. x 7" szer. x 7" wys. |
| Typ kontrolera | Naciśnij przycisk |
| Cechy specjalne | Lighted Display, Temperature Display |
| Kolor | P111-white |
| Konkretne zastosowania | Klimatyzator, pompa ciepła |
| Rodzaj kontroli temperatury | Podręcznik |
| Zawarte komponenty | Pro P111 Non-Programmable Thermostat; 1 Heat, 1 Cool |
| Źródło zasilania | Battery Powered (2 AA batteries required), 24V System Powered |
| Waga przedmiotu | 1.6 uncji |
| Tomtage | 24 wolty |
| Tworzywo | Plastikowy |
| Typ montażu | Montaż ścienny |
| Styl | Nieprogramowalny |
| Podświetlenie | Tak |
| UPC | 021079141111 |
Gwarancja i wsparcie
Informacje o gwarancji
The Lux Pro P111 thermostat comes with a 5-roczna ograniczona gwarancjaNiniejsza gwarancja obejmuje wady materiałowe i wykonawcze powstałe w wyniku normalnego użytkowania. Prosimy zachować dowód zakupu na potrzeby roszczeń gwarancyjnych.
Obsługa klienta
For technical assistance, troubleshooting not covered in this manual, or warranty inquiries, please contact Lux customer support. Refer to the product packaging or the official Lux webna tej stronie znajdziesz najbardziej aktualne dane kontaktowe.
You can visit the official LUX Store for more information: Sklep LUX na Amazonie


