Wstęp
The BOYA BY-DMR7 is a broadcast-quality supercardioid condenser microphone designed for use with DSLR cameras and camcorders. It features an integrated flash recorder capable of capturing 24-bit/48 kHz WAV audio files directly to a MicroSDHC card (up to 32 GB, sold separately). This manual provides comprehensive instructions for setting up, operating, and maintaining your BY-DMR7 microphone to ensure optimal performance.

Image: The BOYA BY-DMR7 microphone with its foam windscreen, showcasing its compact design and integrated controls.
Co jest w pudełku
Sprawdź zawartość paczki, aby upewnić się, że znajdują się w niej wszystkie elementy:
- BOYA BY-DMR7 Shotgun Microphone
- Piankowa szyba przednia
- 3.5mm Gold-Plated Audio Cable
- Instrukcja obsługi (ten dokument)

Image: All components included with the BY-DMR7: the microphone unit, the foam windscreen, and the coiled 3.5mm audio cable.
Produkt ponadview
Familiarize yourself with the various parts and controls of the BY-DMR7 microphone:
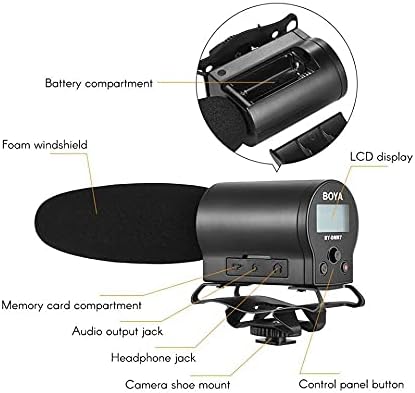
Image: Detailed diagram highlighting key components of the BY-DMR7, including the battery compartment, LCD display, control panel, and various input/output jacks.
- Piankowa szyba przednia: Reduces wind noise and plosives.
- Microphone Barrel: Houses the supercardioid condenser microphone element.
- Wyświetlacz LCD: Shows recording status, battery level, and menu options.
- Przyciski panelu sterowania: Do nawigacji po menu, nagrywania i odtwarzania.
- Gniazdo słuchawkowe (3.5 mm): Do monitorowania dźwięku w czasie rzeczywistym.
- Audio Output Jack (3.5mm): Connects to camera's audio input.
- Memory Card Compartment: For MicroSDHC card insertion.
- Komora baterii: Mieści 2 baterie AA.
- Zintegrowany amortyzator: Reduces handling noise.
- Camera Shoe Mount: Attaches to standard camera hot/cold shoe.
Organizować coś
1. Instalacja baterii
The BY-DMR7 requires two (2) AA batteries for operation.
- Locate the battery compartment on the side of the microphone unit.
- Odsuń pokrywę komory baterii.
- Włóż dwie baterie AA, zwracając uwagę na prawidłową biegunowość (+/-), zgodnie ze wskazaniami wewnątrz komory.
- Dokładnie zamknij pokrywę komory baterii.
2. MicroSDHC Card Installation
A MicroSDHC card (up to 32 GB) is required for recording audio.
- Locate the memory card compartment.
- Gently insert a MicroSDHC card into the slot until it clicks into place. Ensure the card is oriented correctly.
- Aby wyjąć kartę, delikatnie ją dociśnij, aż wyskoczy.
3. Montaż mikrofonu
The BY-DMR7 can be mounted on a camera's hot/cold shoe.
- Slide the camera shoe mount of the microphone onto your camera's hot/cold shoe.
- Tighten the locking wheel on the shoe mount to secure the microphone in place.

Image: The BY-DMR7 microphone securely attached to a DSLR camera, ready for use.

Image: The BY-DMR7 microphone mounted on a different camera body, demonstrating its versatility.

Image: The BY-DMR7 microphone attached to a camcorder, illustrating its compatibility with various video recording devices.
4. Łączenie z kamerą
Use the supplied 3.5mm audio cable to connect the microphone to your camera's audio input.
- Podłącz jeden koniec kabla audio 3.5 mm do Gniazdo wyjścia audio on the BY-DMR7.
- Podłącz drugi koniec kabla do Wejście mikrofonowe jack on your camera or camcorder.
5. Attaching Foam Windscreen
Slide the foam windscreen over the microphone barrel to reduce unwanted wind noise during outdoor recordings or plosives from close-up speech.
Instrukcja obsługi
1. Włączanie/wyłączanie zasilania
- To power on the device, press and hold the power button (usually part of the control panel) until the LCD display illuminates.
- Aby wyłączyć zasilanie, naciśnij i przytrzymaj przycisk zasilania, aż wyświetlacz się wyłączy.
2. Nagrywanie dźwięku
The BY-DMR7 features one-button recording for ease of use.
- Ensure a MicroSDHC card is inserted and batteries are charged.
- Naciśnij dedykowany Nagrywać button (often marked with a red dot or 'REC'). The recording indicator on the LCD will show that recording is active.
- Aby zatrzymać nagrywanie, naciśnij Nagrywać przycisk ponownie. file will be saved automatically to the MicroSDHC card.
3. Monitorowanie dźwięku
Use the 3.5mm headphone output to monitor your audio in real-time.
- Connect a pair of headphones to the Gniazdo słuchawkowe na mikrofonie.
- Adjust the monitoring volume if available through the menu system.
4. Using the Low-Cut Filter
The low-cut filter helps reduce unwanted low-frequency noise such as rumble or air conditioning hum.
- Access the menu system via the control panel buttons.
- Navigate to the audio settings or filter options.
- Enable or disable the low-cut filter as needed for your recording environment.
5. Nawigacja i ustawienia menu
The LCD display and control panel buttons allow you to adjust various settings.
- Use the navigation buttons (e.g., up/down arrows, 'Menu', 'OK') to browse through options on the LCD.
- Common settings include input gain, headphone volume, low-cut filter, and file kierownictwo.
6. Odtwarzanie i File Przenosić
- Odtwarzanie nagranego dźwięku: Use the control panel buttons to navigate to recorded files and initiate playback directly on the device through the headphone jack.
- File Transfer: To transfer recorded WAV files, remove the MicroSDHC card from the BY-DMR7 and insert it into a compatible card reader connected to a computer. The files can then be copied like any other data.
Konserwacja
- Czyszczenie: Use a soft, dry cloth to clean the exterior of the microphone. Do not use liquid cleaners or solvents.
- Składowanie: When not in use for extended periods, remove the batteries to prevent leakage. Store the microphone in a cool, dry place, away from direct sunlight and extreme temperatures.
- Piankowa szyba przednia: W razie zabrudzenia piankową szybę przednią można delikatnie wyczyścić wodą z łagodnym mydłem. Przed ponownym montażem należy upewnić się, że jest całkowicie sucha.
Rozwiązywanie problemów
| Problem | Możliwa przyczyna | Rozwiązanie |
|---|---|---|
| Mikrofon nie włącza się. | Baterie rozładowane lub nieprawidłowo włożone. | Wymień baterie na nowe baterie AA, zwracając uwagę na prawidłową biegunowość. |
| Brak nagrania audio. | No MicroSDHC card inserted, card full, or card error. | Insert a MicroSDHC card, check available space, or try formatting the card (this will erase all data). |
| Słaba jakość dźwięku / nadmierny hałas. | Wind noise, low-cut filter off, incorrect gain settings, or environmental noise. | Ensure foam windscreen is used. Enable low-cut filter. Adjust input gain. Record in a quieter environment. |
| No audio monitoring through headphones. | Headphones not connected properly, headphone volume too low, or faulty headphones. | Check headphone connection. Increase headphone volume. Test with another pair of headphones. |
| Microphone not recognized by camera. | Audio cable not connected properly, or camera audio input settings. | Ensure 3.5mm audio cable is securely connected to both microphone and camera. Check camera's audio input settings (e.g., external mic enabled). |
Specyfikacje
| Funkcja | Szczegół |
|---|---|
| Współczynnik kształtu mikrofonu | Flinta |
| Wzór biegunowy | Superkardioidalna (jednokierunkowa) |
| Czułość audio | 45dB |
| Stosunek sygnału do szumu | 78dB |
| Poziom hałasu | 110dB |
| Format nagrywania | 24-bit/48 kHz WAV audio files |
| Nośniki pamięci | MicroSDHC card (up to 32 GB) |
| Wyjście słuchawkowe | Gniazdo stereo 3.5 mm |
| Wyjście audio | Gniazdo 3.5 mm |
| Źródło zasilania | 2 baterie AA |
| Pozycja Wymiary (dł. x szer. x wys.) | 9.8 x 3.86 x 1.97 cala |
| Waga przedmiotu | 5.3 uncji (około 150 gramów) |
| Tworzywo | Foam (windscreen) |
| Kompatybilne urządzenia | DSLR cameras, camcorders, MiniSDHC cards |
Gwarancja i wsparcie
Niniejsza instrukcja nie zawiera informacji dotyczących gwarancji produktu i obsługi klienta. Prosimy o zapoznanie się z oficjalną instrukcją producenta. website or contact your retailer for details on warranty coverage, technical support, and service options for your BOYA BY-DMR7 microphone.
Aby uzyskać dalszą pomoc, możesz odwiedzić stronę Sklep BOYA na Amazonie.


