1. Wprowadzenie
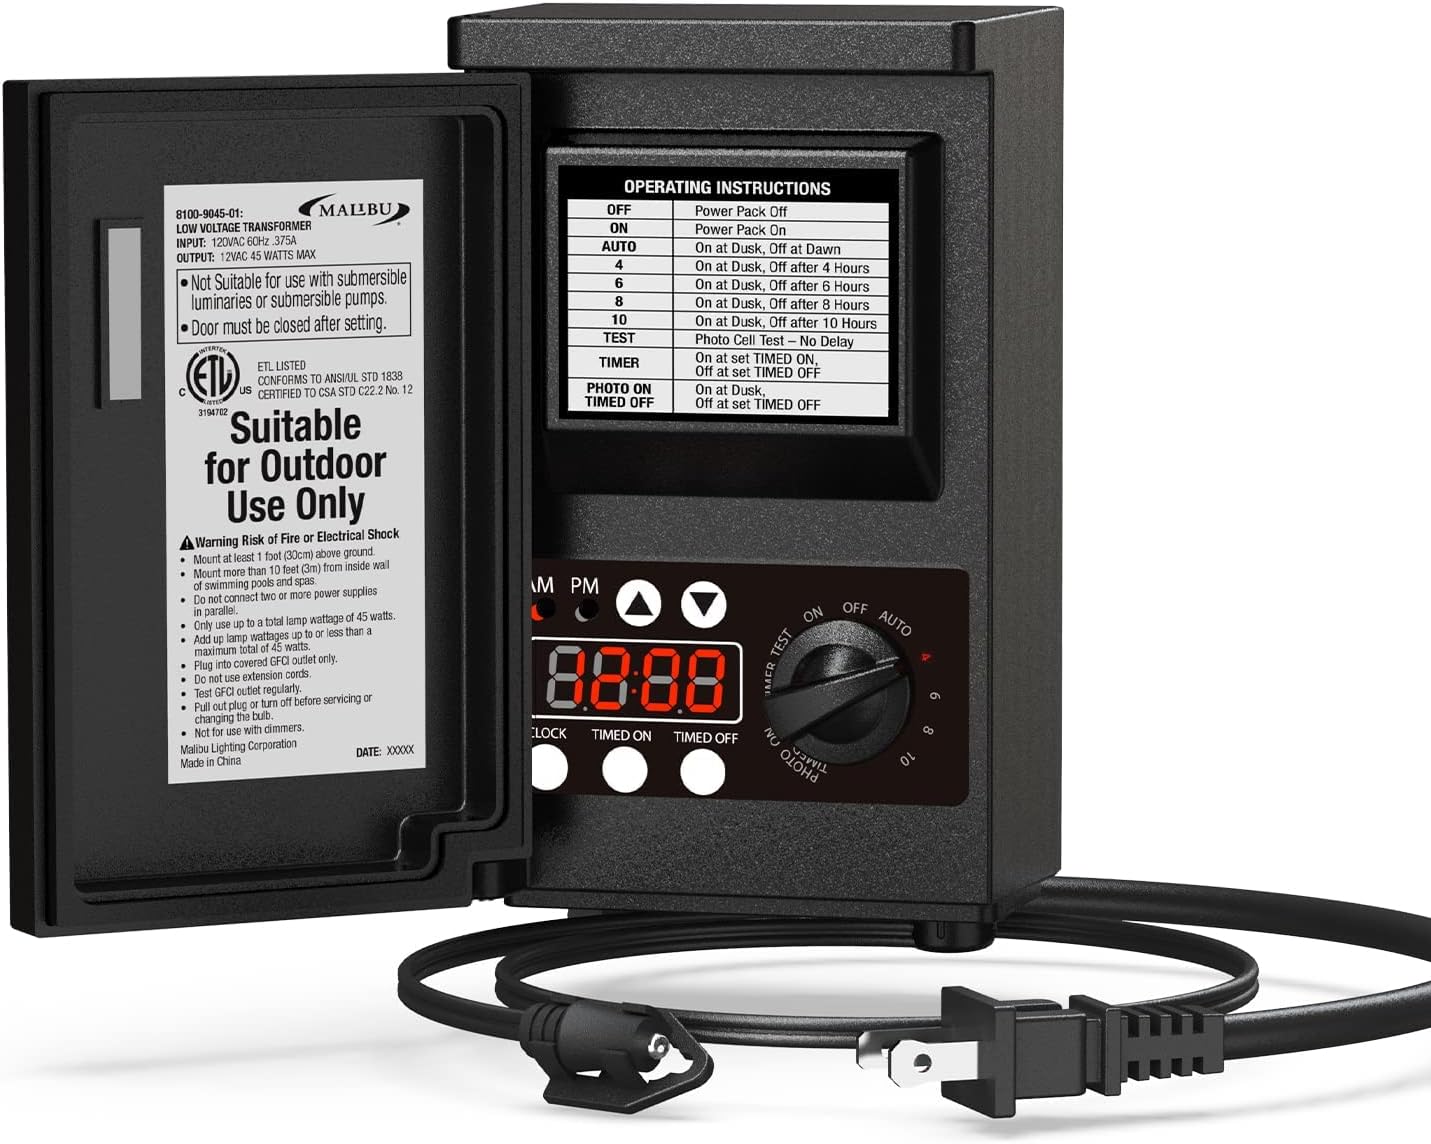
The Malibu 45W Low Voltage Landscape Transformer converts standard household 120V AC to a safe 12V AC, suitable for various low voltage outdoor lighting systems. It features a built-in photo sensor and multiple timer functions for automated operation, enhancing the convenience and safety of your outdoor lighting.
2. Informacje dotyczące bezpieczeństwa
Przed instalacją i uruchomieniem należy przeczytać i zrozumieć wszystkie instrukcje bezpieczeństwa, aby zapobiec obrażeniom lub uszkodzeniom.
- Mount the transformer at least 1 foot (0.305m) above ground level.
- Do not immerse the transformer in water.
- Nie podłączaj dwóch lub więcej zasilaczy równolegle.
- Zapewnij całkowitą moctage of connected lights does not exceed 45 watts.
- This transformer is not suitable for use with dimmers.
- Install the unit away from hot and humid areas to ensure optimal performance and longevity.
- The control panel door must be closed after setting to protect the transformer from adverse weather conditions like rain and snow.
- Always disconnect power by pulling out the plug or turning off the circuit breaker before servicing the unit or changing light bulbs.
- This product is designed for outdoor use only. It is not suitable for submersible luminaires or pumps.
3. Zawartość opakowania
Sprawdź, czy w opakowaniu znajdują się wszystkie elementy:
- 1 x Malibu 45W Low Voltage Transformator krajobrazu
- 1 x Integrated Photo Sensor
- 1 x Instrukcja obsługi (ten dokument)
- Śruby montażowe
4. Instalacja
The transformer is designed for straightforward installation. Follow these steps for proper setup:
- Wybierz lokacje: Select a suitable outdoor location for mounting. Ensure it is at least 1 foot (0.305m) above ground and protected from direct exposure to extreme heat or humidity.
- Mount Transformer: Use the provided mounting screws to securely attach the transformer to a wall or sturdy surface.
- Connect Low-VoltagKabel: Podłącz niskonapięciowotage cable from your landscape lighting system directly to the output port located at the bottom of the transformer. Ensure connections are secure.
- Podłączenie zasilania: Insert the transformer's 120V plug into a standard outdoor household power outlet.
- Zamknij drzwi: After installation and setting the desired operating mode, ensure the control panel door is securely closed to protect internal components from weather.


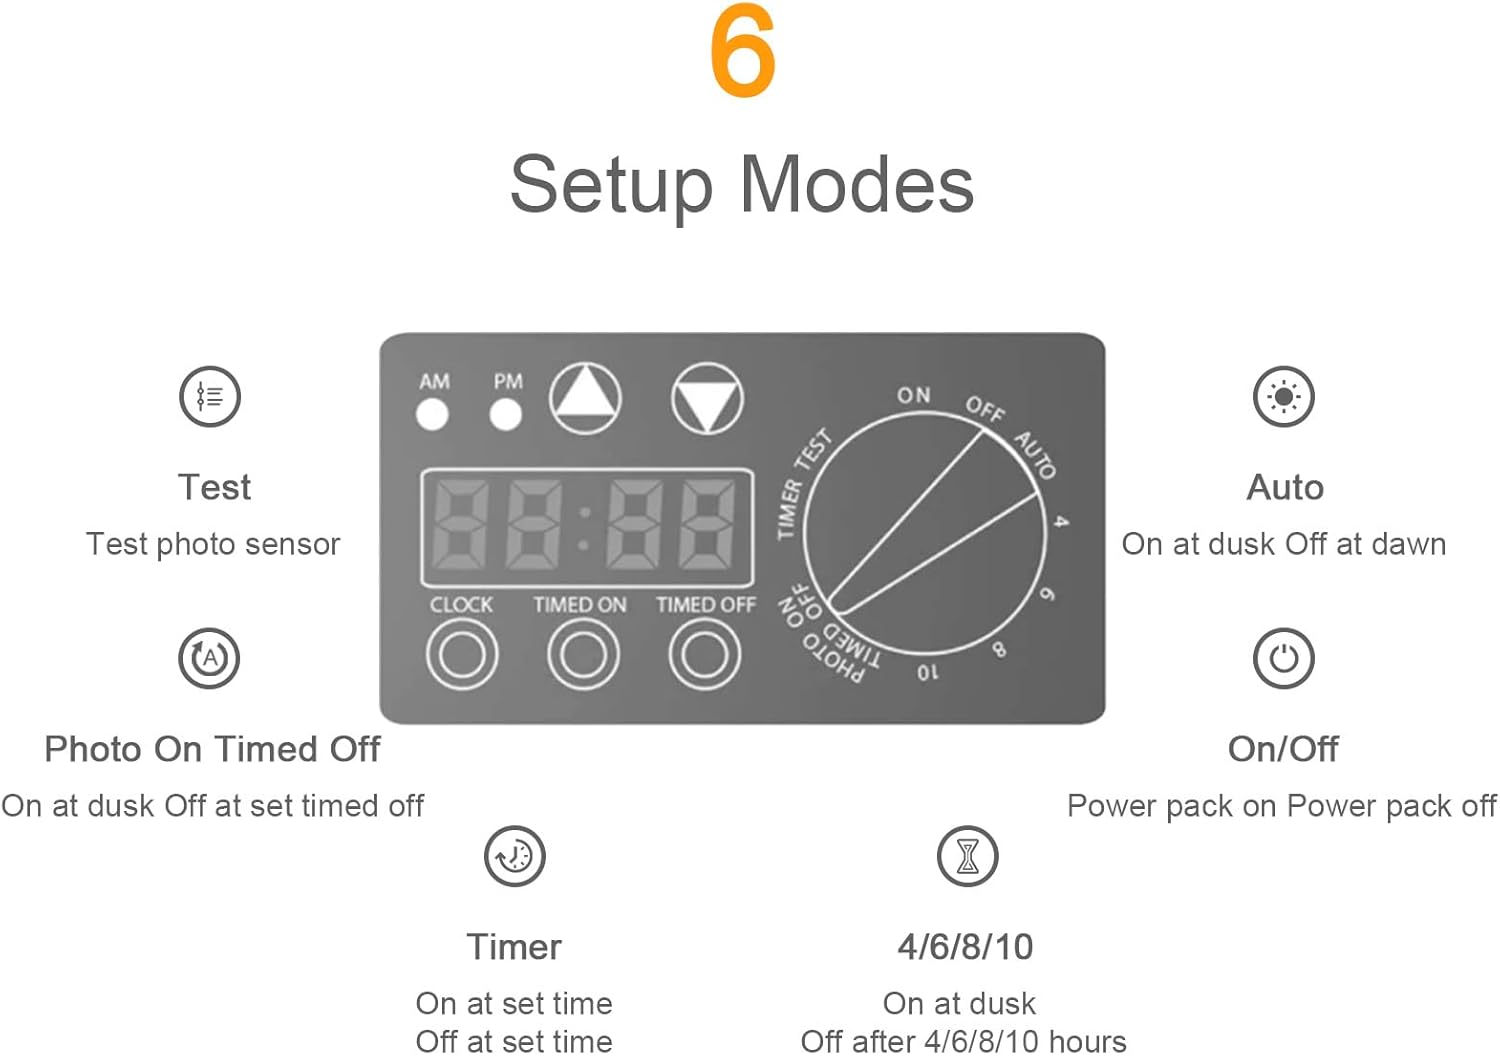
5. Instrukcja obsługi
The transformer features a control dial and buttons for setting various operating modes and the internal clock.
Ustawianie zegara
Use the 'CLOCK' button and the 'AM/PM' and arrow buttons to set the current time. The digital display will show the set time.
Tryby pracy
Rotate the dial to select one of the following operating modes:
- OFF: The power pack is turned off.
- NA: The power pack is continuously on.
- AUTOMATYCZNY: The transformer turns on at dusk (detected by the photo sensor) and turns off at dawn.
- 4/6/8/10 godzin: The transformer turns on at dusk and automatically turns off after 4, 6, 8, or 10 hours, depending on the selected setting.
- REGULATOR CZASOWY: The transformer turns on at a set timed 'ON' time and turns off at a set timed 'OFF' time. Use the 'TIMED ON' and 'TIMED OFF' buttons to configure these times.
- PHOTO ON/TIMED OFF: The transformer turns on at dusk and turns off at a set timed 'OFF' time.
- TEST: This mode allows you to test the photo sensor without delay.
6. Konserwacja
The Malibu 45W Low Voltage Landscape Transformer is designed for durability and ease of maintenance. Regular checks ensure optimal performance:
- Regularna kontrola: Periodically inspect the transformer unit and all wiring for any signs of damage, wear, or loose connections.
- Ochrona przed warunkami atmosferycznymi: Always ensure the control panel door is securely closed to protect the internal electronics from rain, snow, and other environmental elements.
- Czyszczenie: Gently wipe the exterior of the transformer with a damp Do usuwania brudu i zanieczyszczeń należy używać ściereczki. Nie należy używać silnych środków chemicznych ani ściernych środków czyszczących.
- Odłączenie zasilania: Before performing any maintenance, inspection, or changing light bulbs, always disconnect the transformer from the main power supply by unplugging it.
7. Rozwiązywanie Problemów
If you encounter issues with your transformer, consider the following common troubleshooting steps:
- Światła się nie włączają:
- Check if the transformer is plugged into a live 120V outlet.
- Verify that the operating mode is correctly set (e.g., ON, AUTO, or a specific timer setting).
- Inspect the low-voltage wiring connections to ensure they are secure.
- Confirm that the light bulbs in your landscape fixtures are functional.
- Światła nie wyłączają się:
- Recheck the selected operating mode and its settings (e.g., timer duration, timed off setting).
- Ensure the photo sensor is not obstructed or covered, which could prevent it from detecting daylight.
- Działanie przerywane:
- Ensure the transformer is not exposed to excessive heat or moisture.
- Sprawdź, czy połączenia przewodów nie są luźne.
Jeśli wykonanie tych czynności nie rozwiąże problemu, zapoznaj się z sekcją Gwarancja i wsparcie techniczne, aby uzyskać dalszą pomoc.
8. Specyfikacje
| Numer modelu | 8100-9045-01 |
| Wejście Voltage | 120 V prądu zmiennego |
| Objętość wyjściatage | 12 V prądu zmiennego |
| Maksymalna kompatybilna Wattage | 45 watów |
| Waga przedmiotu | 3.68 funtów |
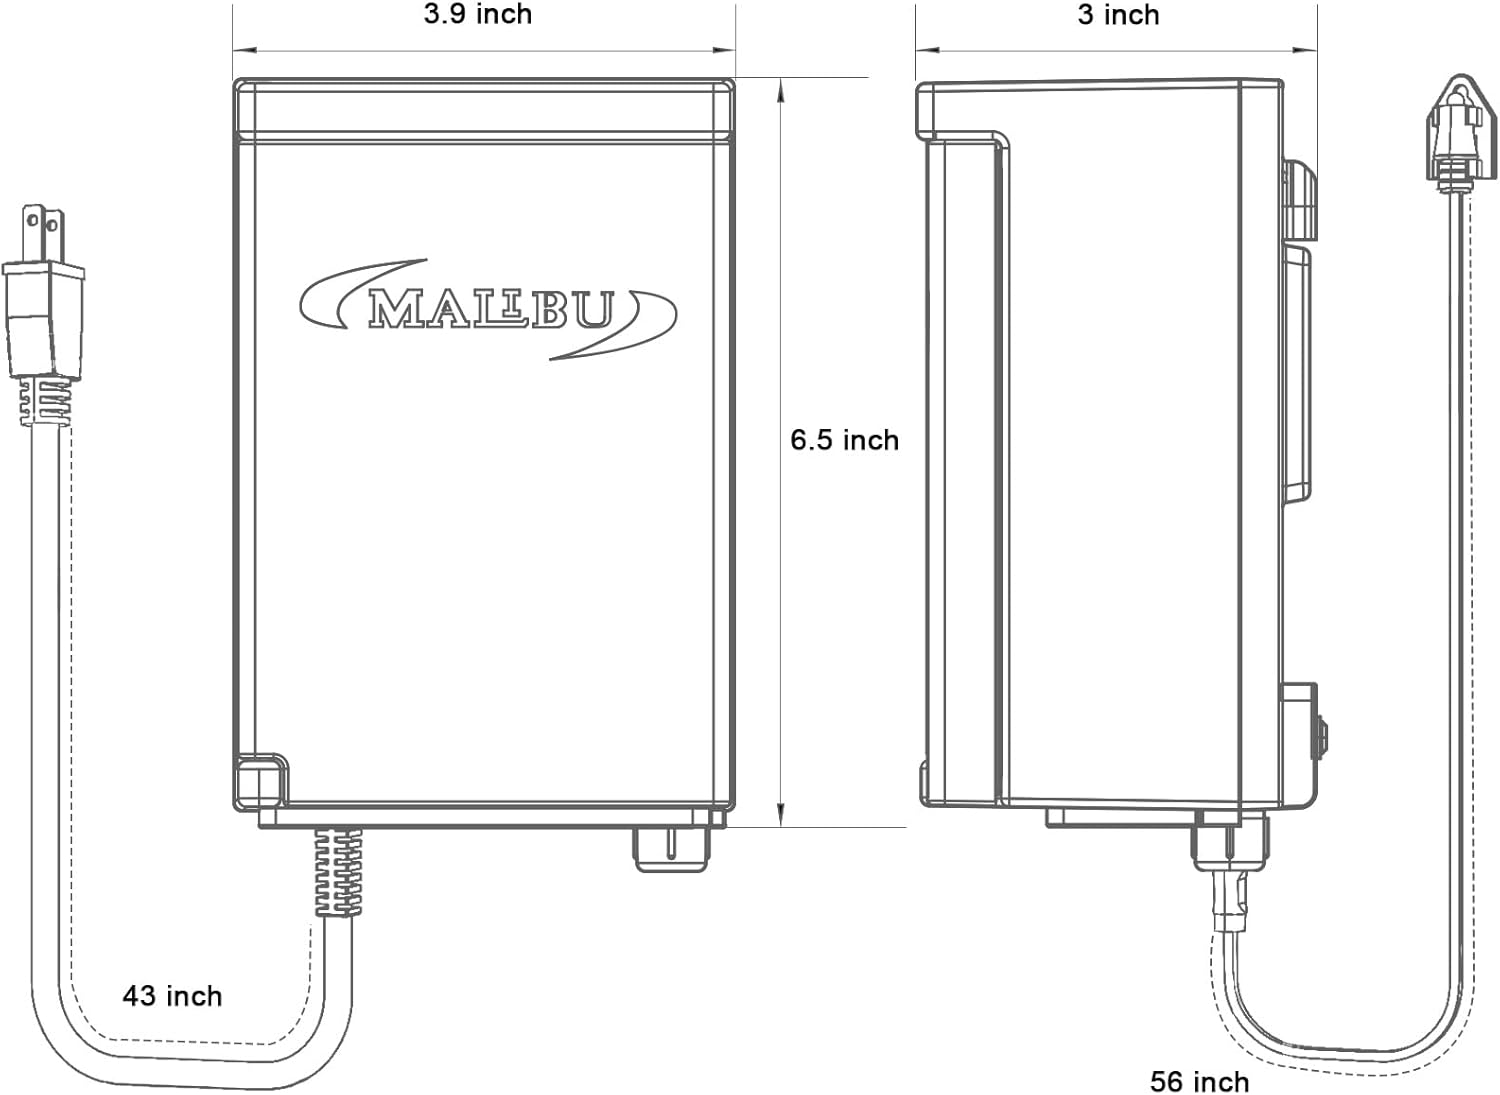
| Wymiary produktu (dł. x szer. x wys.) | 3.5 x 3 x 6.9 cala |
| Tworzywo | Plastikowy |
| Konkretne zastosowania | Tylko do użytku na zewnątrz |
| Cechy specjalne | Integrated Timer, Photo Sensor, Weatherproof Shield |
| UPC | 705300897021 |
9. Gwarancja i wsparcie
Please note that based on available information, the original manufacturer, Malibu, may no longer be actively in business, and direct customer support or warranty services from the manufacturer may not be available. For any product-related inquiries, troubleshooting assistance, or potential warranty claims, please contact the retailer from whom you purchased this product.


