1. Wprowadzenie
The Nexans N-HEAT Millimat/100 Electric Underfloor Heating System provides an energy-efficient and comfortable indoor climate. This system offers several advantages, including low installation costs, maintenance-free operation, and simple management.
Electric underfloor heating systems are economical and easy to install, incurring no annual maintenance costs. They allow for flexible zone control, enabling users to activate heating only in specific areas, such as a bathroom floor, during warmer months. Modern thermostats, like the included CDFR-003, feature advanced energy-saving functions, such as temperature reduction settings for day and night to optimize energy consumption.

Obraz 1.1: A woman enjoying a warm bathroom, illustrating the comfort provided by the Nexans underfloor heating system. The heating mat is visible beneath the floor tiles.
Główne cechy:
- Complete electric underfloor heating set from Nexans.
- Includes a digital thermostat for precise temperature control.
- Factory warranty on the heating mat.
2. Konfiguracja i instalacja
Proper installation is crucial for the efficient and safe operation of your Nexans N-HEAT underfloor heating system. It is recommended that installation be performed by a qualified electrician or heating professional.
2.1 Komponentyview

Obraz 2.1: The Nexans N-HEAT electric underfloor heating mat, shown both rolled and partially unrolled, illustrating its design and flexibility for installation.
The system typically consists of the heating mat (with integrated heating cables), a floor sensor, and the CDFR-003 digital thermostat.
2.2 Kroki instalacji (wytyczne ogólne)
- Przygotuj podłoże: Ensure the subfloor is clean, dry, and level. Apply a suitable primer if necessary.
- Układ planu: Determine the optimal layout for the heating mat, avoiding areas where permanent fixtures (e.g., bathtubs, cabinets) will be placed.
- Install Floor Sensor: Place the floor temperature sensor in a conduit between two heating cables, ensuring it is centrally located within the heated area and accessible for future maintenance.
- Lay the Heating Mat: Unroll the heating mat directly onto the prepared subfloor. The mat can be cut and turned to fit the room's contours (do not cut the heating cable itself). Secure the mat to prevent movement during subsequent steps.
- Connect to Thermostat: Connect the heating mat's cold lead and the floor sensor to the CDFR-003 thermostat according to the wiring diagram provided with the thermostat. Ensure all electrical connections are made by a qualified professional and comply with local electrical codes.
- Apply Floor Covering: Once the mat and connections are verified, apply a suitable leveling compound or tile adhesive over the mat, ensuring full encapsulation of the heating cables. Then, install your chosen floor covering (tiles, laminate, etc.).

Obraz 2.2: A cutaway illustration showing the Nexans underfloor heating mat installed beneath the floor in a bathroom, demonstrating the layering of the system.
3. Instrukcja obsługi
The Nexans N-HEAT system is controlled by the CDFR-003 digital thermostat, allowing precise temperature management and energy optimization.
3.1 CDFR-003 Thermostat Overview
Obraz 3.1: The Nexans CDFR-003 digital thermostat, featuring a blue backlit display showing temperature and time settings.
The CDFR-003 thermostat allows you to set desired floor or room temperatures, program heating schedules, and utilize energy-saving features.
3.2 Podstawowa obsługa
- Włączanie/wyłączanie: Use the power button (usually indicated by a power symbol) to turn the heating system on or off.
- Ustaw temperaturę: Use the up/down arrows or rotary dial (depending on thermostat model) to adjust the desired temperature. The current temperature and setpoint will typically be displayed.
- Programowanie: Refer to the specific CDFR-003 thermostat manual for detailed instructions on setting daily or weekly heating schedules. This feature allows the system to automatically adjust temperatures based on your routine, maximizing comfort and energy savings.
- Wybór trybu: Some thermostats offer different operating modes (e.g., comfort, economy, frost protection). Select the mode that best suits your needs.
For detailed programming and advanced features, consult the separate user manual provided with your CDFR-003 thermostat.
4. Konserwacja
The Nexans N-HEAT Electric Underfloor Heating System is designed to be largely bezobsługowy once correctly installed. The heating cables are sealed within the mat and protected by the floor covering, requiring no routine servicing.
4.1 Ogólna opieka
- Thermostat Cleaning: Keep the thermostat clean by wiping it with a soft, dry cloth. Avoid using abrasive cleaners or solvents.
- Pielęgnacja podłóg: Follow the maintenance guidelines for your specific floor covering. Ensure that any cleaning methods do not damage the floor or potentially affect the heating system beneath.
No internal components of the heating mat or cables require user maintenance. Any issues should be addressed by a qualified technician.
5. Rozwiązywanie Problemów
If you experience issues with your Nexans N-HEAT underfloor heating system, consider the following common troubleshooting steps. For complex electrical problems, always contact a qualified electrician.
5.1 Typowe problemy
- Brak ciepła:
- Check if the thermostat is powered on and set to a temperature above the current room/floor temperature.
- Verify that the circuit breaker for the heating system has not tripped.
- Ensure the thermostat is not in an 'off' or 'frost protection' mode if heat is expected.
- Nierównomierne ogrzewanie:
- This can sometimes occur if the mat was not laid evenly or if there are obstructions on the floor. Ensure proper air circulation if using an air sensor.
- Wyświetlacz termostatu nie działa:
- Sprawdź zasilanie termostatu.
- If the thermostat uses batteries, check or replace them.
If these steps do not resolve the issue, or if you suspect an electrical fault, disconnect power to the system and contact a certified technician for assistance.
6. Specyfikacje techniczne
Below are the general technical specifications for the Nexans N-HEAT Millimat/100 system and its components.
6.1 Heating Mat Construction
- Dyrygent: Double-resistant wires
- Izolacja: FEP
- Przewodnik uziemiający: Miedź stała
- Wzmocnienie: Fiberglass mesh
- Osłona zewnętrzna: PCV
- Additional Layer: Aluminum sheath
- Całkowita grubość: 4.5 mm
- Szerokość maty: 50 cm
6.2 Dane dotyczące wydajności
- Surface Heating Capacity: 100 W/m² or 150 W/m² (depending on model)
- Element Values: 100 W do 1800 W
- Max. Operating Temperature (Outer Sheath): 65 °C
- Conductor Resistance Tolerance: -5/+10%
- Objętość nominalnatage: 230 V
6.3 Mat Size and Power Table

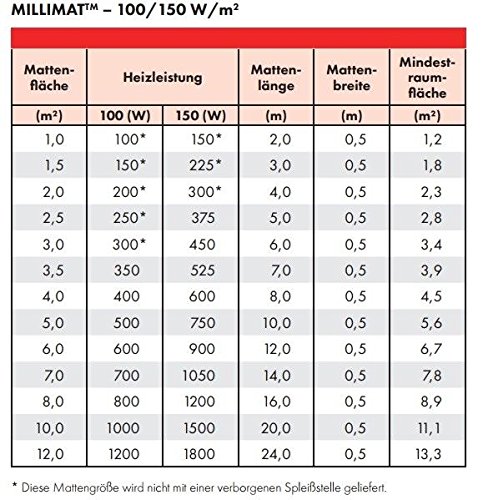
Obraz 6.1: Detailed table outlining the specifications for Millimat 100 and 150 W/m² heating mats, including mat area, heating power, mat length, mat width, and minimum room area.
| Mat Area (m²) | Heating Power (100W/m²) | Heating Power (150W/m²) | Mat Length (m) | Mat Width (m) | Min. powierzchnia pomieszczenia (m²) |
|---|---|---|---|---|---|
| 1.0 | 100 W | 150 W | 2.0 | 0.5 | 1.2 |
| 1.5 | 150 W | 225 W | 3.0 | 0.5 | 1.8 |
| 2.0 | 200 W | 300 W | 4.0 | 0.5 | 2.3 |
| 2.5 | 250 W | 375 W | 5.0 | 0.5 | 2.8 |
| 3.0 | 300 W | 450 W | 6.0 | 0.5 | 3.4 |
| 3.5 | 350 W | 525 W | 7.0 | 0.5 | 3.9 |
| 4.0 | 400 W | 600 W | 8.0 | 0.5 | 4.5 |
| 5.0 | 500 W | 750 W | 10.0 | 0.5 | 5.6 |
| 6.0 | 600 W | 900 W | 12.0 | 0.5 | 6.7 |
| 7.0 | 700 W | 1050 W | 14.0 | 0.5 | 7.8 |
| 8.0 | 800 W | 1200 W | 16.0 | 0.5 | 8.9 |
| 10.0 | 1000 W | 1500 W | 20.0 | 0.5 | 11.1 |
| 12.0 | 1200 W | 1800 W | 24.0 | 0.5 | 13.3 |
Note: Mat sizes marked with an asterisk (*) in the original table indicate they are not supplied with a hidden splice joint.
7. Gwarancja i wsparcie
7.1 Gwarancja na produkt
The Nexans N-HEAT Electric Underfloor Heating System comes with a factory warranty on the heating mat. Please refer to the warranty documentation included with your product for specific terms, conditions, and duration of coverage.
7.2 Obsługa klienta
For technical assistance, installation queries, or warranty claims, please contact your authorized Nexans dealer or the point of purchase. Ensure you have your product model number (Millimat/100 N-HEAT) and proof of purchase available when contacting support.


