1. Wprowadzenie
The Melnor 73280 Digital 4-Zone Electronic Water Hose Timer provides flexible and efficient control over your outdoor watering needs. Designed for durability and ease of use, this timer allows you to customize watering schedules for up to four independent zones, ensuring optimal hydration for different areas of your garden or lawn.
Główne cechy:
- Elastyczne programowanie: Set up to 4 watering cycles per day, each with its own start time and duration, on specific days of the week.
- 4 niezależne strefy: Control watering for up to four separate areas, each with unique scheduling.
- Duży wyświetlacz cyfrowy: A 25% larger rectangular screen provides clear information for easy setup and programming.
- Podlewanie ręczne: Easily activate any zone for immediate watering without affecting programmed schedules.
- Funkcja opóźnienia deszczu: Pause watering for up to 7 days to conserve water during rainy periods. The program resumes automatically after the delay.
- Low Battery Consumption: A new set of AA alkaline batteries (not included) can last up to 6 months. Watering programs are retained during battery changes.
Video 1: Melnor 73280 Product Overview. This video provides a brief visual introduction to the Melnor 73280 Digital 4-Zone Electronic Water Hose Timer, highlighting its main features and design.
2. Konfiguracja
2.1. Instalacja baterii
- Znajdź komorę baterii z tyłu timera.
- Wysuń tackę na baterię.
- Insert two (2) new AA alkaline batteries (not included), ensuring correct polarity (+/-).
- Slide the battery tray back into the timer until it clicks securely.
2.2. Attaching the Timer to Your Faucet
- Upewnij się, że zewnętrzny kran jest zakręcony.
- Thread the timer's brass inlet connector onto your faucet. Hand-tighten firmly to prevent leaks.
- Attach your garden hoses to the desired zone outlets (1-4) at the bottom of the timer.
- Slowly turn on your outdoor faucet. The timer is designed to withstand water pressure, but sudden surges should be avoided.
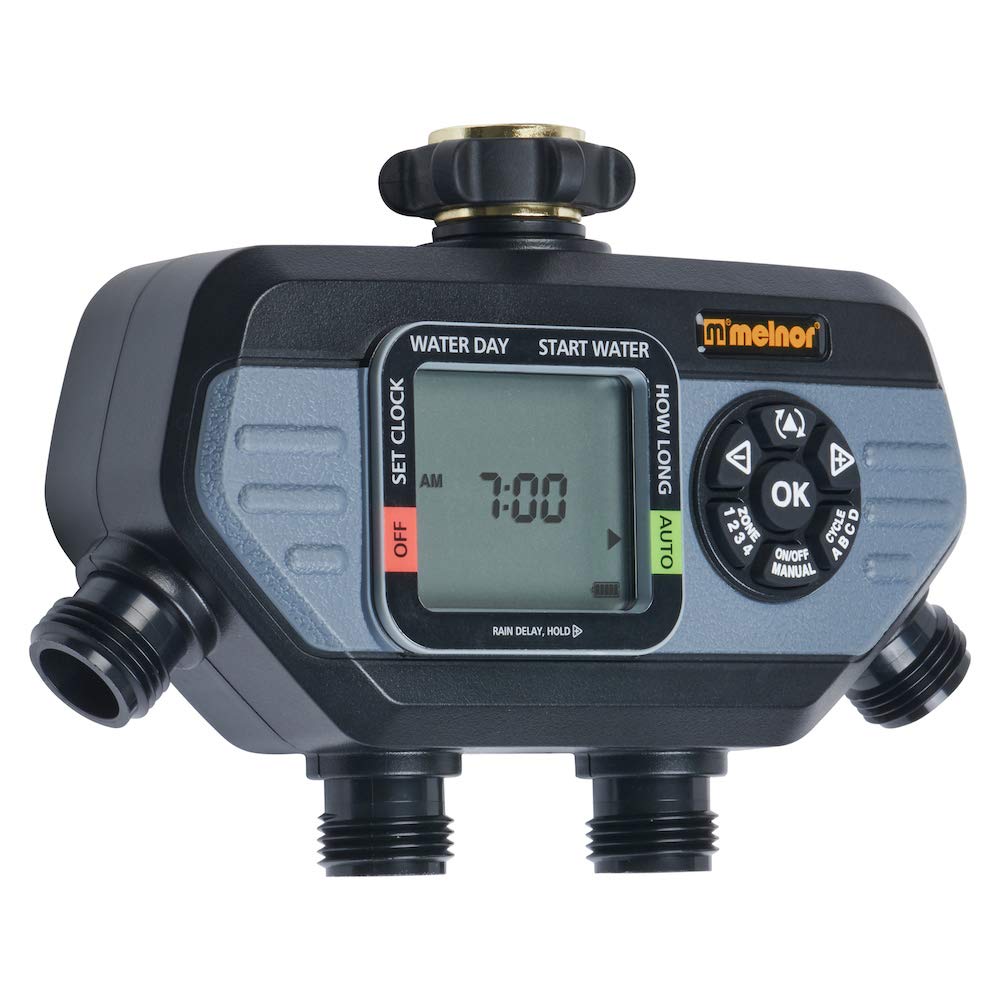
Image 1: The Melnor 73280 timer securely attached to an outdoor faucet, demonstrating the connection points for multiple hoses.
2.3. Initial Time and Day Setting
- Ustaw pokrętło na „USTAW ZEGAR”.
- Use the arrow buttons to adjust the current time (AM/PM). Press "OK" to confirm.
- Use the arrow buttons to select the current day of the week. Press "OK" to confirm.
- Turn the dial back to "AUTO" to save settings and return to automatic operation.
3. Działanie
3.1. Programming Watering Cycles
- Turn the dial to "START TIME".
- Use the "ZONE" button to select the zone (1-4) you wish to program.
- Use the arrow buttons to set the desired start time for the first cycle. Press "OK" to confirm.
- Turn the dial to "HOW LONG". Use the arrow buttons to set the watering duration for the selected zone. Press "OK" to confirm.
- Turn the dial to "HOW OFTEN". Use the arrow buttons to set the frequency (e.g., every day, every other day, specific days). Press "OK" to confirm.
- Repeat steps for additional cycles (up to 4 per zone) or other zones as needed.
- Turn the dial back to "AUTO" to activate your programmed schedules.
3.2. Podlewanie ręczne
To manually water a zone without affecting your programmed schedule:
- Ensure the dial is set to "AUTO".
- Naciśnij przycisk „MANUAL”.
- Use the "ZONE" button to select the desired zone (1-4).
- Use the arrow buttons to set the desired manual watering duration. Press "OK" to start watering.
- To stop manual watering, press "MANUAL" again or turn the dial to "OFF" and then back to "AUTO".
3.3. Funkcja opóźnienia deszczu
To temporarily pause your watering schedule due to rain:
- Ensure the dial is set to "AUTO".
- Press and hold the "DELAY +" button for 3-5 seconds.
- Use the arrow buttons to select the desired delay duration (e.g., 24 hours, 48 hours, up to 7 days). Press "OK" to confirm.
- Po upływie wybranego okresu opóźnienia timer automatycznie wznowi działanie zaprogramowanego harmonogramu.
- To cancel the rain delay early, press and hold "DELAY +" again until the delay is cleared.
4. Konserwacja
4.1. Wymiana baterii
The timer will display a low battery indicator when replacement is needed. Programs are retained during battery changes.
- Slide out the battery tray from the back of the timer.
- Remove old batteries and insert two (2) new AA alkaline batteries, observing polarity.
- Reinsert the battery tray securely.
4.2. Czyszczenie ekranu filtra
Periodically check and clean the filter screen located in the brass inlet to prevent debris from affecting water flow and timer operation.
- Turn off the outdoor faucet and disconnect the timer.
- Ostrożnie wyjmij sitko filtra z mosiężnego wlotu.
- Opłucz ekran pod bieżącą wodą, aby usunąć wszelkie nagromadzone zanieczyszczenia.
- Załóż ponownie czysty filtr i zamontuj timer na kranie.
5. Rozwiązywanie Problemów
| Problem | Możliwa przyczyna | Rozwiązanie |
|---|---|---|
| Timer nie podlewa / Brak przepływu wody |
|
|
| Water flowing when off / Valve stuck open |
|
|
| Water leaking from faucet connection |
|
|
| Water leaking from zone outlets |
|
|
| Timer nie odpowiada |
|
|
Video 2: Melnor HydroLogic 2-Zone Digital Water Timer 73100. While this video features a 2-zone model, it demonstrates similar programming and operational principles that can be applied to the 4-zone timer.
6. Specyfikacje
- Numer modelu: 73280
- Marka: Melnora
- Kolor: Czarny/Szary
- Tworzywo: Plastikowy
- Wymiary produktu: 5.7" gł. x 8.26" szer. x 2.67" wys.
- Waga przedmiotu: 1.06 funtów
- Liczba stref: 4
- Źródło zasilania: 2 baterie alkaliczne AA (brak w zestawie)
- Kod UPC: 042206732804
7. Gwarancja i pomoc techniczna
The Melnor 73280 Digital 4-Zone Electronic Water Hose Timer is backed by a Melnor 7-Year Limited Warranty. Melnor stands behind its products and values your experience. For any questions, feedback, or support needs, please refer to the contact information provided in your product packaging or visit the official Melnor webstrona.
Ważne informacje: Ten produkt może narazić Cię na działanie substancji chemicznych, w tym styrenu, o którym stan Kalifornia wie, że powoduje raka. Aby uzyskać więcej informacji, przejdź do www.P65Warnings.ca.gov. For outdoor use only.


