Wstęp
The Lowrance 000-12603-001 3D StructureScan Bracket is designed to provide a robust mounting solution for your 3D StructureScan and Totalscan Transducers. This bracket ensures secure placement, contributing to the optimal performance of your fishfinder system. It is compatible with select 3D StructureScan and Totalscan models, offering a durable alternative to standard plastic brackets.
StructureScan 3D technology offers freshwater and saltwater anglers a unique, three-dimensional view of fish, structure, and bottom contours. This advanced view simplifies the process of identifying the precise location of fish and underwater structures relative to your vessel, thereby enhancing fishing efficiency. To utilize StructureScan 3D, a 3D module with a compatible transducer and an HDS Carbon or HDS Gen3 fishfinder/chartplotter display are required.
Zawartość opakowania
- Transom mount bracket
- Associated mounting hardware (bolts, nuts, washers)
- Instruction document (this manual)
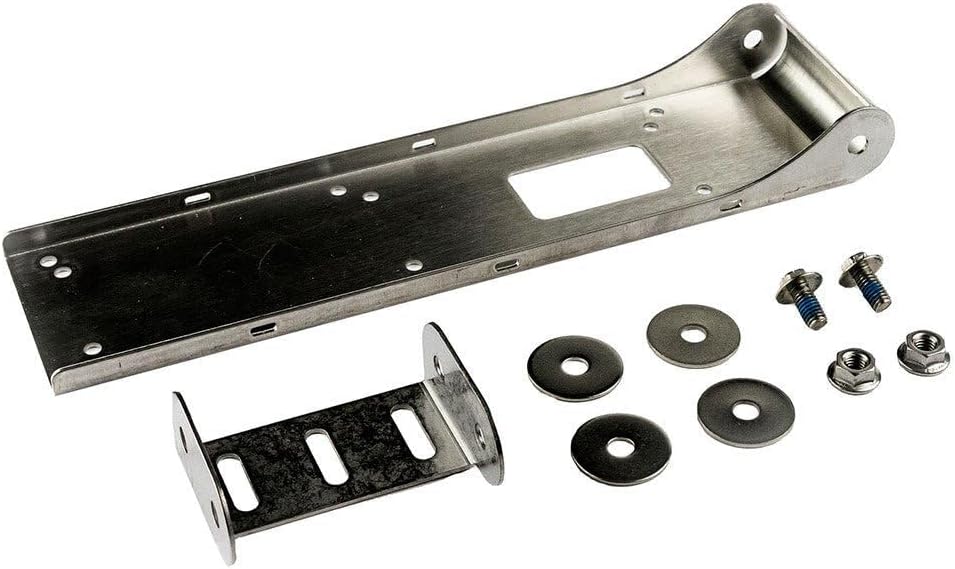
Image: Components of the Lowrance 000-12603-001 3D StructureScan Bracket, including the main bracket, a smaller support bracket, bolts, nuts, and washers.
Konfiguracja i instalacja
Proper installation of the 3D StructureScan Bracket is crucial for optimal transducer performance and longevity. Follow these steps carefully:
- Przygotowanie: Ensure your boat's transom area is clean and free of obstructions. If replacing an existing bracket, remove the old one and clean any residue.
- Pozycjonowanie: Select a mounting location on the transom that provides an unobstructed view for the transducer and minimizes turbulence. The bracket should be mounted as low as possible on the transom without interfering with the propeller or other boat components.
- Oznaczanie otworów wiertniczych: Hold the bracket firmly against the chosen mounting surface. Use a pencil or marker to accurately mark the positions for drilling. Ensure the bracket is level.
- Wiercenie: Using an appropriate drill bit size for your mounting hardware, carefully drill pilot holes at the marked locations. Apply marine sealant to the drilled holes to prevent water intrusion.
- Montaż uchwytu: Align the bracket with the drilled holes. Insert the provided bolts through the bracket and transom. Secure with washers and nuts on the inside of the transom. Tighten all fasteners firmly, but do not overtighten.
- Attaching the Transducer: Refer to your transducer's specific manual for instructions on attaching it to the 000-12603-001 bracket. Ensure the transducer is securely fastened and properly aligned for optimal signal transmission.
- Prowadzenie kabli: Route the transducer cable away from sharp edges and heat sources. Secure the cable using cable clips or ties to prevent damage and entanglement.
Notatka: For best results, consider professional installation if you are unsure about any step of the process.
Rozważania operacyjne
Once installed, the bracket requires no specific operation. Its function is to securely hold the transducer in place. However, consider the following for optimal performance of your transducer system:
- Transducer Angle: Ensure the transducer is angled correctly for your boat's hull type and typical operating speeds. An incorrect angle can lead to signal loss or poor readings.
- Przepływ wody: Verify that the transducer is in clean, undisturbed water flow when the boat is underway. Air bubbles or turbulence can significantly degrade sonar performance.
- Prędkość: At very high speeds, some transducers may experience cavitation, leading to signal loss. If this occurs, consider adjusting the transducer depth or angle, or reducing speed when detailed sonar readings are required.
Konserwacja
The Lowrance 3D StructureScan Bracket is constructed from durable materials designed for marine environments. Regular maintenance will ensure its longevity and continued performance:
- Regularne czyszczenie: Periodically clean the bracket and transducer with fresh water to remove salt, dirt, and marine growth. Avoid abrasive cleaners or tools that could scratch the surface.
- Kontrola elementów złącznych: Annually, or more frequently if used in harsh conditions, inspect all mounting bolts, nuts, and washers for tightness and corrosion. Tighten any loose fasteners.
- Sprawdź, czy nie ma uszkodzeń: Inspect the bracket for any signs of bending, cracking, or other physical damage. If damage is observed, replace the bracket to prevent transducer loss.
- Antifouling: If marine growth is an issue in your area, consult with a marine professional about suitable antifouling coatings for your transducer and bracket that will not interfere with sonar signals.
Rozwiązywanie problemów
While the bracket itself is a passive component, issues related to its installation can affect transducer performance. Here are common problems and their potential solutions:
| Problem | Możliwa przyczyna | Rozwiązanie |
|---|---|---|
| Poor Sonar Readings / Signal Loss at Speed | Transducer not in clean water flow (cavitation), incorrect angle. | Adjust transducer depth or angle. Ensure no obstructions are creating turbulence in front of the transducer. |
| Bracket Appears Loose | Mounting hardware has loosened over time. | Inspect and tighten all mounting bolts and nuts. Consider using thread-locking compound if loosening persists. |
| Excessive Marine Growth on Transducer/Bracket | Lack of regular cleaning or antifouling. | Clean regularly with fresh water. Apply appropriate marine antifouling paint if necessary (consult a professional). |
Specyfikacje
- Numer modelu: 000-12603-001
- Zgodność: Select Lowrance 3D StructureScan and Totalscan Transducers
- Tworzywo: Durable marine-grade material (often stainless steel, though not explicitly stated as such in product description, reviews suggest it's metal/stainless steel replacing plastic)
- Waga: Approximately 0.01 ounces (Note: This weight seems unusually low for a bracket, likely a data entry error in source. Actual weight would be higher.)
- Typ montażu: Mocowanie pawęży
Gwarancja i wsparcie
For warranty information and technical support regarding your Lowrance 000-12603-001 3D StructureScan Bracket, please refer to the official Lowrance webOdwiedź witrynę lub skontaktuj się z działem obsługi klienta. Zachowaj paragon jako dowód zakupu na wypadek ewentualnych roszczeń gwarancyjnych.
Oficjalny Lowrance Webstrona: www.lowrance.com


