1. Wprowadzenie
This manual provides essential information for the safe and effective operation, setup, and maintenance of your Virutex Plunge-Cut Saw, model SRI174T-UCP. Please read these instructions carefully before using the tool to ensure proper function and to prevent injury.
The Virutex SRI174T-UCP is a powerful and ergonomic plunge-cut saw designed for precise cutting of various materials. It features a robust motor, automatic overload protection, and a soft start system for smooth operation. The included cutting guide (UCP174T) facilitates straight, parallel, and stable cuts.
2. Ogólne instrukcje bezpieczeństwa
OSTRZEŻENIE: Przeczytaj wszystkie ostrzeżenia dotyczące bezpieczeństwa, instrukcje, ilustracje i specyfikacje dołączone do tego elektronarzędzia. Nieprzestrzeganie wszystkich instrukcji wymienionych poniżej może skutkować porażeniem prądem, pożarem i/lub poważnymi obrażeniami.
- Always wear eye protection, hearing protection, and a dust mask when operating the saw.
- Utrzymuj miejsce pracy w czystości i dobrym oświetleniu. Zagracone lub ciemne obszary sprzyjają wypadkom.
- Nie należy używać elektronarzędzi w atmosferach zagrożonych wybuchem, np. w obecności łatwopalnych cieczy, gazów lub pyłów.
- Trzymaj dzieci i osoby postronne z dala od siebie podczas obsługi elektronarzędzia. Rozproszenie uwagi może spowodować utratę kontroli.
- Upewnij się, że przewód zasilający nie jest uszkodzony i jest ułożony w taki sposób, aby nie stwarzał ryzyka potknięcia.
- Przed przystąpieniem do jakichkolwiek regulacji, wymiany akcesoriów lub przechowywania elektronarzędzi należy zawsze odłączyć je od źródła zasilania.
- Użyj clamps lub inne praktyczne sposoby zabezpieczenia i podparcia przedmiotu obrabianego na stabilnej platformie. Trzymanie pracy ręką lub przy ciele jest niestabilne i może prowadzić do utraty kontroli.
- Podczas pracy należy mocno trzymać narzędzie obiema rękami.
- Sprawdź, czy ostrze piły jest ostre i prawidłowo zamontowane.
- Never force the tool. Let the tool do the work at its intended speed.
- Do not reach underneath the workpiece when the saw is running.
- Allow the blade to stop completely before setting the tool down.
3. Koniec produktuview i komponenty
The Virutex SRI174T-UCP Plunge-Cut Saw is designed for precision cutting tasks. Familiarize yourself with its main components for safe and efficient use.
- Mocny silnik: 1150 W input power for cutting various materials.
- System łagodnego startu: Ensures a smooth start, reducing kickback.
- Automatyczna ochrona przed przeciążeniem: Protects the motor from damage.
- Fast Saw Blade Stop: Zwiększa bezpieczeństwo poprzez szybkie zatrzymanie ostrza.
- Soft Grip Rear Handle: Zapewnia wygodną i bezpieczną obsługę.
- Blocking Lever: For easy saw blade changes and dividing knife adjustment.
- External Dust Collector Connection: Allows connection to a dust extraction system.
- Cutting Guide (UCP174T): 800 mm length, for straight and parallel cuts.
- Depth Adjustment Scale: For precise control over cutting depth.
- Regulacja kąta: Umożliwia wykonywanie cięć skośnych pod kątem do 45 stopni.
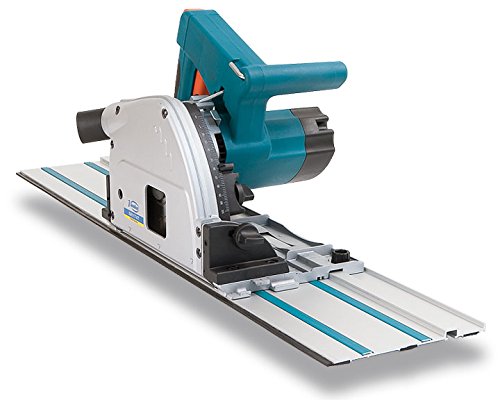
Rysunek 1: The Virutex SRI174T-UCP Plunge-Cut Saw mounted on its cutting guide. This image highlights the robust construction and the integration of the saw with the guide rail system, essential for achieving straight and precise cuts.
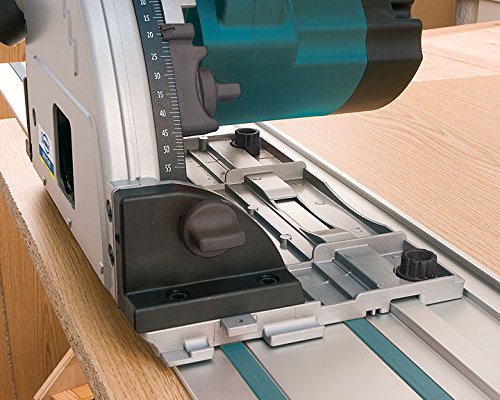
Rysunek 2: Szczegółowy view of the saw's base plate and its interaction with the cutting guide. The depth adjustment scale, visible on the side, allows for precise setting of the cutting depth. The two adjusting knobs ensure the machine glides smoothly on the guide without lateral movement.
4. Konfiguracja
4.1 Attaching the Cutting Guide
The cutting guide (UCP174T) is crucial for achieving straight and accurate cuts.
- Place the cutting guide on the workpiece, aligning it with your desired cut line.
- Position the plunge-cut saw onto the guide rail. The saw is designed to glide directly on the guide without additional accessories.
- Adjust the two knobs on the saw's base to ensure a snug fit on the guide, preventing any lateral movement during operation.
- For enhanced stability, especially on smooth surfaces, consider using optional suction cups (7445819) or clamping pliers (6045710) to secure the guide to the workpiece.
4.2 Montaż/wymiana brzeszczotu piły
Always ensure the tool is disconnected from the power supply before changing the blade.
- Locate the blocking lever on the saw. Engage the lever to lock the saw blade in place.
- Using the provided service keys, loosen the arbor nut that secures the saw blade.
- Ostrożnie wyjmij stare ostrze, zwracając uwagę na kierunek jego obrotu.
- Install the new carbide saw blade (Ø 160 mm, 28 Z for wood and plastic), ensuring the teeth are oriented correctly for cutting.
- Tighten the arbor nut securely with the service keys.
- Disengage the blocking lever.
4.3 Podłączanie odpylacza
For a cleaner work environment and improved visibility, connect an external dust collection system.
- Locate the external dust collector connection port on the saw.
- Attach a standard dust collector attachment (optional, code 6446073) to this port.
- Connect your dust extraction hose to the attachment.
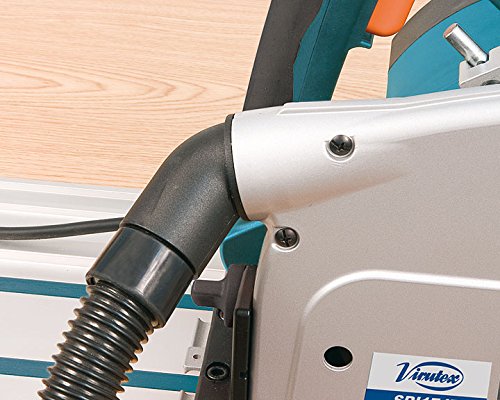
Rysunek 3: Z bliska view of the dust collection port on the Virutex SRI174T-UCP saw. This port allows for connection to an external dust extraction system, significantly reducing airborne dust during operation and maintaining a cleaner workspace.
5. Instrukcja obsługi
5.1 Regulacja głębokości cięcia
The cutting depth can be precisely adjusted to suit your material and desired cut.
- Ensure the saw is disconnected from the power supply.
- Locate the depth adjustment mechanism, typically a lever or knob with a scale.
- Set the desired cutting depth using the scale. The maximum cutting depth at 90° is 55 mm, and at 45° is 35 mm.
- Secure the depth adjustment mechanism.
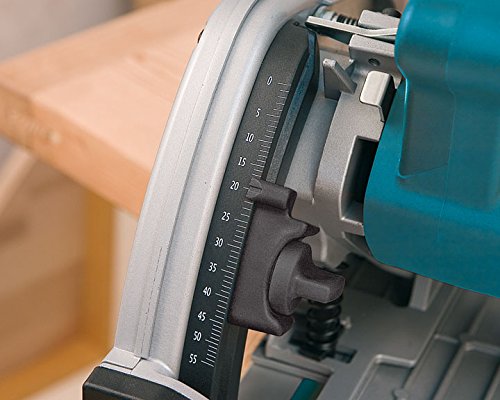
Rysunek 4: A close-up of the depth adjustment scale on the Virutex SRI174T-UCP. This scale allows users to accurately set the cutting depth, ensuring precise and consistent results for various material thicknesses.
5.2 Regulacja kąta cięcia (cięcie skośne)
The saw allows for angle adjustments for bevel cuts.
- Ensure the saw is disconnected from the power supply.
- Locate the angle adjustment mechanism.
- Set the desired cutting angle (e.g., 45 degrees).
- Secure the angle adjustment mechanism.
5.3 Performing a Plunge Cut
A key feature of this saw is its ability to perform plunge cuts, starting a cut in the middle of a workpiece.
- Position the saw on the cutting guide at the desired starting point of your cut.
- Ensure the saw blade is retracted (not in contact with the workpiece).
- Trzymaj piłę mocno obiema rękami.
- Start the saw. The soft start system will ensure a smooth power-up.
- Once the blade reaches full speed, slowly and steadily plunge the blade into the workpiece by pressing down on the saw.
- Maintain a consistent feed rate as you push the saw along the cutting guide to complete the cut.
- Po zakończeniu cięcia zwolnij spust i poczekaj, aż ostrze całkowicie się zatrzyma, zanim podniesiesz piłę z obrabianego przedmiotu.
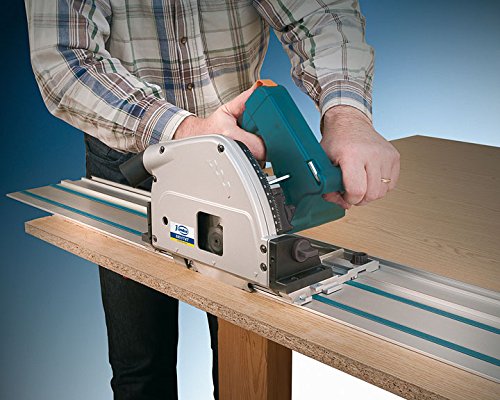
Rysunek 5: An operator demonstrating the use of the Virutex SRI174T-UCP Plunge-Cut Saw with the cutting guide. This illustrates the proper two-hand grip and the saw's movement along the guide for a controlled and accurate cut.
6. Konserwacja
Regular maintenance ensures the longevity and optimal performance of your Virutex Plunge-Cut Saw. Always disconnect the tool from the power supply before performing any maintenance.
- Czyszczenie: After each use, clean the saw and guide rail to remove dust and debris. Use a soft cloth and avoid harsh chemicals. Ensure ventilation slots are clear.
- Kontrola ostrza: Regularnie sprawdzaj ostrość i stan uszkodzeń ostrza piły. Tępe lub uszkodzone ostrze może powodować odrzut i słabą jakość cięcia. W razie potrzeby wymieniaj ostrza.
- Kontrola przewodu: Sprawdź przewód zasilający pod kątem uszkodzeń, przecięć lub przetarć. Uszkodzone przewody należy natychmiast wymienić.
- Smarowanie: Refer to the detailed service manual for specific lubrication points, if any. Generally, power tools require minimal user lubrication.
- Składowanie: Store the saw and its accessories in the provided carrying case in a dry, secure location, out of reach of children.
7. Rozwiązywanie Problemów
This section addresses common issues you might encounter with your plunge-cut saw.
| Problem | Możliwa przyczyna | Rozwiązanie |
|---|---|---|
| Piła się nie uruchamia | Brak zasilania; Uszkodzony przewód zasilający; Wadliwy przełącznik | Sprawdź podłączenie zasilania; Sprawdź, czy przewód nie jest uszkodzony; Skontaktuj się z serwisem, jeśli przełącznik jest uszkodzony. |
| Słaba jakość cięcia / Nadmierne rozszczepianie | Dull or incorrect blade; Incorrect cutting depth; Improper feed rate | Replace blade or use appropriate blade for material; Adjust cutting depth; Maintain consistent, moderate feed rate. |
| Piła blokuje się lub odskakuje | Dull blade; Improper workpiece support; Saw not aligned with guide; Forcing the tool | Replace blade; Secure workpiece properly; Ensure saw glides freely on guide; Do not force the saw. |
| Nadmierna ilość kurzu | Dust collection not connected; Dust port blocked | Connect dust collection system; Clear any blockages in the dust port. |
8. Specyfikacje techniczne
| Funkcja | Specyfikacja |
|---|---|
| Model | SRI174T-UCP |
| Moc wejściowa | 1150 W |
| Średnica ostrza piły | 160 mm |
| Otwór brzeszczotu piły | 20 mm |
| Głębokość cięcia przy 90° | 55 mm |
| Głębokość cięcia przy 45° | 35 mm |
| Prędkość bez obciążenia | 5500/min |
| Waga | 4.7 Kg (Tool only) / 15 kg (Package) |
| Izolacja | Podwójna izolacja |
| Źródło zasilania | Elektryczny przewodowy |
| Zalecenia dotyczące powierzchni | Plastic (and Wood, as per blade description) |
| Cutting Guide (UCP174T) | 800 mm length (standard with SRI174T-UCP) |
9. Gwarancja i wsparcie
For specific warranty information, please refer to the warranty card included with your product or contact your local Virutex dealer. Keep your purchase receipt as proof of purchase.
For technical support, spare parts, or service, please contact the authorized Virutex service center in your region. Contact details can typically be found on the Virutex official weblub za pośrednictwem sprzedawcy produktu.


