1. Wprowadzenie
This manual provides comprehensive instructions for the proper installation, safe operation, and routine maintenance of your APS Black Running Boards. Please read this manual thoroughly before beginning installation or use to ensure safety and optimal performance. These running boards are designed for Dodge Durango models from 2011 to 2025. Note: Will not fit models with OE Skirt Cladding or Diesel models. Drilling is required for installation.
2. Informacje dotyczące bezpieczeństwa
Always prioritize safety during installation and use. Failure to follow these instructions may result in injury or damage to your vehicle.
- Upewnij się, że pojazd jest zaparkowany na równej powierzchni i ma zaciągnięty hamulec postojowy.
- Należy nosić odpowiedni sprzęt ochrony osobistej, obejmujący okulary ochronne i rękawice.
- Nie należy przekraczać maksymalnego ciężaru 500 funtów na stopień.
- Verify all fasteners are securely tightened after installation and periodically thereafter.
- If you are unsure about any step, consult a professional installer.
3. Zawartość opakowania
Przed rozpoczęciem instalacji należy sprawdzić, czy wszystkie komponenty są obecne i nieuszkodzone.
- (2) APS iBoard Running Boards
- Zestaw uchwytów montażowych
- Zestaw sprzętu
- Instrukcja obsługi (ten dokument)
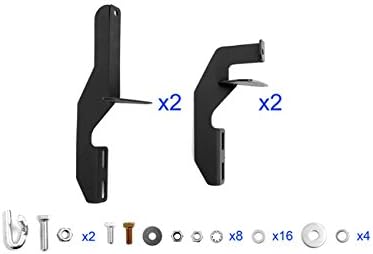
Rysunek 3.1: Included Mounting Brackets and Hardware. This image displays the two main types of mounting brackets (x2 each) and a variety of bolts, nuts, and washers required for installation.
4. Konfiguracja i instalacja
This section outlines the steps required to install the APS Black Running Boards on your Dodge Durango. Drilling is required.
4.1 Wymagane narzędzia
- Wiertarka
- Drill bits (appropriate size for enlarging existing holes and creating new ones)
- Wrenches/Sockets
- Taśma miernicza
- Znacznik
- Rust-preventative primer (recommended for drilled holes)
4.2 Kontrola przed instalacją
- Confirm vehicle compatibility: Dodge Durango 2011-2025.
- Ensure your vehicle does not have OE Skirt Cladding or is a Diesel model, as these running boards are not compatible.
- Clean the installation area on the vehicle's rocker panel.
4.3 Kroki instalacji
- Pozycje nawiasów: Identify the mounting points along the rocker panel. The brackets are designed to align with specific locations. Note that rear supports may be mislabeled; verify their correct orientation before drilling.
- Zaznacz i wywierć: Using the brackets as a template, mark the locations for drilling. Enlarge existing holes in the pinch weld and create one new hole per side as required. Apply rust-preventative primer to all drilled holes.
- Zamontuj wsporniki: Securely attach the mounting brackets to the vehicle frame using the provided hardware. Do not fully tighten bolts at this stage.
- Montaż podnóżków: Carefully position the running boards onto the attached brackets. Ensure proper alignment and fit.
- Bezpieczne stopnie: Attach the running boards to the brackets using the remaining hardware.
- Ostateczne dokręcanie: Once both running boards are properly aligned and secured, fully tighten all bolts and nuts. Double-check all connections for security.

Rysunek 4.1: Installed Running Board on a Red Dodge Durango. This image shows the running board seamlessly integrated along the side of the vehicle.

Rysunek 4.2: Installed Running Board on a Silver Dodge Durango. This image provides another perspective of the running board's appearance on a different color vehicle.
5. Obsługa i użytkowanie
The APS Black Running Boards provide a convenient step for easier entry and exit from your Dodge Durango. They are designed for durability and secure footing.
- Step onto the running board firmly and evenly.
- The full-length, UV-resistant high-grip tread top provides anti-slip protection.
- The raised ends act as mud guards, offering additional protection.
- Do not use the running boards as a jacking point for the vehicle.

Rysunek 5.1: Running Board Features. This image highlights key design elements such as the one-piece construction, high-grip tread, raised ends, and the 6061-T6 aluminum material with a black powder-coated surface.
6. Konserwacja
Regular maintenance will ensure the longevity and continued safe operation of your running boards.
- Czyszczenie: Regularnie czyść podnóżki łagodnym mydłem i wodą. Unikaj środków czyszczących o działaniu ściernym i silnych środków chemicznych, które mogłyby uszkodzić wykończenie.
- Kontrola: Periodically inspect all mounting hardware for tightness. Re-tighten any loose bolts or nuts.
- Kontrola uszkodzeń: Inspect the running boards for any signs of damage, such as cracks, bends, or corrosion. Replace damaged components immediately.
7. Rozwiązywanie Problemów
| Problem | Możliwa przyczyna | Rozwiązanie |
|---|---|---|
| Running board feels loose | Luźne elementy montażowe. | Inspect and re-tighten all bolts and nuts. |
| Difficulty aligning during installation | Incorrect bracket placement or mislabeled parts. | Double-check bracket orientation and ensure they match the vehicle's mounting points. Refer to installation steps. |
| Running board does not fit vehicle | Incorrect vehicle model/year or presence of OE Skirt Cladding/Diesel model. | Verify vehicle compatibility as specified in the introduction. These boards are not compatible with OE Skirt Cladding or Diesel models. |
8. Specyfikacje
| Funkcja | Szczegół |
|---|---|
| Model | IB-DR913B (iBoard Running Board Style) |
| Zgodność | Dodge Durango 2011-2025 (Excludes models with OE Skirt Cladding or Diesel models) |
| Tworzywo | Aircraft-grade 6061-T6 Aluminum |
| Skończyć | Matowe czarne wykończenie proszkowe |
| Wymiary (dł. x szer. x wys.) | 79 x 6 x 3.25 cala |
| Waga przedmiotu | 36.2 funta |
| Ograniczenie wagowe | 500 funta |
| Typ instalacji | Mocowanie panelu progowego (wymagane wiercenie) |

Rysunek 8.1: Running Board Dimensions. This image illustrates the 6-inch width and 3.25-inch height of the running board.

Rysunek 8.2: Solid Aluminum Construction. This image emphasizes the running boards' solid aluminum build and patented design, highlighting the absence of plastic caps.
9. Gwarancja i wsparcie
9.1 Informacje o gwarancji
APS products are manufactured to high standards. For specific warranty details, please refer to the warranty card included with your product or visit the official APS website. The EU Spare Part Availability Duration is 5 Years.

Rysunek 9.1: Customer Satisfaction Guarantee. This badge indicates a commitment to customer satisfaction.
9.2 Obsługa klienta
For technical assistance, missing parts, or warranty claims, please contact APS customer support through their official channels. You can often find contact information on the product packaging or the APS brand store on Amazon: APS Store.


