1. Wprowadzenie
The PreSonus AIR10 is a compact and lightweight 2-way active sound-reinforcement loudspeaker designed to deliver rich low-end and natural high-frequency extension. Its enclosure is engineered for portability and versatility, fitting easily into various setups.
Key features of the AIR10 include:
- 10-calowy niestandardowy przetwornik niskotonowy z cewką drgającą o średnicy 2 cala.
- 1-calowy przetwornik kompresyjny o wysokiej częstotliwości.
- Kąt rozproszenia 90° w poziomie i 60° w pionie.
- Hybrydowa moc 1,200 W ampkonfiguracja filtru (klasa D dla niskich częstotliwości, klasa AB dla wysokich częstotliwości).
- Mikser pokładowy z dwoma wejściami combo XLR i ¼” oraz wejściem stereo 1/8”.
- Easy-to-use Digital Signal Processing (DSP) performance presets.
2. Informacje dotyczące bezpieczeństwa
Before operating your PreSonus AIR10 loudspeaker, please read and understand all safety instructions. Retain this manual for future reference.
- Źródło zasilania: Connect the unit only to a power supply of the type described in this manual or on the unit.
- Grunt: Aby zapobiec porażeniu prądem elektrycznym, należy upewnić się, że urządzenie jest prawidłowo uziemione.
- Wentylacja: Nie blokuj otworów wentylacyjnych. Zainstaluj zgodnie z instrukcją producenta.
- Woda i wilgoć: Nie należy używać urządzenia w pobliżu wody ani narażać go na działanie kapiącej lub zachlapanej wody.
- Ciepło: Nie należy instalować w pobliżu źródeł ciepła, takich jak grzejniki, kratki wentylacyjne, piece lub inne urządzenia (w tym amp(lifiers) wytwarzające ciepło.
- Serwisowanie: Wszelkie czynności serwisowe należy powierzyć wykwalifikowanemu personelowi serwisowemu. Serwis jest wymagany, gdy urządzenie zostało w jakikolwiek sposób uszkodzone.
- Ochrona słuchu: Długotrwałe narażenie na wysokie poziomy ciśnienia akustycznego może spowodować trwałe uszkodzenie słuchu. Zachowaj ostrożność podczas ustawiania poziomu głośności.
3. Konfiguracja
Proper setup ensures optimal performance and safety for your AIR10 loudspeaker.
3.1 Rozpakowanie
Carefully remove the AIR10 from its packaging. Inspect the unit for any signs of damage that may have occurred during shipping. If damage is found, contact your dealer or PreSonus immediately.
3.2 Umieszczenie i montaż
The AIR10 is designed for versatile placement, including front-of-house (FOH), floor wedge monitoring, stand mounting, bracket mounting, or flown installations. Location presets optimize performance for these different configurations.

Rycina 1: Przód view of the PreSonus AIR10 Active Loudspeaker.

Rysunek 2: Strona view of the PreSonus AIR10 Active Loudspeaker, showing integrated handles.
3.3 Połączenie zasilania
Connect the provided power cord to the AC inlet on the rear panel of the AIR10 and then to a suitable grounded power outlet. Ensure the voltage selector switch matches your local power supply before powering on the unit.
3.4 Połączenia wejściowe
The AIR10 features an onboard mixer with various input options:
- Mic/Line 1 & 2: Two combo XLR and ¼” inputs for microphones or line-level sources.
- Wejście pomocnicze: A stereo 1/8” input for connecting portable media players or other consumer-level devices.
- Wymieszaj: An XLR output for sending the mixed signal to another AIR series loudspeaker or a subwoofer.
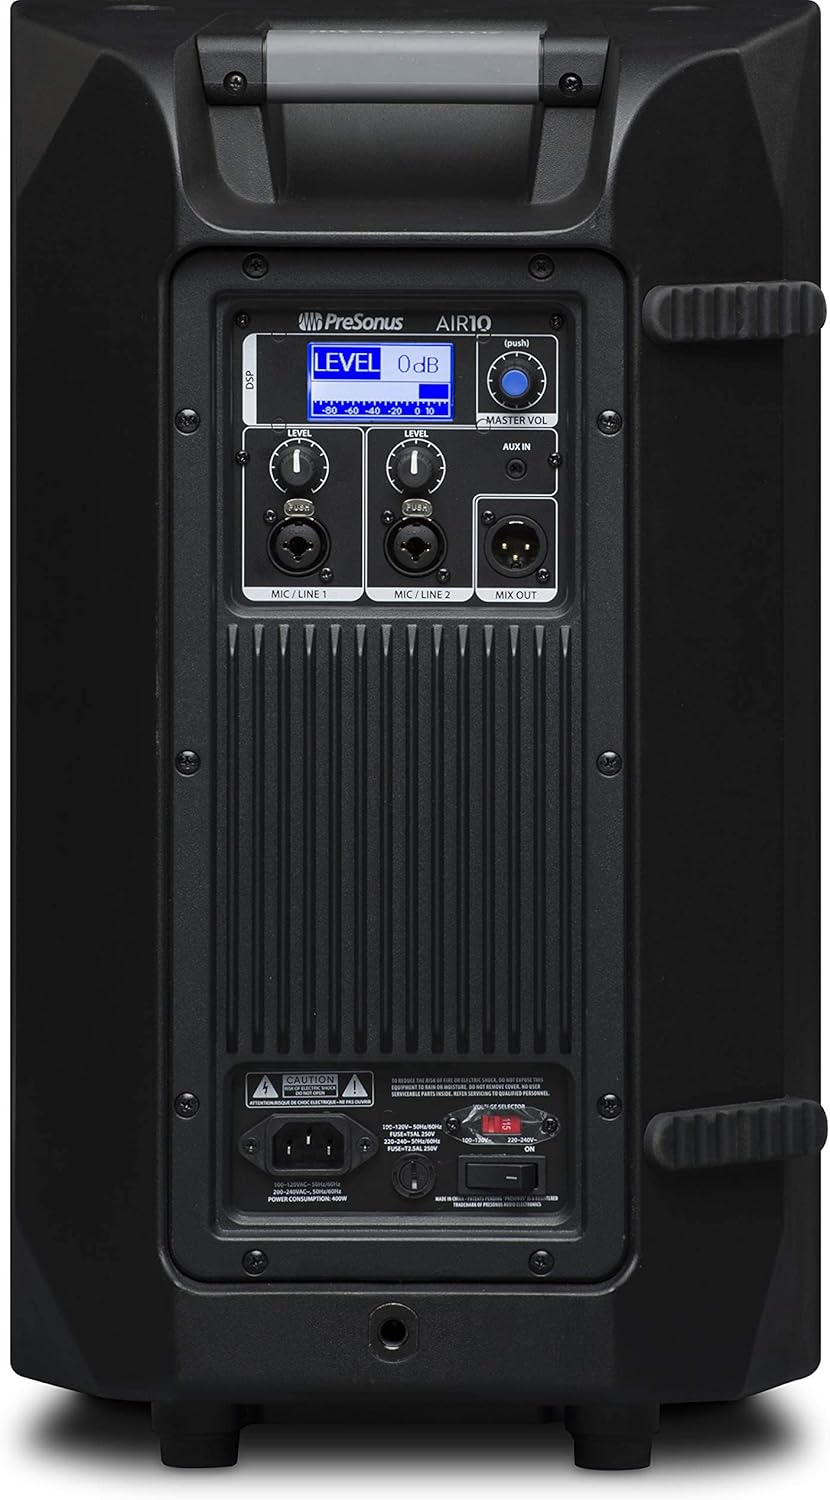
Figure 3: Rear panel of the PreSonus AIR10, showing input/output connections, level controls, DSP display, and power switch.
4. Obsługa
The AIR10 is designed for straightforward operation with powerful DSP controls.
4.1 Włączanie/wyłączanie
After connecting the power cord, locate the power switch on the rear panel. Flip the switch to the 'ON' position. The front panel LED will illuminate to indicate power. Always power on your AIR10 after connecting all audio sources and power off before disconnecting.
4.2 Level Controls
Adjust the individual LEVEL knobs for Mic/Line 1 and Mic/Line 2 to set the input gain for your sources. The MASTER VOL knob controls the overall output level of the loudspeaker.
4.3 DSP Performance Presets
The AIR10 features easy-to-use DSP presets to optimize its performance for various applications. These presets include options for front-of-house use, floor wedge placement, music playback, enhanced low-end warmth, and improved speech intelligibility. Use the DSP button and display on the rear panel to navigate and select the appropriate preset for your environment.
4.4 Sterowanie EQ
The onboard EQ controls allow you to compensate for room anomalies and fine-tune the sound. Access these controls via the DSP menu to adjust frequency response as needed for your specific acoustic space.
4.5 Wideo powyżejview
Wideo 1: Sędziaview of the PreSonus AIR series loudspeakers, demonstrating features and sound quality. This video provides a visual guide to the product's capabilities and design.
5. Konserwacja
Regular maintenance helps prolong the life and performance of your AIR10 loudspeaker.
- Czyszczenie: Use a soft, dry cloth to clean the exterior of the loudspeaker. Do not use abrasive cleaners, waxes, or solvents.
- Krata: Periodically check the front grille for dust or debris accumulation. Gently clean with a soft brush or vacuum if necessary.
- Składowanie: When not in use for extended periods, store the loudspeaker in a dry, temperature-controlled environment, ideally in its original packaging or a protective cover.
6. Rozwiązywanie Problemów
This section addresses common issues you might encounter with your AIR10 loudspeaker.
6.1 Brak zasilania
- Check that the power cord is securely connected to both the loudspeaker and the power outlet.
- Sprawdź, czy gniazdo zasilania jest aktywne.
- Upewnij się, że objętośćtagPrzełącznik wyboru na tylnym panelu jest ustawiony prawidłowo dla Twojego regionu.
- Check the fuse on the rear panel. Replace if blown with a fuse of the correct type and rating.
6.2 Brak dźwięku
- Confirm the loudspeaker is powered on and the front LED is illuminated.
- Check all audio cable connections from your source to the AIR10 inputs.
- Ensure the input LEVEL knobs and the MASTER VOL knob are turned up.
- Verify that your audio source is active and producing sound.
- If using the Mix Out, ensure the connected device is receiving a signal and its volume is adjusted.
6.3 Syczenie lub hałas
- Reduce the input gain (LEVEL knobs) if the input signal is too strong.
- Upewnij się, że wszystkie kable są w dobrym stanie i odpowiednio ekranowane.
- Try connecting the loudspeaker to a different power outlet to rule out ground loop issues.
- Disconnect all inputs and listen for the noise. If the noise persists, the issue may be internal.
7. Specyfikacje
| Funkcja | Specyfikacja |
|---|---|
| Nazwa modelu | POWIETRZE10 |
| Typ głośnika | 2-Way Active Sound-Reinforcement Loudspeaker |
| Średnica głośnika niskotonowego | 10 cali |
| Średnica głośnika wysokotonowego | 1 cali |
| Głośnik AmpTyp lifikacji | Active (Hybrid Class D/Class AB) |
| Maksymalna moc wyjściowa głośnika | 1200 watów |
| Technologia łączności | XLR, 1/4", 1/8" |
| Tryb wyjścia audio | Stereofoniczny |
| Waga przedmiotu | 28.7 funtów |
| Wymiary produktu | 14.1 x 14.6 x 24.4 cala |
| Typ montażu | Car Mount, Floor Mount, Stand, Bracket, Suspend |
| Metoda kontroli | Touch (DSP) |
8. Co znajduje się w pudełku
Your PreSonus AIR10 package should contain the following items:
- PreSonus AIR10 10" 2-Way Active Sound-Reinforcement Loudspeaker
- Przewód zasilający
- Product Documentation (including this manual)
9. Gwarancja i wsparcie
PreSonus provides a limited warranty for the AIR10 loudspeaker. For detailed warranty information, please refer to the warranty card included with your product or visit the official PreSonus webstrona.
For technical support, product registration, or to access additional resources, please visit the PreSonus support page or contact their customer service directly. Keeping your product registered can facilitate warranty claims and support.


