1. Wprowadzenie
This manual provides detailed instructions for the installation, operation, and maintenance of your Focal FPX1.1000 Class D Mono Amplifier. Please read this manual thoroughly before attempting installation or operation to ensure proper function and safety. Retain this manual for future reference.
2. Instrukcje bezpieczeństwa
Observe the following safety precautions to prevent injury or damage to the amplifier i pojazd:
- Zalecana profesjonalna instalacja: Installation of car audio equipment can be complex. It is highly recommended that a qualified professional install this ampliyfikator.
- Odłącz akumulator: Aby zapobiec zwarciom, przed rozpoczęciem jakichkolwiek prac elektrycznych należy zawsze odłączyć ujemny zacisk akumulatora pojazdu.
- Prawidłowe okablowanie: Use appropriate gauge wiring for power, ground, and speaker connections as specified in the installation section. Incorrect wiring can cause overheating, fire, or damage to components.
- Wentylacja: Zapewnij amplifier is mounted in a location with adequate ventilation to prevent overheating. Do not block cooling fins.
- Unikaj wilgoci: Nie wystawiaj na działanie amprozpuszczać w wilgoci lub wodzie.
- Bezpieczne mocowanie: Zamontuj ampZamocuj go bezpiecznie, aby zapobiec jego poluzowaniu się podczas jazdy pojazdem, co mogłoby spowodować obrażenia lub uszkodzenia.
- Zabezpieczenie bezpiecznika: Always use an external fuse on the main power wire, close to the battery, with the recommended ampwymazać
3. Koniec produktuview
3.1 Główne cechy
- CEA Power (4 Ohms): 1×420 Wrms
- Maximum Power (2 Ohms): 1×700 Wrms
- Maximum Power (1 Ohm): 1×1000 Wrms
- Bandwidth: 15Hz–250Hz
- Integrated Protections: Short Circuit, low impedance, reversal of polarity, DC, power drop, heat protection.
- Klasa D Mono Amplifier design for high power and efficiency.
3.2 Zawartość pudełka
- Focal FPX1.1000 Mono Ampżywsze
- Instrukcja obsługi (ten dokument)
- Mounting hardware (screws, etc.)
4. Instalacja i konfiguracja
Proper installation is crucial for optimal performance and safety. Consult a professional installer if you are unsure about any steps.
4.1 Miejsce montażu
Wybierz miejsce montażu, które jest:
- Suche i bez wilgoci.
- Dobra wentylacja, pozwalająca na rozprowadzanie ciepła.
- Secure and protected from physical damage.
- Away from fuel lines, brake lines, and electrical wiring harnesses.
Typowe miejsca to pod siedzeniem, w bagażniku lub za panelem.
4.2 połączeń przewodów
Przed dokonaniem jakichkolwiek podłączeń należy odłączyć ujemny zacisk akumulatora pojazdu.
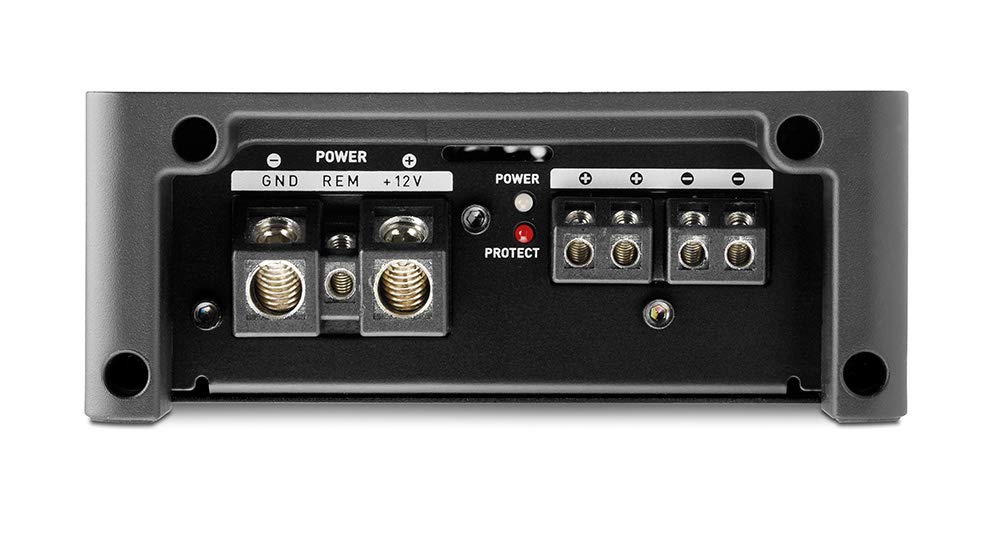
Image 1: Power and Speaker Terminal Connections. This image displays the rear panel of the amplifier, highlighting the power input terminals (GND, REM, +12V) and the speaker output terminals. A red 'PROTECT' indicator light is also visible.
- Przewód zasilający (+12V): Run a heavy-gauge power wire (e.g., 4 AWG or larger, depending on total system power) directly from the positive terminal of the vehicle's battery to the +12V terminal on the amplifier. Install an inline fuse holder with the appropriate fuse (refer to specifications for recommended fuse size) within 18 inches (45 cm) of the battery.
- Przewód uziemiający (GND): Connect a heavy-gauge ground wire (same gauge as power wire) from the GND terminal on the amplifier to a clean, unpainted metal surface on the vehicle's chassis. Ensure a good electrical connection by scraping away any paint or rust. The ground wire should be as short as possible, ideally less than 3 feet (1 meter).
- Przewód zdalnego włączania (REM): Podłącz przewód o mniejszym przekroju (np. 18 AWG) do zacisku REM na amplifier to the remote turn-on output of your head unit or other switched 12V source. This wire turns the ampwłączanie i wyłączanie filtra za pomocą systemu audio.
- Wyjście głośnika: Connect your subwoofer(s) to the speaker output terminals. Ensure correct polarity (+ to + and - to -). This is a mono amplifier, designed for a single subwoofer or multiple subwoofers wired to present a 1-ohm or 2-ohm load. Refer to your subwoofer's specifications for impedance matching.
- Wejście RCA: Connect RCA cables from the subwoofer output of your head unit to the INPUT CH1/CH2 RCA jacks on the ampliyfikator.

Image 2: Input and Control Panel. This image shows the front panel of the amplifier, featuring RCA input and output jacks, a remote port, and various control knobs for Gain, Subsonic filter, Bass Boost, Phase, and Low Pass Filter (LPF).
5. Instrukcja obsługi
Po zainstalowaniu dostosuj ampustawienia filtra zapewniające optymalną jakość dźwięku.
5.1 Control Panel Adjustments
- GAIN (czułość wejściowa): Ta kontrola pasuje do amplifier's input sensitivity to the output level of your head unit. Start with the gain at minimum (Min) and slowly increase it until you hear distortion, then back off slightly. Do not use the gain control as a volume knob.
- PODDŹWIĘKOWY: This filter removes extremely low frequencies that are inaudible and can waste amplifier power or damage subwoofers. Adjust it to a frequency below your subwoofer's resonant frequency or port tuning frequency (typically 15-30Hz).
- PODBICIE BASÓW: This control provides an increase in bass output at a specific frequency. Use sparingly to avoid distortion and potential damage to subwoofers.
- FAZA: This control adjusts the phase of the subwoofer output relative to the main speakers (0° to 180°). Adjust for the best blend and impact with your front speakers.
- LPF (filtr dolnoprzepustowy): This filter allows only frequencies below the set point to pass through to the subwoofer. Adjust it to blend smoothly with your main speakers, typically between 50Hz and 80Hz.
5.2 Power and Protection Indicators
- Wskaźnik zasilania: Świeci się, gdy amplifier jest zasilany i działa normalnie.
- Wskaźnik ochrony: Świeci się, gdy amplifier detects a fault (e.g., short circuit, overheating, low impedance). If this light comes on, turn off your audio system immediately and troubleshoot the issue.
6. Konserwacja
The Focal FPX1.1000 ampLifier wymaga minimalnej konserwacji. Aby zapewnić długowieczność, postępuj zgodnie z poniższymi wskazówkami:
- Czyszczenie: Okresowo wycieraj ampZewnętrzną powierzchnię filtra czyścić miękką, suchą ściereczką. Nie używać silnych środków chemicznych ani ściernych środków czyszczących.
- Wentylacja: Ensure that the cooling fins remain free of dust and debris. Use compressed air to gently clear any blockages if necessary.
- Znajomości: Od czasu do czasu należy sprawdzać wszystkie połączenia przewodów, aby mieć pewność, że są solidne i nie są skorodowane.
7. Rozwiązywanie Problemów
Jeśli masz problemy z urządzeniem amplifier, przed skorzystaniem z usług fachowca zapoznaj się z poniższą tabelą:
| Problem | Możliwa przyczyna | Rozwiązanie |
|---|---|---|
| Brak zasilania / Amplifier nie włącza się |
|
|
| Protect light is on |
|
|
| Brak dźwięku |
|
|
| Zniekształcony dźwięk |
|
|
8. Specyfikacje
| Funkcja | Szczegół |
|---|---|
| Numer modelu | FPX1.1000 |
| Marka | Ogniskowy |
| Moc CEA (4 omy) | 1×420 Wrms |
| Maximum Power (2 Ohms) | 1×700 Wrms |
| Maximum Power (1 Ohm) | 1×1000 Wrms |
| Przepustowość łącza | 15 Hz – 250 Hz |
| Ochrona | Short Circuit, low impedance, reversal of polarity, DC, power drop, heat protection |
| Wymiary produktu | 11.81 x 11.81 x 11.81 cala; 6 funta |
| Typ montażu | Montaż powierzchniowy |
| Tomtage | 10 Volts, 14.4 Volts, 5 Volts (Operating Voltage Zakres) |
9. Gwarancja i wsparcie
Focal products are designed and manufactured to high quality standards. This product is covered by a limited warranty against defects in materials and workmanship. The specific terms and duration of the warranty may vary by region and retailer. Please retain your proof of purchase for warranty claims.
For technical support, warranty service, or further assistance, please contact your authorized Focal dealer or visit the official Focal webwitryna do informacji kontaktowych.


