1. Wprowadzenie
This manual provides detailed instructions for the installation, operation, and maintenance of your Avision FL-1501B document scanner. Please read this manual thoroughly before using the scanner to ensure proper and safe operation. Keep this manual for future reference.

Figure 1: Avision FL-1501B Document Scanner with its automatic document feeder (ADF) and output tray extended.
2. Informacje dotyczące bezpieczeństwa
Observe the following safety precautions to prevent damage to the scanner and ensure user safety:
- Używaj wyłącznie zasilacza dołączonego do skanera.
- Nie wystawiaj skanera na działanie wody ani nadmiernej wilgotności.
- Place the scanner on a stable, level surface.
- Unikaj blokowania otworów wentylacyjnych.
- Nie próbuj samodzielnie demontować ani naprawiać skanera. Skontaktuj się z wykwalifikowanym personelem serwisowym.
- Keep the scanner away from direct sunlight and heat sources.
3. Zawartość opakowania
Sprawdź, czy w opakowaniu znajdują się wszystkie elementy:
- Avision FL-1501B Scanner Unit
- Zasilacz
- Kabel USB
- Szybki przewodnik
- Płyta CD z oprogramowaniem (lub instrukcja pobierania)
4. Konfiguracja
4.1 Rozpakowywanie i umieszczanie
- Ostrożnie wyjmij skaner z opakowania.
- Remove all protective tapes and packing materials.
- Place the scanner on a flat, stable surface with adequate space for document feeding and output.

Figure 2: The Avision FL-1501B scanner in its closed position, suitable for storage or before extending trays.
4.2 Podłączanie skanera
- Connect the power adapter to the scanner's power input port and then to an electrical outlet.
- Podłącz kabel USB do portu USB skanera, a następnie do wolnego portu USB w komputerze.
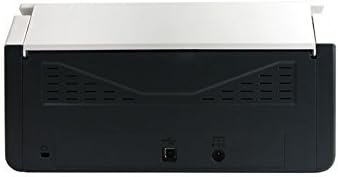
Figure 3: Rear panel of the scanner, illustrating the power input and USB connection ports.
4.3 Instalacja sterowników i oprogramowania
Before using the scanner, you must install the necessary drivers and scanning software on your computer.
- Insert the provided Software CD into your computer's optical drive, or download the latest drivers and software from the official Avision webstrona.
- Follow the on-screen instructions to complete the installation process. It is recommended to install all bundled software for full functionality.
- Jeśli zostaniesz o to poproszony, uruchom ponownie komputer.
5. Działanie
5.1 Ładowanie dokumentów
- Extend the input tray and output tray of the scanner.
- Dopasuj prowadnice papieru do szerokości dokumentów.
- Place the documents face down, top edge first, into the automatic document feeder (ADF). Ensure the stack is neatly aligned. The scanner supports a maximum input sheet capacity of 100 sheets.

Rysunek 4: Profesjonalizm bocznyfile of the scanner, showing the fully extended input and output trays ready for document feeding.
5.2 Korzystanie z panelu sterowania
The scanner features a control panel for quick access to common scanning functions.

Rysunek 5: Szczegółowy view of the scanner's control panel, featuring a digital display, function selection buttons, Cancel, Scan, and Power buttons.
- Przycisk zasilania: Press to turn the scanner on or off.
- Function Buttons (Up/Down Arrows): Use these to select different scanning profiles or functions displayed on the digital screen.
- Przycisk skanowania: Initiates the scanning process based on the currently selected function.
- Przycisk Anuluj: Stops the current scanning operation.
5.3 Wykonywanie skanowania
- Sprawdź, czy skaner jest włączony i podłączony do komputera.
- Load your documents into the ADF as described in section 5.1.
- Open the Avision scanning software on your computer (e.g., Button Manager, Capture Tool).
- Select your desired scanning settings (e.g., color mode, resolution, destination folder, single-sided/duplex).
- Click the "Scan" button in the software or press the Skandować button on the scanner's control panel to begin scanning.
- The scanned images will be processed and saved according to your software settings.
6. Konserwacja
6.1 Czyszczenie skanera
Regular cleaning helps maintain optimal scanning performance.
- Przed czyszczeniem wyłącz skaner i odłącz kabel zasilający.
- Delikatnie użyj miękkiej, niestrzępiącej się szmatki dampPrzetrzyj zewnętrzną część skanera wodą lub delikatnym, nieściernym środkiem czyszczącym.
- To clean the glass platen (if applicable) and rollers, open the scanner cover. Use a specialized scanner cleaning kit or a soft cloth with isopropyl alcohol.
- Przed ponownym podłączeniem zasilania należy odczekać, aż wszystkie elementy całkowicie wyschną.
6.2 aktualizacji oprogramowania sprzętowego
Periodically check the Avision website for firmware updates. Firmware updates can improve performance, add features, or resolve issues. Follow the instructions provided with the firmware update package carefully.
7. Rozwiązywanie Problemów
Jeśli napotkasz problemy ze skanerem, zapoznaj się z poniższymi typowymi problemami i ich rozwiązaniami:
| Problem | Możliwa przyczyna | Rozwiązanie |
|---|---|---|
| Skaner się nie włącza. | Kabel zasilający nie jest podłączony; gniazdko elektryczne jest uszkodzone. | Upewnij się, że kabel zasilający jest dobrze podłączony. Spróbuj użyć innego gniazdka elektrycznego. |
| Computer does not detect scanner. | Luźny kabel USB; sterowniki nie zostały zainstalowane lub są uszkodzone. | Check USB cable connection. Reinstall scanner drivers. Try a different USB port. |
| Scanned images are blurry or streaky. | Scanner glass or rollers are dirty; document misfeed. | Clean the scanner's internal components (refer to Section 6.1). Ensure documents are loaded correctly. |
| Documents jam in the ADF. | Documents are wrinkled or stapled; paper guides not adjusted. | Straighten documents. Remove staples/clips. Adjust paper guides to fit document width. |
8. Specyfikacje
| Funkcja | Szczegół |
|---|---|
| Marka | Wizja |
| Model | FL-1501B |
| Typ skanera | Skaner dokumentów |
| Rozdzielczość skanera | 600 dpi |
| Maksymalna pojemność arkuszy wejściowych | 100 arkuszy |
| Typ nośnika | Papier |
| Cotage | 24 watów |
| Wymiary produktu | Wymiary 33 x 32.32 x 80.94 cm |
| Waga przedmiotu | 5.67 kilogramów |
| Data pierwszej dostępności | 6 czerwca 2016 |
9. Gwarancja i wsparcie
9.1 Informacje o gwarancji
Avision products are manufactured to high-quality standards. This product is covered by a limited warranty against defects in materials and workmanship. The specific terms and duration of the warranty may vary by region. Please refer to the warranty card included with your product or visit the official Avision webStrona zawiera szczegółowe informacje o gwarancji.
9.2 Wsparcie techniczne
For technical assistance, driver downloads, or further information, please visit the official Avision support website or contact your local Avision service center. Contact details can typically be found on the Avision webstronie lub w dokumentacji produktu.


