Wstęp
This manual provides detailed instructions for the installation, operation, and maintenance of your Memphis Audio SRX750D.1 Street Reference Series Mono Subwoofer Amplifier. Przed przystąpieniem do instalacji lub użytkowania należy dokładnie przeczytać niniejszą instrukcję, aby zapewnić prawidłowe użytkowanie i zapobiec uszkodzeniu urządzenia lub systemu audio pojazdu.
The SRX750D.1 amplifier is designed to deliver reliable performance and powerful bass output for your car audio system. It features a textured aluminum heatsink, high-level inputs, selectable bass boost, remote level control, and a variable crossover network.
Środki ostrożności
- Przed rozpoczęciem jakiejkolwiek instalacji należy zawsze odłączyć ujemny zacisk akumulatora pojazdu.
- Upewnij się, że wszystkie przewody są prawidłowo poprowadzone i zabezpieczone, aby zapobiec ich uszkodzeniom lub zwarciom.
- Use appropriate gauge wiring as recommended in the specifications section.
- Unikaj montowania tzw ampPrzechowywać w miejscach narażonych na bezpośrednie działanie promieni słonecznych, nadmierne ciepło, wilgoć lub kurz.
- Nie uruchamiaj ampJeśli jest uszkodzony lub działa nieprawidłowo, skontaktuj się z działem pomocy technicznej. Zapoznaj się z sekcją rozwiązywania problemów lub skontaktuj się z działem pomocy technicznej.
- Aby zapewnić optymalną wydajność i bezpieczeństwo, zaleca się zlecenie instalacji profesjonaliście.
Zawartość opakowania
Sprawdź, czy w opakowaniu znajdują się wszystkie elementy:
- Memphis Audio SRX750D.1 Mono Subwoofer Ampżywsze
- Zdalne pokrętło basowe
- Sprzęt montażowy
- Instrukcja obsługi (ten dokument)
Instalacja i konfiguracja
1. Wybór miejsca montażu
Select a location that provides adequate ventilation for the amplifier's heatsink. Avoid mounting directly on carpet or in enclosed spaces without airflow. Common locations include under seats, in the trunk, or on a custom ampstojak na filtry.

Rysunek 1: Kątowy view of the SRX750D.1 amplifier, highlighting its heatsink design.
2. Power Wiring
- Odłączanie akumulatora: Disconnect the negative (-) terminal of your vehicle's battery.
- Przewód zasilający: Run a 4-gauge power cable (Recommended Amp Kit: 4GKIT) from the positive (+) terminal of the battery to the amplifier's power input. Install an inline fuse holder within 18 inches (45 cm) of the battery. The fuse rating should match the ampwymagania producenta (patrz specyfikacje).
- Kabel uziemiający: Connect a 4-gauge ground cable from the amplifier's ground terminal to a clean, unpainted metal surface on the vehicle's chassis. Ensure a solid, low-resistance connection. The ground cable should be as short as possible, ideally less than 3 feet (1 meter).
- Zdalne włączanie: Podłącz przewód zdalnego włączania (zwykle o grubości 18 AWG) do wyjścia zdalnego urządzenia głównego ampZacisk REM filtru. Ten przewód sygnalizuje amplifier do włączania i wyłączania za pomocą jednostki głównej.
3. Signal Input Wiring
The SRX750D.1 supports both low-level (RCA) and high-level inputs.
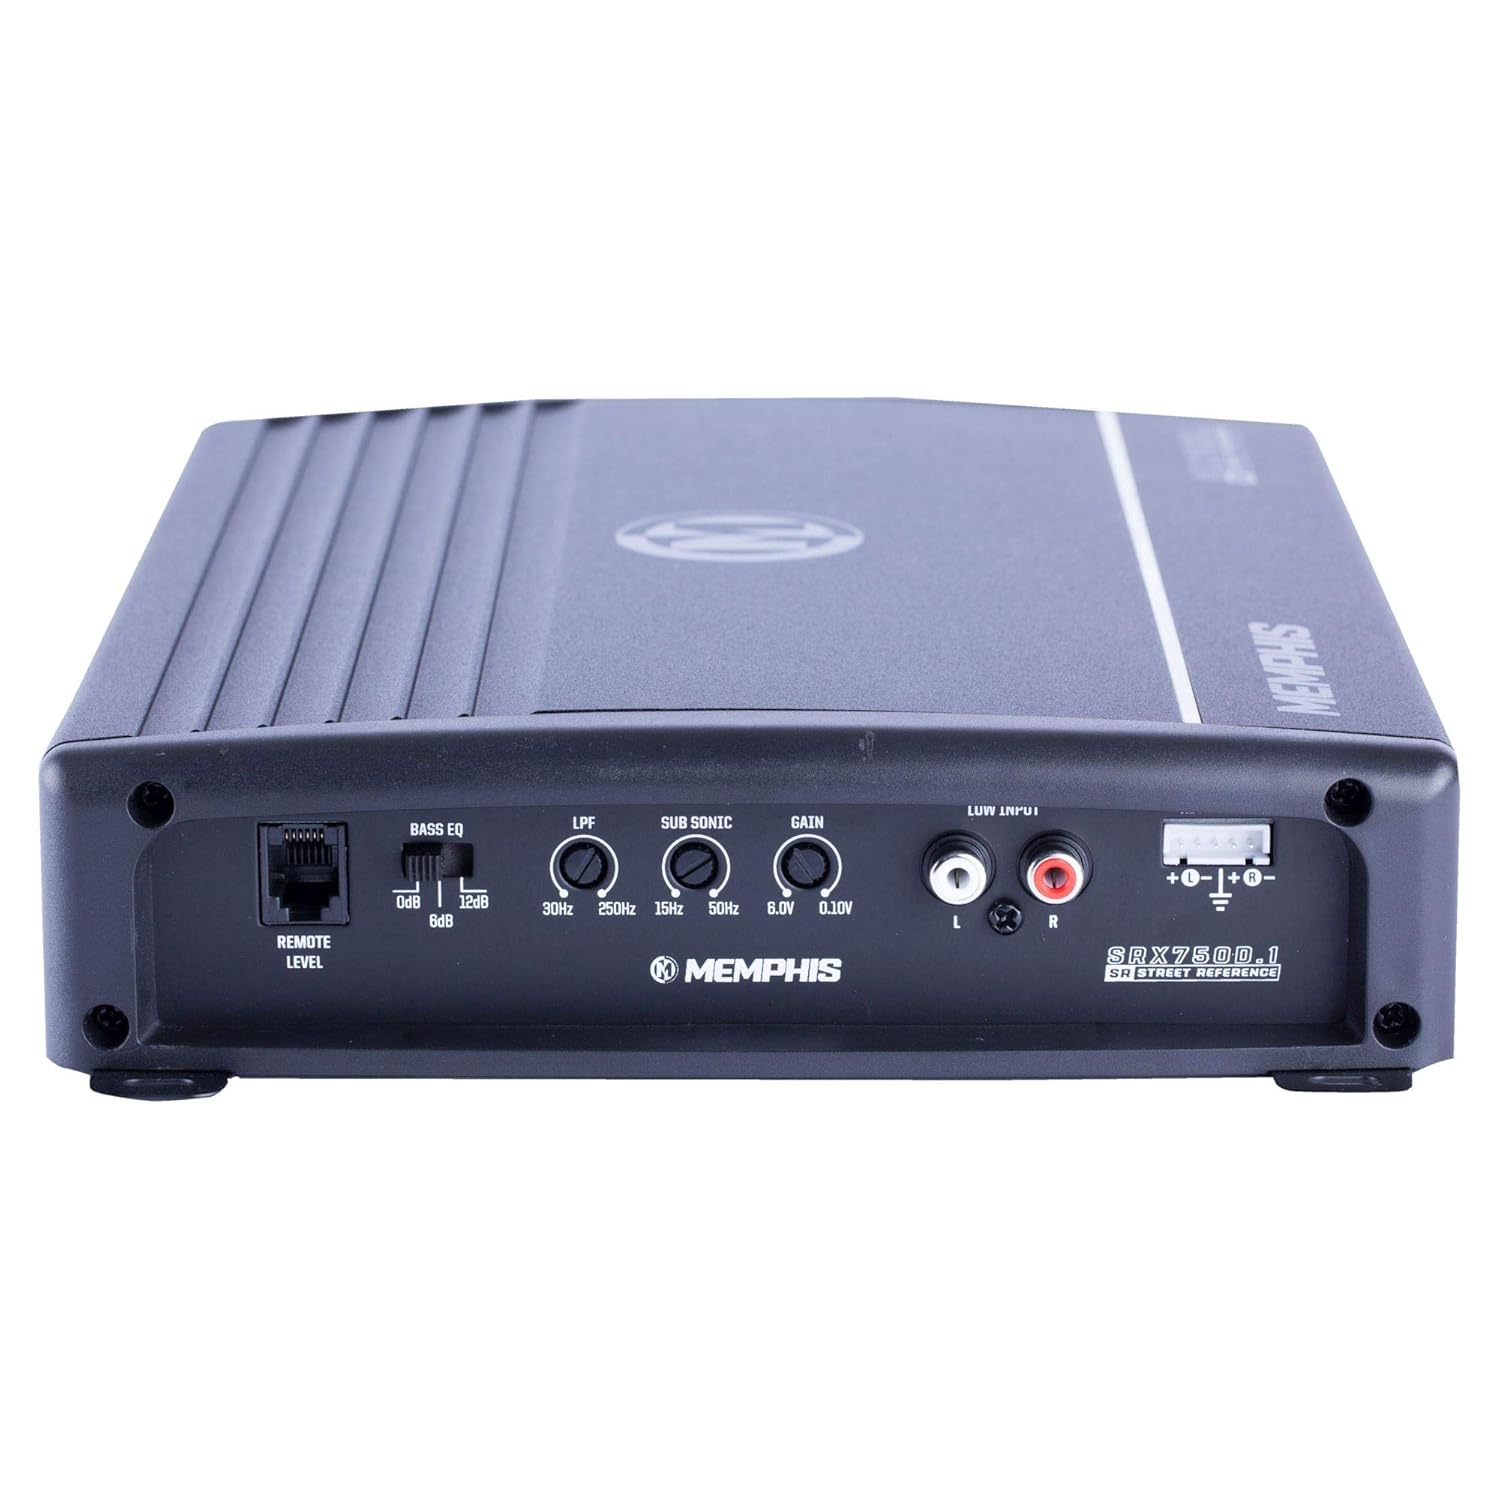
Figure 2: Rear panel of the SRX750D.1 amplifier with input and control connections.
- Wejście niskopoziomowe (RCA): Podłącz kable RCA z subwoofera lub wyjść przedwzmacniacza pełnozakresowego jednostki głównej do amplifier's "LOW INPUT" RCA jacks.
- Wejście wysokiego poziomu: If your head unit does not have RCA outputs, use the high-level input. Connect the speaker wires from your head unit directly to the amplifier's high-level input terminal. Refer to your head unit's manual for speaker wire polarity.
4. Speaker Output Wiring
Podłącz subwoofer(y) do amplifier's speaker output terminals. Ensure correct polarity (+ to + and - to -). The SRX750D.1 is a mono amplifier, designed for a single subwoofer or multiple subwoofers wired to a final impedance of 2 ohms or 4 ohms.
Important: Do not wire the amplifier below a 2-ohm load, as this can cause damage and void the warranty.
5. Remote Bass Knob Installation
Connect the included remote bass knob to the "REMOTE LEVEL" port on the amplifier. Mount the knob in a convenient location for easy access while driving. This allows for real-time adjustment of the subwoofer output level.
Instrukcja obsługi
1. Pierwsze uruchomienie
After all connections are made and verified, reconnect the vehicle's battery negative terminal. Turn on your head unit. The ampUrządzenie powinno się włączyć, o czym poinformuje dioda LED (jeśli jest obecna).
2. Regulacja wzmocnienia
The "GAIN" control matches the amplifier's input sensitivity to the output level of your head unit. This is not a volume control. To set the gain:
- Włącz ampustawić wzmocnienie wzmacniacza na minimum (przeciwnie do ruchu wskazówek zegara).
- Ustaw głośność jednostki głównej na około 75% maksymalnego poziomu.
- Play a dynamic piece of music with strong bass.
- Powoli zwiększaj amplifier's gain control (clockwise) until you hear distortion, then back it off slightly until the sound is clear.
3. Crossover Settings (LPF)
The "LPF" (Low Pass Filter) control allows only frequencies below the set point to pass through to the subwoofer. This is crucial for blending the subwoofer with your main speakers.
- Adjust the LPF control (30Hz - 250Hz) to a frequency typically between 80Hz and 120Hz, depending on your subwoofer and main speaker capabilities.
- Experiment with different settings to achieve the best sound integration.
4. Sub Sonic Filter
The "SUB SONIC" filter removes extremely low frequencies that your subwoofer cannot reproduce effectively, preventing wasted power and potential damage. Set this filter slightly below your LPF setting, typically around 20Hz-30Hz.
5. Bass EQ / Bass Boost
The "BASS EQ" or "BASS BOOST" control provides an adjustable boost at a specific low frequency (e.g., 0dB to +12dB). Use this sparingly to enhance bass impact. Excessive boost can lead to distortion and damage.
Konserwacja
- Czyszczenie: Okresowo czyść ampZewnętrzną powierzchnię filtra czyścić miękką, suchą ściereczką. Nie używać silnych środków chemicznych ani ściernych środków czyszczących.
- Wentylacja: Ensure the heatsink fins remain clear of obstructions to allow for proper cooling. Dust or debris buildup can impair cooling performance.
- Znajomości: Od czasu do czasu należy sprawdzać wszystkie połączenia zasilania, uziemienia i sygnału, aby mieć pewność, że są dobrze zamocowane i nie są skorodowane.
- Wymiana bezpiecznika: Jeśli amplifier's fuse blows, replace it only with a fuse of the exact same type and rating. Using an incorrect fuse can cause severe damage or fire.
Rozwiązywanie problemów
| Problem | Możliwa przyczyna | Rozwiązanie |
|---|---|---|
| Brak zasilania / Amplifier nie włącza się |
|
|
| Brak wyjścia dźwięku |
|
|
| Zniekształcony dźwięk |
|
|
| Amplifier przegrzewa się |
|
|
Specyfikacje
| Funkcja | Specyfikacja |
|---|---|
| Model | SRX750D.1 |
| Moc skuteczna przy 4Ω | 400 Watts x 1 |
| Moc skuteczna przy 2Ω | 750 Watts x 1 |
| THD% @ 4Ω | <1% |
| Odpowiedź częstotliwościowa | 30Hz - 250Hz |
| Zakres wejściowy | 120mV - 6.1V |
| Wymiary (dł. x szer. x wys.) | 15 x 9.45 x 3.5 cala |
| Tomtage | 6.1 Volts (Input/Supply) |
| Tworzywo | Aluminium |
| Waga przedmiotu | 7 funta |
| Liczba kanałów | 1 (mono) |
| Zalecony Amp Zestaw | 4GKIT (4-Gauge) |
| Cechy | Textured aluminum heatsink, High level inputs, Selectable bass boost, Remote level control/bass knob, Variable crossover network |
Gwarancja i wsparcie
Informacje o gwarancji
The Memphis Audio SRX750D.1 amplifier jest dostarczany z 1-roczna ograniczona gwarancja od daty zakupu. Niniejsza gwarancja obejmuje wady materiałowe i wykonawcze powstałe w wyniku normalnego użytkowania. Nie obejmuje ona uszkodzeń spowodowanych nieprawidłową instalacją, wypadkiem, niewłaściwym użytkowaniem, nadużyciem, zaniedbaniem lub nieautoryzowaną modyfikacją.
Proszę zachować dowód zakupu na potrzeby roszczeń gwarancyjnych.
Obsługa klienta
For technical assistance, warranty service, or further inquiries, please contact Memphis Audio customer support. Refer to the official Memphis Audio webna tej stronie znajdziesz najbardziej aktualne dane kontaktowe.
Zasoby internetowe: www.memphiscaraudio.com


