1. Wprowadzenie
Thank you for choosing the SCHEPPACH HC 16W DIY Wall Compressor. This manual provides essential information for the safe and efficient operation, maintenance, and troubleshooting of your new compressor. Please read this manual thoroughly before initial use and keep it for future reference.
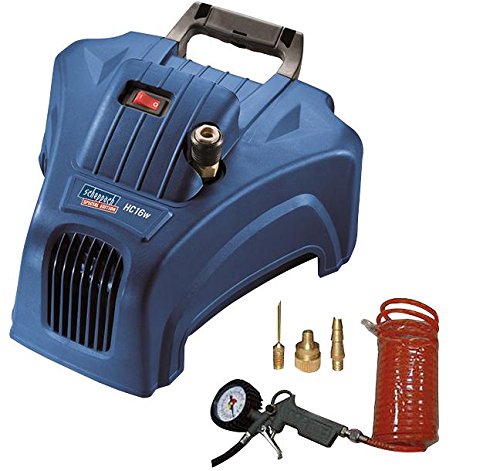
Figure 1: SCHEPPACH HC 16W DIY Wall Compressor and included accessories (inflator with pressure gauge, 5m hose, 3 adapters).
2. Instrukcje bezpieczeństwa
Always observe basic safety precautions when using electrical appliances to reduce the risk of fire, electric shock, and personal injury. This compressor is designed for DIY use and should not be used for commercial or industrial applications.
- Upewnij się, że zasilanie jest zgodne z objtage specified on the compressor (230V).
- Nie używaj sprężarki w mokrym lub damp warunki.
- Trzymać dzieci i osoby nieupoważnione z dala od obszaru roboczego.
- Wear appropriate personal protective equipment, such as safety glasses, when operating the compressor and air tools.
- Nigdy nie kieruj sprężonego powietrza w stronę ludzi lub zwierząt.
- Disconnect the compressor from the power supply before performing any maintenance or adjustments.
- Do not modify the compressor or its accessories.
- Ensure adequate ventilation when operating the compressor.
3. Koniec produktuview
The SCHEPPACH HC 16W is a compact and portable oil-free air compressor designed for various DIY tasks. Its oil-free pump eliminates the need for lubrication, making it ready for immediate use.
Główne cechy:
- Kompaktowa i przenośna konstrukcja.
- Oil-free pump for maintenance-free operation.
- Can be used on the ground or wall-mounted with the included bracket.
- Suitable for a range of air tools including tire inflators and blow guns.
Dołączone akcesoria:
- Inflator z manometrem
- 5m Flush Hose
- 3x Adapters
4. Konfiguracja
Rozpakowywanie:
Carefully remove the compressor and all accessories from the packaging. Inspect for any damage that may have occurred during transit. Retain packaging for future storage or transport.
Umieszczenie:
The compressor can be placed on a stable, level surface or mounted to a wall. If wall-mounting, ensure the wall can support the weight of the compressor and that there is adequate space for ventilation and access to controls.
- Ground Use: Place the compressor on a flat, stable surface, ensuring it is not obstructed and has good airflow around it.
- Montaż na ścianie:
- Identify a suitable location on a sturdy wall, preferably near a power outlet.
- Use the provided wall mount bracket as a template to mark drilling points.
- Wywierć otwory i włóż odpowiednie kotwy ścienne (nie znajdują się w zestawie, zależą od rodzaju ściany).
- Securely fasten the bracket to the wall.
- Attach the compressor to the mounted bracket.
Podłączanie akcesoriów:
Connect the 5m flush hose to the air outlet on the compressor. Attach the desired air tool (e.g., inflator with pressure gauge) to the other end of the hose. Use the appropriate adapters as needed.
5. Instrukcja obsługi
Pierwsze uruchomienie:
- Ensure all connections are secure and the compressor is placed on a stable surface or securely wall-mounted.
- Podłącz przewód zasilający do uziemionego gniazdka prądu zmiennego 230 V.
- Turn the power switch (usually red, located on top of the unit) to the "ON" position. The compressor will begin to build pressure.
- Allow the compressor to reach its maximum operating pressure (8 bar) and shut off automatically. This indicates proper function.
Korzystanie z narzędzi pneumatycznych:
Once the compressor has built pressure, you can begin using your air tools. The compressor will automatically cycle on and off to maintain the desired pressure as you use air.
- Pompka do opon: Attach the inflator with pressure gauge to the hose. Connect it to the tire valve and monitor the pressure gauge while inflating.
- Pistolet dmuchawkowy: Use the blow gun for cleaning dust and debris from surfaces. Always wear eye protection.
- Adaptery: Use the included adapters for various inflation needs (e.g., sports balls, inflatable toys).
Wyłączanie:
- Ustaw wyłącznik zasilania w pozycji „WYŁ”.
- Odłącz sprężarkę od gniazdka zasilania.
- Release any remaining air pressure from the hose and tools by briefly activating the tool or using the pressure relief valve (if present).
6. Konserwacja
The SCHEPPACH HC 16W compressor features an oil-free pump, significantly reducing maintenance requirements. However, regular checks are still important for optimal performance and longevity.
- Czyszczenie: Regularly wipe down the exterior of the compressor with a clean, damp cloth. Do not use harsh chemicals or abrasive cleaners. Ensure ventilation grilles are free from dust and debris.
- Filtr powietrza: Check the air filter periodically for cleanliness. A clogged air filter can reduce compressor efficiency. Clean or replace as necessary (refer to manufacturer guidelines for replacement parts).
- Węże i przyłącza: Inspect the air hose and all connections for signs of wear, cracks, or leaks before each use. Replace damaged components immediately.
- Składowanie: When not in use, store the compressor in a clean, dry place, away from extreme temperatures and direct sunlight.
7. Rozwiązywanie Problemów
This section provides solutions to common issues you might encounter with your compressor. For problems not listed here, contact customer support.
| Problem | Możliwa przyczyna | Rozwiązanie |
|---|---|---|
| Sprężarka nie uruchamia się. | No power supply; Power switch off; Thermal overload. | Check power cord and outlet; Turn power switch ON; Allow compressor to cool down. |
| Sprężarka pracuje ciągle lub często. | Air leak in hose or connections; Excessive air tool usage. | Check all connections for leaks and tighten; Reduce continuous air tool usage; Inspect hose for damage. |
| Niskie ciśnienie powietrza. | Air leak; Clogged air filter; Insufficient power. | Check for leaks; Clean or replace air filter; Ensure proper voltage dostaw. |
| Nietypowy hałas lub wibracje. | Loose components; Compressor not on stable surface. | Check and tighten any loose screws; Ensure compressor is on a stable, level surface. |
8. Specyfikacje
| Parametr | Wartość |
|---|---|
| Model | UK-HC 16W |
| Producent | SCHEPPACH |
| Marka | Seria Pro |
| Moc wejściowa | 1000 W |
| Objętość dostawtage | 230 V prądu zmiennego |
| Maksymalne ciśnienie robocze | 8 bar |
| Przepływ powietrza | 160 L/min (LPM) |
| Wymiary (dł. x szer. x wys.) | Wymiary: 350 x 370 x 210 mm |
| Typ pompy | Bez oleju |
9. Gwarancja i wsparcie
This product comes with a UK Standard Manufacturer Term Warranty. For warranty claims or technical support, please contact your retailer or the manufacturer, SCHEPPACH, directly. Keep your proof of purchase for warranty validation.
For further assistance, please refer to the contact information provided with your purchase or visit the official SCHEPPACH webstrona.


