1. Wprowadzenie
The Crenova PT100A is a 720P HD WIFI Surveillance IP Camera designed for home security and monitoring. It features Pan-Tilt-Zoom (PTZ) capabilities, night vision, two-way audio, and support for wireless alarm sensors, providing comprehensive surveillance and communication functionalities.
This manual provides detailed instructions for setting up, operating, and maintaining your Crenova PT100A camera to ensure optimal performance and security.
2. Główne cechy
- One-Key Wi-Fi Configuration: Simple and quick setup via sound.
- Rozdzielczość HD: 720P resolution with a 1.0 MP CMOS sensor for clear images and video.
- Widzenie nocne: Ceramic infrared light provides optimal visibility in low-light conditions.
- Sterowanie PTZ: Pan 355 degrees horizontally and tilt 120 degrees vertically for wide area coverage.
- Alerty bezpieczeństwa: Supports up to 64 wireless alarm sensors, with siren, mobile phone calls, and email photo alerts.
- Dwukierunkowy dźwięk: Real-time communication with the monitored area.
- Pamięć lokalna: Supports up to a 128GB TF card for continuous recording.
3. Zawartość opakowania
Sprawdź, czy w przesyłce znajdują się wszystkie elementy:
- 1 x Crenova Smart IP Camera (PT100A)
- 1 x kabel USB
- 1 x zasilacz
- 1 x Mounting Basket Panel
- 1 x Instrukcja obsługi
4. Koniec produktuview

Obraz 4.1: Diagram of the Crenova PT100A IP Camera with its main components labeled. This includes the lens, ceramic lamp, speaker, antenna, network cable interface, TF card slot, reset button, and power interface.
Zapoznaj się z elementami aparatu:
- Obiektyw: Nagrywanie wideo i obrazów.
- Ceramika lamp: Zapewnia oświetlenie podczerwone umożliwiające widzenie w nocy.
- Głośnik: Outputs audio for two-way communication and alarm siren.
- Antena: Do łączności Wi-Fi.
- PT (Pan/Tilt) Mechanism: Allows remote adjustment of camera angle.
- Interfejs kabla sieciowego: For wired Ethernet connection (optional).
- Gniazdo karty TF: Włóż kartę MicroSD do lokalnego przechowywania wideo.
- Przycisk resetowania: Służy do przywracania ustawień fabrycznych.
- Interfejs zasilania: Łączy się z zasilaczem.
5. Przewodnik konfiguracji
Follow these steps to set up your Crenova PT100A IP Camera:

Obraz 5.1: Visual guide for the quick setup process, illustrating connecting power, downloading the app, performing one-key Wi-Fi setup, and adding the camera.
- Podłącz zasilanie: Plug the power adapter into the camera's power interface and then into a wall outlet. The camera will power on and initiate its startup sequence.
- Pobierz aplikację: Szukaj the official Crenova camera application on your smartphone's app store (e.g., Apple App Store for iOS or Google Play Store for Android). Download and install the application.
- Zarejestruj konto: Otwórz aplikację i postępuj zgodnie z instrukcjami wyświetlanymi na ekranie, aby zarejestrować nowe konto użytkownika.
- One-Key Wi-Fi Setup: Within the app, select the option for 'One-Key Wi-Fi Configuration' or 'SmartLink'. Follow the prompts to connect the camera to your Wi-Fi network. Ensure your smartphone is connected to the same 2.4GHz Wi-Fi network you intend to use for the camera. The app will use sound waves to transmit network information to the camera.
- Dodaj kamerę: Once the Wi-Fi setup is complete, the app will guide you to add the camera to your account. You may need to scan a QR code on the camera or manually enter its ID.
- Umieszczenie: Position the camera in your desired monitoring area. The included mounting basket panel can be used for wall or ceiling installation.
6. Instrukcja obsługi
6.1. Zdalny Viewsterowanie i PTZ
After successful setup, open the app on your smartphone to view the live feed from your camera. Use the on-screen controls to remotely pan (horizontal rotation) and tilt (vertical rotation) the camera lens.

Obraz 6.1: Illustration of the camera's Pan-Tilt-Zoom (PTZ) capabilities, demonstrating 355 degrees of horizontal rotation and 120 degrees of vertical rotation for comprehensive area coverage.
- Obrót poziomy: The camera supports 355 degrees of horizontal movement.
- Obrót pionowy: The camera supports 120 degrees of vertical movement.
6.2. Motion Detection and Alarm Alerts
The camera can detect motion and trigger various alarm responses. Configure these settings within the camera app.

Obraz 6.2: A smartphone displaying a motion detection alarm notification from the camera, indicating an event has occurred.
- Alarm Sensor Support: The camera can integrate with up to 64 wireless alarm sensors.
- Alarm Methods: When an alarm is triggered, the camera can:
- Emit a loud siren.
- Call up to five pre-configured mobile phone numbers.
- Capture photos and send them via email.
6.3. Dźwięk dwukierunkowy
Wykorzystaj wbudowany mikrofon i głośnik do dwukierunkowej komunikacji w czasie rzeczywistym.

Obraz 6.3: The camera depicted alongside an icon representing two-way audio functionality, with sound waves indicating active communication.
- Kliknij ikonę mikrofonu w aplikacji, aby mówić przez głośnik kamery.
- Mikrofon kamery będzie rejestrować dźwięk z monitorowanego obszaru.
6.4. Nagrywanie wideo
The camera supports local video recording to a TF (MicroSD) card.
- Insert a TF card (up to 128GB) into the designated slot on the camera.
- Configure recording settings (e.g., continuous recording, motion-activated recording) within the camera app.
- Fujtage może być ponownieviewbezpośrednio z aplikacji.
7. Specyfikacje
| Funkcja | Specyfikacja |
|---|---|
| Model | PT100A |
| Czujnik obrazu | 1.0 MP HD CMOS Sensor |
| Rezolucja | 720P (1280x720) |
| Łączność | Wi-Fi (Wireless), Wired Ethernet |
| Kąty PTZ | Pan 355 °, pochylenie 120 ° |
| Wizja nocna | Ceramic Infrared Light |
| Składowanie | Obsługuje karty TF o pojemności do 128 GB |
| Alarm Sensor Support | Up to 64 wireless channels |
| Źródło zasilania | Cable eléctrico (Power Cable) |
| Wymiary (dł. x szer. x wys.) | 20.57 x 15.49 x 13.21 cm (ok. 8.1 x 6.1 x 5.2 cala) |
| Waga | 657.7 g (ok. 1.45 funta) |
| Certyfikaty | CE, FCC, ROHS |
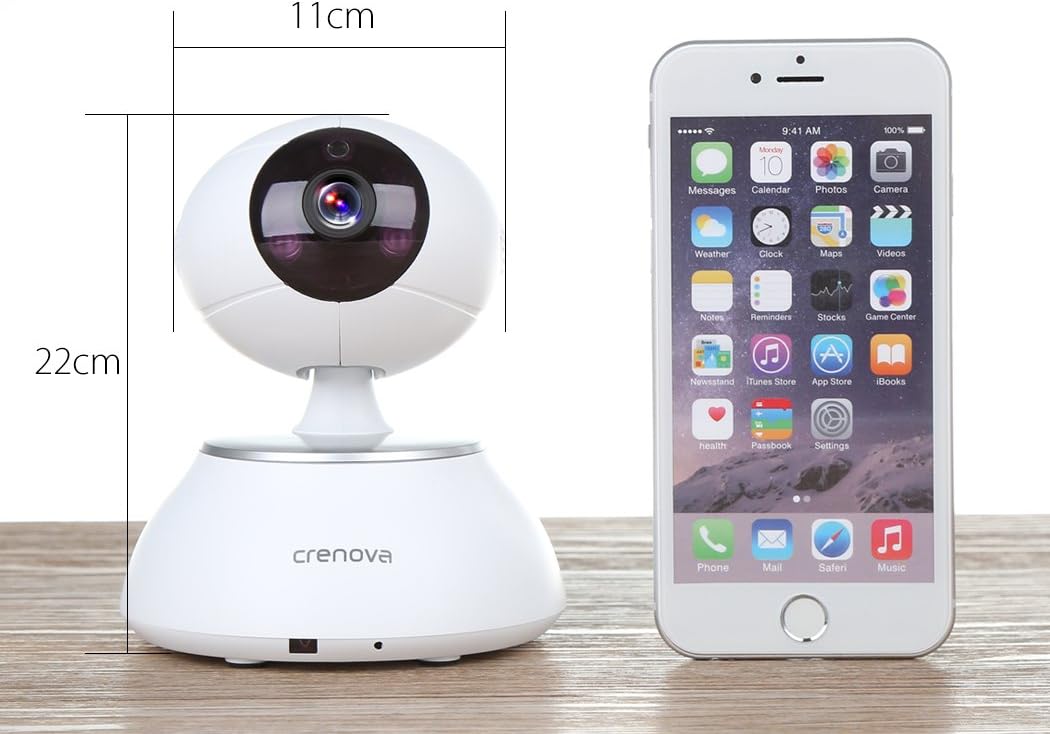
Obraz 7.1: The Crenova PT100A IP Camera shown next to a smartphone, with its approximate dimensions indicated as 11cm in width and 22cm in height.
8. Konserwacja
- Czyszczenie: Use a soft, dry cloth to clean the camera's exterior. Do not use liquid cleaners or aerosols directly on the camera.
- Pielęgnacja soczewek: Gently wipe the lens with a microfiber cloth designed for optics to avoid scratches.
- Umieszczenie: Upewnij się, że kamera znajduje się w stabilnym miejscu, z dala od bezpośredniego światła słonecznego, ekstremalnych temperatur i wysokiej wilgotności.
- Aktualizacje oprogramowania układowego: Periodically check the camera app for available firmware updates to ensure optimal performance and security.
9. Rozwiązywanie Problemów
- Kamera nie łączy się z Wi-Fi:
- Upewnij się, że Twoja sieć Wi-Fi obsługuje częstotliwość 2.4 GHz. Kamera może nie obsługiwać sieci 5 GHz.
- Sprawdź, czy hasło Wi-Fi jest poprawnie wprowadzone w aplikacji.
- Przesuń kamerę bliżej routera Wi-Fi.
- Reset the camera using the reset button and attempt setup again.
- Słaba jakość obrazu:
- Sprawdź prędkość swojego połączenia internetowego. Wolne połączenie może mieć wpływ na jakość przesyłania strumieniowego.
- Clean the camera lens for any smudges or dust.
- Ensure adequate lighting in the monitored area, especially for optimal night vision performance.
- No Alarm Alerts:
- Verify motion detection and alarm settings are enabled in the app.
- Check app notification settings on your smartphone to ensure alerts are not blocked.
- Ensure wireless alarm sensors (if used) are properly paired and functioning.
- Dwukierunkowe przesyłanie dźwięku nie działa:
- Sprawdź uprawnienia mikrofonu i głośnika dla aplikacji na swoim smartfonie.
- Sprawdź, czy głośność w smartfonie i aplikacji jest ustawiona na odpowiednim poziomie.
- Sprawdź, czy nie ma żadnych przeszkód blokujących mikrofon lub głośnik kamery.
10. Gwarancja i wsparcie
For warranty information and technical support, please refer to the documentation included with your purchase or contact Crenova customer service directly. Details for contacting support are typically available on the manufacturer's official webmiejscu lub w opakowaniu produktu.


