1. Wprowadzenie
This manual provides essential information for the safe and efficient operation of your COTEC SP2000-224 Pure Sine Wave Inverter. This advanced inverter offers high efficiency and power density, featuring selectable output voltage and frequency, all housed within a robust aluminum casing. Please read this manual thoroughly before installation and use to ensure proper function and longevity of the device.
2. Informacje dotyczące bezpieczeństwa
Aby zapobiec obrażeniom ciała i uszkodzeniom falownika lub podłączonego sprzętu, należy zawsze przestrzegać następujących środków ostrożności:
- Wentylacja: Zapewnij odpowiednią wentylację wokół falownika. Nie blokuj otworów wentylacyjnych.
- Środowisko: Falownik należy zainstalować w suchym, chłodnym i dobrze wentylowanym pomieszczeniu, z dala od bezpośredniego światła słonecznego, źródeł ciepła i materiałów łatwopalnych.
- Grunt: Properly ground the inverter chassis to prevent electrical shock.
- Wejście DC: Connect the inverter only to a 24V DC battery bank. Ensure correct polarity (positive to positive, negative to negative). Reverse polarity will damage the unit.
- Wyjście AC: Do not overload the inverter. Ensure the total wattage of connected AC devices does not exceed the inverter's rated output.
- Serwisowanie: Nie próbuj samodzielnie otwierać ani serwisować falownika. Wszelkie prace serwisowe zlecaj wykwalifikowanemu personelowi.
- Narażenie na działanie wody: Keep the inverter away from water, rain, or excessive moisture.
3. Funkcje produktu
The COTEC SP2000-224 Inverter incorporates several advanced features for reliable power conversion:
- Czysta fala sinusoidalna dla wrażliwej elektroniki.
- Power ON / OFF remote control capability via a dedicated green terminal.
- Full input and output isolation for enhanced safety.
- Temperature and load-controlled cooling fan for efficient heat dissipation.
- Przyjazny dla użytkownika interfejs z 3-kolorowymi wskaźnikami stanu LED.
- Output frequency selectable between 50 Hz and 60 Hz via DIP switch.
- Objętość wyjściowatagMożna je wybierać za pomocą przełącznika DIP.
- Power saving mode adjustable via a variable resistor.
- Comprehensive input protection: Reverse Polarity (via fuse), Under Voltage, ponad tomtage.
- Comprehensive output protection: Short Circuit, Overload, Over Temperature.
- Certifications: E13, UL, CE, FCC approved.
4. Konfiguracja i instalacja
Proper installation is crucial for the inverter's performance and safety.
4.1 Fizyczna instalacja
Mount the inverter securely in a location that meets the safety requirements mentioned in Section 2. Ensure sufficient space around the unit for airflow.
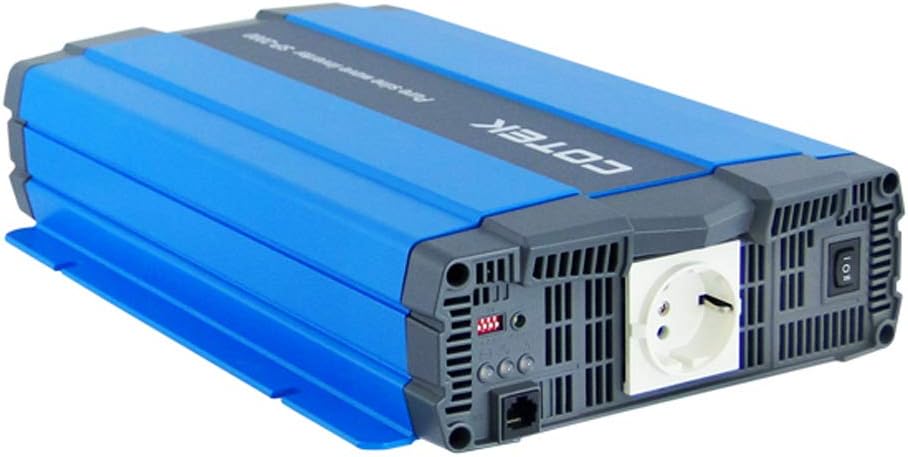
Rysunek 4.1: Kątowy view of the COTEC SP2000-224 Pure Sine Wave Inverter, showcasing its robust blue and gray casing.
4.2 Podłączenie wejścia prądu stałego
Connect the inverter to a 24V DC battery bank using appropriate gauge cables. Ensure the positive (+) terminal of the inverter connects to the positive terminal of the battery, and the negative (-) terminal of the inverter connects to the negative terminal of the battery. Install an appropriate fuse or circuit breaker in the positive DC line close to the battery.

Rysunek 4.2: Tył view of the inverter, highlighting the DC input terminals (red for positive, black for negative), the chassis ground screw, and the remote control terminal.
4.3 Chassis Ground Connection
Connect the chassis ground terminal (labeled 'CHASSIS GROUND') to a reliable earth ground point. This is a critical safety step.
4.4 AC Output and Controls
The inverter features a standard AC outlet and control switches on its front panel.

Rysunek 4.3: Przód view of the inverter, displaying the AC output socket, the main power switch, LED indicators, and DIP switches for configuration.
4.5 Ustawienia przełącznika DIP
The inverter features DIP switches for configuring output frequency and voltage. Refer to the specifications table (Section 7) or the product label for specific settings. Ensure the inverter is powered off before adjusting DIP switches.
- Częstotliwość wyjściowa: Select 50 Hz or 60 Hz based on your regional requirements.
- Objętość wyjściatage: Wybierz żądaną głośność wyjściową prądu przemiennegotage (e.g., 230VAC for this model).
5. Instrukcja obsługi
5.1 Włączanie/wyłączanie
After all connections are secure and verified, switch the main power button on the inverter to the 'ON' position. The LED indicators will illuminate to show the inverter's status. To power off, switch the button to 'OFF'. A remote control terminal is also available for external ON/OFF control.
5.2 Wskaźniki LED
The 3-color LED indicators provide visual feedback on the inverter's operational status and any potential faults. Consult the product documentation or the specifications table for a detailed explanation of each LED state.
5.3 Tryb oszczędzania energii
The power saving mode can be adjusted via a variable resistor. This feature helps reduce quiescent current draw when no load or a very light load is connected, conserving battery power.
5.4 Podłączanie obciążeń prądu przemiennego
Plug your AC appliances into the inverter's AC output socket. Ensure the total power consumption does not exceed the inverter's continuous power rating (2000W for this model). For inductive loads (e.g., motors, refrigerators), consider their surge power requirements, which can be significantly higher than their running power.
6. Konserwacja
Regularna konserwacja zapewnia optymalną wydajność i wydłuża żywotność falownika.
- Czyszczenie: Utrzymuj falownik w czystości i zapobiegaj jego zakurzeniu. Do czyszczenia obudowy używaj suchej ściereczki. Nie używaj płynnych środków czyszczących.
- Wentylacja: Periodically check that the cooling fan and ventilation openings are clear of obstructions.
- Znajomości: Inspect all DC and AC connections regularly to ensure they are tight and free from corrosion. Loose connections can cause overheating and poor performance.
- Konserwacja akumulatora: Follow the manufacturer's recommendations for your battery bank's maintenance.
7. Rozwiązywanie Problemów
If the inverter is not functioning correctly, refer to the following common issues and solutions:
- Brak mocy wyjściowej:
- Check DC input connections and battery voltage.
- Verify the inverter's power switch is ON.
- Check for blown DC input fuses (if applicable).
- Wskazanie przeciążenia:
- Zmniejsz całkowite obciążenie podłączone do falownika.
- Disconnect and reconnect the load to reset the inverter.
- Over Temperature Indication:
- Należy zapewnić odpowiednią wentylację wokół falownika.
- Check if the cooling fan is operating.
- Jeśli pracujesz w gorącym otoczeniu, zmniejsz obciążenie.
- Niski poziom naładowania bateriitage Alarm/Wyłączenie:
- Recharge the battery bank.
- Check battery connections for looseness or corrosion.
For persistent issues, contact COTEC customer support.
8. Specyfikacje
The following table details the technical specifications for the COTEC SP2000 series, with specific values for the SP2000-224 model highlighted where applicable.

Rysunek 8.1: Detailed technical specifications for the COTEC SP-2000 series, including the SP2000-224 model.
| Funkcja | Specyfikacja |
|---|---|
| Marka | COTEK |
| Nazwa modelu | SP2000 (SP2000-224 variant) |
| Moc znamionowa | 2000 W |
| Surge Power (1 Sec) | 4000 W |
| Objętość wejścia DCtage | 24VDC (Operating Range: 21.0-33.0VDC) |
| Objętość wyjścia ACtage | 230VAC (selectable) |
| Częstotliwość wyjściowa | 50/60 Hz (do wyboru) |
| Przebieg wyjściowy | Pure Sine Wave (THD<3% at nominal load) |
| Wydajność (maks.) | 93% |
| Chłodzenie | Temperature & load controlled fan |
| Temperatura pracy | -20°C do +40°C |
| Temperatura przechowywania | -30°C do +70°C |
| Wymiary (szer. x wys. x gł.) | 17.44 x 9.76 x 3.27 cala (443 x 248 x 83 mm) |
| Waga przedmiotu | 1 pounds (approximate, actual unit weight may vary) |
| Wymiary opakowania | 19 x 12 x 6 cala |
| Certyfikaty | E13, UL, CE, FCC approved |
8.1 Rysunki mechaniczne
For detailed physical dimensions and mounting information, refer to the mechanical drawings below.
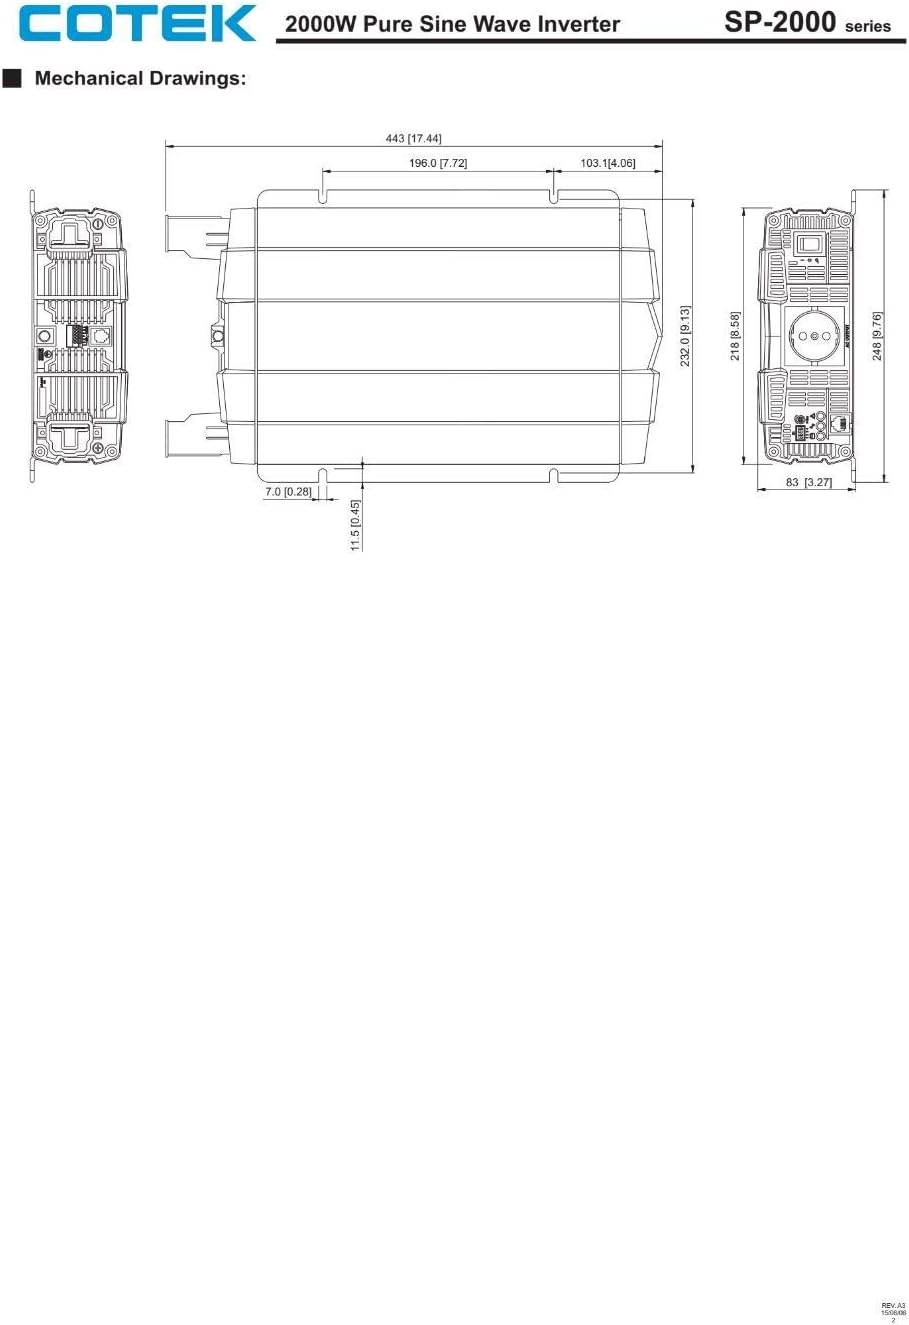
Rysunek 8.2: Mechanical drawings providing precise dimensions for installation planning.
9. Gwarancja i wsparcie
COTEC products are designed for reliability and performance. For warranty information, technical support, or service inquiries, please refer to the warranty card included with your product or visit the official COTEC webZachowaj paragon jako dowód zakupu na wypadek reklamacji.


