1. Wprowadzenie
This manual provides instructions for the safe and efficient use of your KitchenAid KSM1JA Masticating Juicer & Sauce Attachment. This attachment is designed to work with all household KitchenAid Stand Mixers, transforming them into a versatile juicer and sauce maker. It features a slow (masticating) juicing process that first slices and then processes soft, hard, or leafy fruits and vegetables for nutrient-rich extraction. With three included pulp screens, you can create low pulp or high pulp juices, sauces, and jams.
Please read all instructions carefully before using the attachment to ensure proper operation and to prevent injury or damage.
2. Ważne zabezpieczenia
Podczas korzystania z urządzeń elektrycznych należy zawsze przestrzegać podstawowych zasad bezpieczeństwa, w tym:
- Przeczytaj wszystkie instrukcje.
- Aby uniknąć ryzyka porażenia prądem elektrycznym, nie zanurzaj podstawy miksera w wodzie ani innym płynie.
- Należy zachować ścisły nadzór, jeżeli z urządzenia korzystają dzieci lub w ich pobliżu.
- Odłączaj urządzenie od gniazdka, gdy nie jest używane, przed montażem lub demontażem części oraz przed czyszczeniem.
- Unikać kontaktu z ruchomymi częściami.
- Nie używaj żadnego urządzenia z uszkodzonym przewodem lub wtyczką lub gdy urządzenie nie działa prawidłowo lub zostało upuszczone lub uszkodzone w jakikolwiek sposób. Zwróć urządzenie do najbliższego autoryzowanego serwisu w celu sprawdzenia, naprawy lub regulacji elektrycznej lub mechanicznej.
- Użycie akcesoriów niezalecanych lub niesprzedawanych przez firmę KitchenAid może spowodować pożar, porażenie prądem lub obrażenia.
- Nie używaj urządzenia na zewnątrz.
- Nie pozwól, aby przewód zwisał poza krawędź stołu lub blatu.
- Nie dopuść do kontaktu przewodu zasilającego z gorącymi powierzchniami, w tym z kuchenką.
- Always ensure the attachment is properly assembled and securely attached to the stand mixer before operation.
- Do not feed fingers or other utensils into the feed chute while the appliance is operating. Use only the provided food pusher.
- Do not process frozen fruits or vegetables.
- Nie należy używać nasadki do celów innych niż te, do których jest przeznaczona.
3. Części i funkcje
Your KitchenAid KSM1JA Masticating Juicer & Sauce Attachment includes the following components:
- Zespół napędu: The main body of the attachment that connects to the stand mixer.
- Miska do soku: The transparent bowl where juicing occurs.
- Wiper Basket: Helps to keep the strainer clean during operation.
- Pulp Screens (3):
- Low Pulp Screen
- High Pulp Screen
- Sauce/Jam Screen
- Auger/Blade Assembly: The component that slices and processes fruits and vegetables.
- Pokrywa: Covers the juicing bowl and includes the feed chute.
- Zbiornik: Sits on top of the feed chute to hold ingredients.
- Pchacz jedzenia: Służy do wprowadzania składników do otworu zasypowego.
- Pojemnik na miąższ: Collects discarded pulp.
- Pojemnik na sok: Zbiera wyciśnięty sok.
- Szczotka do czyszczenia: For easy cleaning of the strainer and other parts.

Image: The three interchangeable pulp screens for varying pulp levels and sauce making.
4. Konfiguracja
- Prepare the Attachment:
- Place the drive assembly on a clean, flat countertop.
- Ensure the rubber gasket is securely placed behind the pulp chute of the juicing bowl.
- Attach the juicing bowl to the drive assembly, ensuring the pulp chute aligns with the shoot slot.
- Insert the wiper basket into the juicing bowl.
- Select the desired pulp screen (low pulp, high pulp, or sauce/jam) and align its red position arrow with the red position arrow on the juicing bowl.
- Firmly place the auger/blade assembly into the selected pulp screen.
- Align the unlock icon on the lid with the red position arrow on the juicing bowl, press the lid down, and twist clockwise until the locked icon aligns with the red position arrow, securing the lid.
- Attach to Stand Mixer:
- Turn off and unplug your KitchenAid Stand Mixer.
- Remove the hub cover from the power hub on the front of your stand mixer.
- Insert the attachment shaft into the power hub, ensuring the shaft fits into the square hub socket.
- Tighten the hub knob clockwise until the attachment is firmly secured to the stand mixer.
- Pozycjonowanie kontenerów:
- Place the pulp container directly under the pulp chute.
- Place the juice container directly under the juice spout.
- Insert Hopper and Pusher:
- Insert the hopper into the top of the feed chute.
- Keep the food pusher nearby for use during operation.

Image: The juicer attachment securely mounted on a KitchenAid stand mixer.
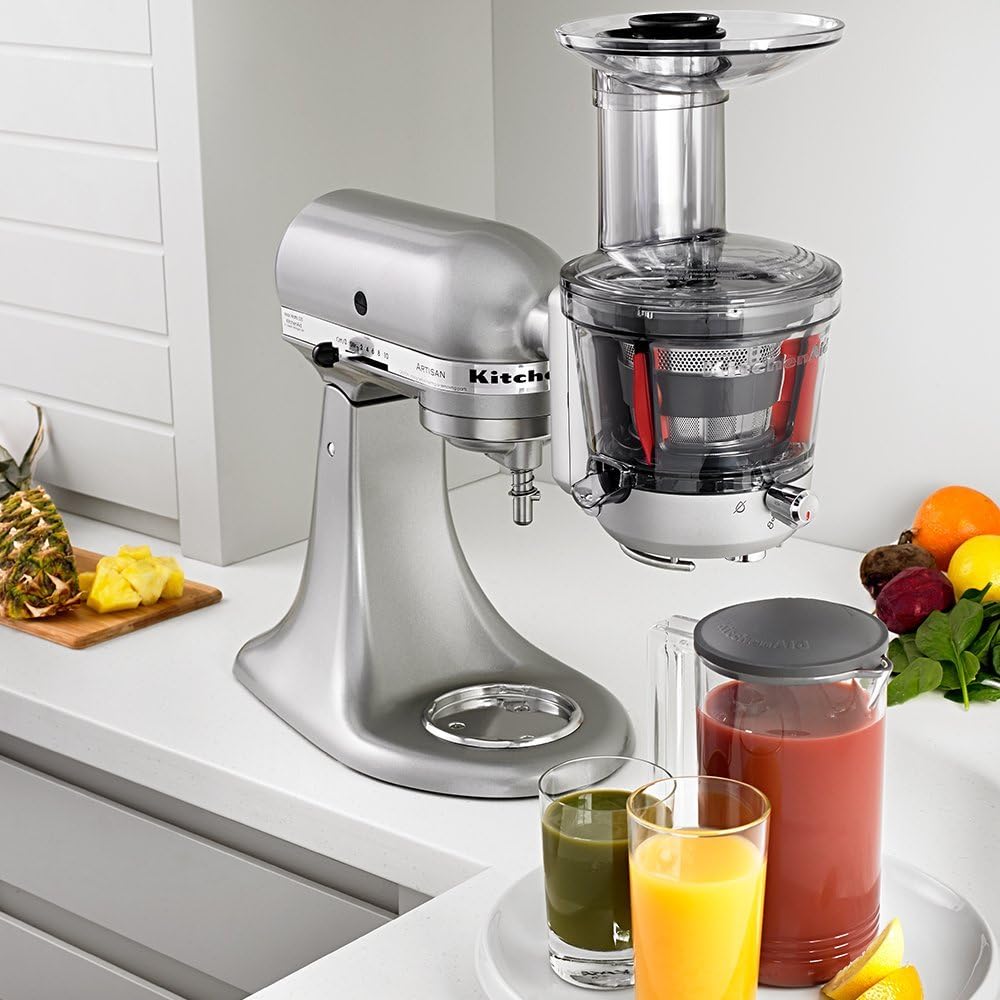
Image: The juicer attachment in use, demonstrating juice collection.
5. Działanie
Przygotowanie składników:
- Dokładnie umyj wszystkie owoce i warzywa.
- Remove any pits, large seeds, or hard cores.
- Cut ingredients into pieces small enough to fit comfortably into the feed chute. The extra-wide feed tube accommodates a variety of sizes.
- For best results, process ingredients that are at room temperature.
Proces wyciskania soku:
- Ensure the juicer attachment is properly assembled and attached to your stand mixer.
- Position the pulp and juice containers.
- For Juicing: Open the pulp chute by pressing it towards the juicing bowl. This allows pulp to be ejected into the pulp container and juice to flow into the juice container.
- For Sauces/Jams: Close the pulp chute by pulling it away from the juicing bowl. This allows pulp and juice to flow together into the juicing container.
- Podłącz mikser stojący KitchenAid.
- Obróć mikser stojący do pozycji Prędkość 10.
- Gradually feed prepared fruits or vegetables into the hopper. Use the food pusher to gently guide ingredients down the feed chute. Do not force ingredients.
- Continue feeding ingredients until all desired produce is processed.
- Once finished, turn off the stand mixer and unplug it.
Wskazówki dotyczące uzyskania najlepszych wyników:
- Process softer ingredients alternately with harder ingredients to maintain optimal performance.
- For leafy greens, roll them into a tight ball before feeding them into the chute.
- Nie przepełniać zasobnika.
- If the attachment jams, turn off the mixer, unplug it, and disassemble to clear the obstruction.
Video: Official KitchenAid demonstration of assembling and using the KSM1JA Masticating Juicer and Sauce Attachment.
6. Pielęgnacja i czyszczenie
Proper cleaning of your juicer attachment is essential for hygiene and longevity. All parts, except the drive assembly, are dishwasher-safe (top rack recommended) or can be hand-washed.
- Demontaż:
- Turn off and unplug the stand mixer.
- Remove the juicer attachment from the power hub.
- Twist the lid counter-clockwise to unlock and remove it.
- Remove the auger/blade assembly, pulp screen, wiper basket, and juicing bowl from the drive assembly.
- Remove the rubber gasket from the pulp chute for thorough cleaning.
- Czyszczenie:
- Mycie rąk: Wash all disassembled parts (except the drive assembly) in warm, soapy water. Use the provided cleaning brush to remove any pulp residue from the screens and other intricate areas. Rinse thoroughly and dry completely before reassembling or storing.
- Pomywaczka: All parts except the drive assembly are dishwasher-safe (top rack only).
- Zespół napędu: Wipe the drive assembly with a damp ściereczka. Nie zanurzaj jej w wodzie ani innych płynach.
- Składowanie:
- Przed przechowywaniem upewnij się, że wszystkie części są całkowicie suche.
- Store the attachment in a clean, dry place.
7. Rozwiązywanie Problemów
| Problem | Możliwa przyczyna | Rozwiązanie |
|---|---|---|
| Załącznik nie działa. | Stand mixer not plugged in or turned on. Attachment not properly secured. | Ensure stand mixer is plugged in and turned to Speed 10. Re-attach the juicer securely to the power hub. |
| Zsyp miąższu jest zatkany. | Too much pulp buildup, or ingredients are too fibrous. | Turn off and unplug the mixer. Disassemble the attachment and clear the clog. Clean the pulp screen thoroughly. |
| Przepływ soku jest powolny lub zatrzymuje się. | Strainer is clogged with pulp. | Turn off and unplug the mixer. Disassemble and clean the strainer and wiper basket. |
| Nadmierna ilość piany w soku. | Common with certain fruits/vegetables (e.g., apples, leafy greens). | This is normal. Skim off foam if desired. Processing at a slightly lower speed might reduce foam. |
| Attachment detaches during use. | Not securely fastened to the power hub. | Ensure the attachment shaft is fully inserted into the power hub and the hub knob is tightened securely. |
8. Specyfikacje
| Funkcja | Szczegół |
|---|---|
| Marka | Kuchenka Aid |
| Numer modelu | KSM1JA |
| Kolor | Srebrny |
| Wymiary produktu | 7" gł. x 9.65" szer. x 11.6" wys. |
| Pojemność | 1 litrów |
| Materiał ostrza | Stal nierdzewna |
| Tworzywo | Plastik (obudowa), stal nierdzewna (ostrze) |
| Instrukcje pielęgnacji produktu | Hand Wash Only (for some parts, check manual) / Dishwasher Safe (top rack for most parts) |
| Zgodność | Fits all Household KitchenAid Stand Mixers |
9. Gwarancja i wsparcie
Aby uzyskać szczegółowe informacje dotyczące gwarancji i obsługi klienta, zapoznaj się z oficjalną stroną KitchenAid webOdwiedź stronę internetową lub skontaktuj się bezpośrednio z działem obsługi klienta. Zachowaj paragon jako dowód zakupu na wypadek reklamacji.
Obsługa klienta KitchenAid:
- Webstrona: www.pomoc kuchenna.com
- Telefon: Sprawdź informacje o KitchenAid w swoim regionie webstrona z lokalnymi numerami kontaktowymi.
This product is designed, engineered, and tested by KitchenAid to meet high-quality standards.


