Wstęp
This manual provides essential instructions for the safe and effective installation, operation, and maintenance of the Carrier HK61EA005 OEM Replacement Furnace Control Board. Please read this manual thoroughly before proceeding with any installation or service procedures. Retain this manual for future reference.
Informacje dotyczące bezpieczeństwa
OSTRZEŻENIE: Installation and servicing of heating, ventilation, and air conditioning (HVAC) equipment can be hazardous due to system pressure, electrical components, and equipment location. Only trained and qualified service personnel should install, repair, or service HVAC equipment. Failure to follow these instructions could result in property damage, personal injury, or death.
- Always disconnect power to the furnace before installing or servicing the control board.
- Verify all wiring connections are secure and correct according to the furnace manufacturer's specifications.
- Należy nosić odpowiedni sprzęt ochrony osobistej (PPE), w tym okulary ochronne i rękawice.
- Ensure proper grounding of the furnace system.
Produkt ponadview
The Carrier HK61EA005 is an OEM replacement furnace control board designed to manage the operational sequences of a furnace, including ignition, fan control, and safety monitoring. This board is compatible with various Carrier furnace models.
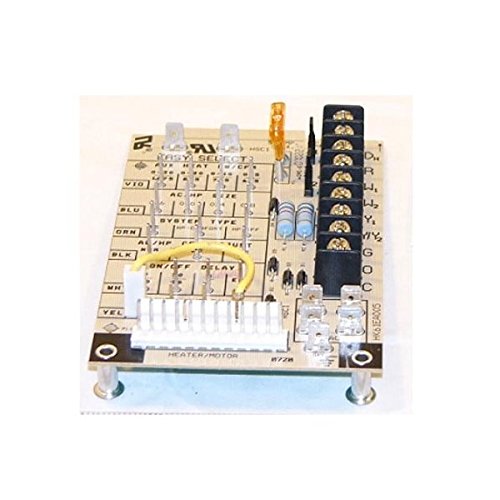
Rysunek 1: Carrier HK61EA005 Furnace Control Board. This image displays the circuit board with various terminals, jumpers, and components. Key features include the "EASY SELECT" jumper settings for system type, ON/OFF DELAY settings, and terminal blocks for wiring connections such as D, R, W, W2, Y, Y2, G, O, and C. A yellow jumper wire is visible connecting two pins on the board.
Konfiguracja i instalacja
- Odłączenie zasilania: Wyłącz zasilanie elektryczne pieca za pomocą głównego panelu serwisowego. Sprawdź, czy zasilanie jest wyłączone za pomocą przełącznika głośności.tage metr.
- Dostęp do starej tablicy: Otwórz panel dostępu do pieca, aby zlokalizować istniejącą płytę sterowniczą.
- Okablowanie dokumentów: Before disconnecting any wires, take clear photographs or make a detailed diagram of all wiring connections to the old control board. Note the position and color of each wire.
- Odłącz przewody: Carefully disconnect all wires and connectors from the old control board.
- Usuń starą tablicę: Zdemontuj starą płytę sterowniczą z obudowy pieca. Zwróć uwagę na sposób jej zamocowania (śruby, zaciski itp.).
- Zainstaluj nową płytę: Mount the new HK61EA005 control board in the same location and orientation as the old board. Ensure it is securely fastened.
- Podłącz okablowanie: Refer to your photographs or diagram and carefully reconnect all wires and connectors to the corresponding terminals on the new control board. Double-check each connection for accuracy and tightness.
- Ustawienia zworki: Configure the "EASY SELECT" jumpers and ON/OFF DELAY jumpers on the new board to match the settings of the original board or the furnace manufacturer's specifications. These settings typically determine the system type (e.g., AC, HP) and fan delay times. Refer to the furnace wiring diagram for specific requirements.
- Zamknij Panel dostępu: Once all connections are verified, close and secure the furnace access panel.
- Przywróć zasilanie: Przywróć zasilanie elektryczne pieca za pomocą głównego panelu serwisowego.
Instrukcja obsługi
After successful installation and power restoration, the furnace control board will initiate its normal operating sequence. The board manages the following functions:
- Kolejność zapłonu: Controls the gas valve and igniter for safe furnace startup.
- Sterowanie wentylatorem: Manages the indoor blower motor operation based on heating or cooling demands and delay settings.
- Monitorowanie bezpieczeństwa: Continuously monitors various safety sensors (e.g., flame sensor, limit switches) and will shut down the furnace if a fault is detected.
- Interfejs termostatu: Communicates with the thermostat to receive heating and cooling calls.
For specific operational details, refer to your furnace's primary instruction manual.
Konserwacja
The HK61EA005 control board itself requires no routine maintenance. However, regular maintenance of the overall furnace system is crucial for its longevity and proper function. This includes:
- Wymiana filtra powietrza: Replace or clean the furnace air filter regularly (typically every 1-3 months) to ensure proper airflow.
- Roczna kontrola zawodowa: Have a qualified HVAC technician inspect and service your furnace annually.
- Clean Flame Sensor: A dirty flame sensor can cause intermittent furnace operation. This should be cleaned by a qualified technician.
Przed przystąpieniem do prac konserwacyjnych należy zawsze odłączyć piec od zasilania.
Rozwiązywanie problemów
If the furnace is not operating correctly after installing the new control board, consider the following troubleshooting steps:
- Brak zasilania:
- Sprawdź wyłącznik obwodu pieca.
- Ensure the furnace disconnect switch is in the "ON" position.
- Sprawdź wszystkie niskie obrotytage i dużej objętościtagPołączenia z płytą sterującą są bezpieczne.
- Piec się nie zapala:
- Confirm the thermostat is set to "HEAT" and the temperature is above the ambient room temperature.
- Check for error codes on the control board (if applicable, refer to your furnace manual for code interpretations).
- Upewnij się, że zawór zasilania gazem jest otwarty.
- Verify the flame sensor is clean and properly positioned.
- Fan Not Operating Correctly:
- Check the "ON/OFF DELAY" jumper settings on the control board.
- Ensure the thermostat fan setting is correct (AUTO/ON).
- Verify the fan motor connections to the control board.
- Kody błędów: Many control boards have diagnostic LEDs that flash codes to indicate specific faults. Consult your furnace's original manual for a list of error codes and their meanings.
Jeśli wykonanie czynności rozwiązywania problemów nie pomoże, skontaktuj się z wykwalifikowanym technikiem HVAC, aby uzyskać pomoc.
Specyfikacje
| Numer modelu | HK61EA005 |
| Alternatywny numer modelu | CECOMINOD058414 |
| Marka | Nośnik (zamiennik OEM) |
| Wymiary produktu | 6 x 6 x 6 cala |
| Waga | 0.01 uncji |
| Data pierwszej dostępności | 8 października 2013 r. |
Gwarancja i wsparcie
For warranty information regarding this OEM replacement part, please refer to the terms provided by your original point of purchase or the specific warranty documentation included with the product. For technical support, it is recommended to consult a qualified HVAC technician or the original furnace manufacturer's support resources.


