Wstęp
This instruction manual provides detailed guidance for the safe installation, operation, and maintenance of your new Progress Lighting Outdoor Wall Lantern. Please read all instructions carefully before beginning installation and retain this manual for future reference. Proper installation and care will ensure optimal performance and longevity of your lighting fixture.

Obraz: Przód view of the 1-Light Clear Flat Glass Traditional Outdoor Wall Lantern Light in Antique Bronze finish.
Informacje dotyczące bezpieczeństwa
- OSTRZEŻENIE: Ryzyko porażenia prądem. Przed instalacją lub serwisowaniem należy odłączyć zasilanie od wyłącznika automatycznego lub skrzynki bezpiecznikowej.
- All electrical connections must be in accordance with local codes, ordinances, or the National Electric Code (NEC). Contact a qualified electrician if you are unfamiliar with proper electrical wiring installations.
- Use only UL/cUL listed wire connectors.
- This fixture is designed for outdoor use and is suitable for wet locations.
- Nie przekraczać maksymalnej mocytage określono dla żarówki.
- Podczas montażu należy nosić okulary ochronne i rękawice.
Zawartość opakowania
Sprawdź, czy w Twoim pakiecie znajdują się wszystkie części wymienione poniżej:
- A. Fixture Body (1)
- B. Mounting Plate (1)
- C. Mounting Screws (2)
- D. Wire Connectors (3)
- E. Decorative Nuts (2)
- F. Glass Panels (4, pre-installed)
Specyfikacje
| Funkcja | Szczegół |
|---|---|
| Numer modelu | P5607-20 |
| Wymiary (szer. x wys.) | 4-1/2 cala x 8 cali |
| Skończyć | Antyczny brąz |
| Rodzaj szkła | Clear Flat Glass |
| Typ żarówki | Średnia podstawa (E26) |
| Maksymalna moctage | 100 watów (ekwiwalent żarówki żarowej) |
| Ocena lokalizacji | Lista lokalizacji mokrych |
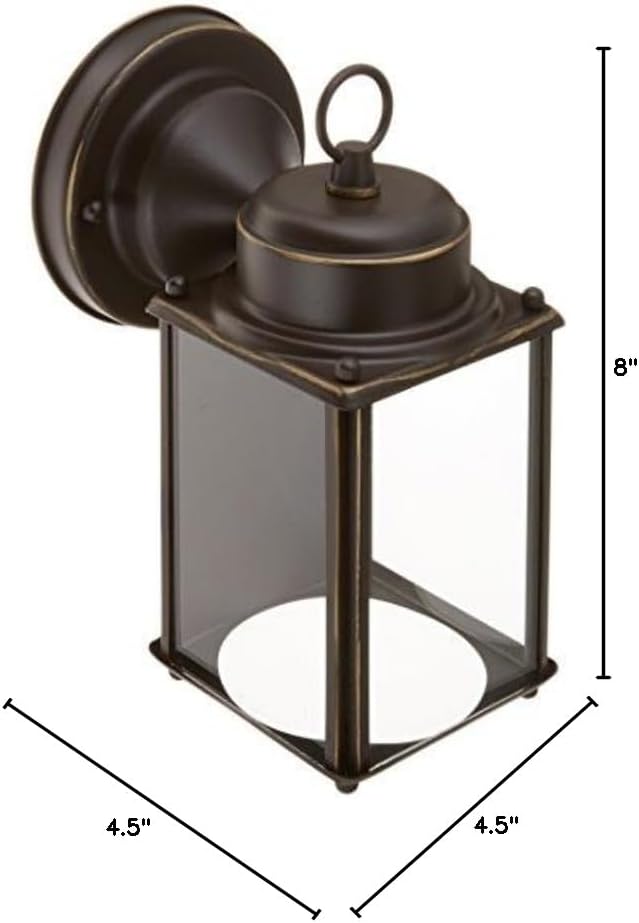
Image: Diagram showing the width (4.5 inches) and height (8 inches) of the wall lantern.
Instrukcja instalacji
Follow these steps for proper installation of your outdoor wall lantern. It is recommended to watch the accompanying video for visual guidance on sizing and placement.
Wymagane narzędzia:
- Śrubokręt krzyżakowy
- Wkrętak płaski
- Ściągacze izolacji
- Taśma izolacyjna (opcjonalnie)
- Okulary ochronne
Przed instalacją:
- Wyłącz zasilanie: Locate the circuit breaker or fuse box that supplies power to the light fixture location. Turn off the main power switch.
- Rozpakuj zawartość: Carefully remove all components from the packaging. Keep the packaging materials until installation is complete to ensure no small parts are lost.
- Review existing wiring: Ensure the existing electrical box is securely mounted and capable of supporting the fixture's weight.
Montaż urządzenia:
- Attach the mounting plate (B) to the electrical box using the mounting screws (C). Ensure the plate is level and secure.
- Pull the electrical wires from the electrical box through the center hole of the mounting plate.
Połączenia elektryczne:
- Connect the bare copper ground wire from the fixture to the bare copper ground wire from the electrical box using a wire connector (D). If your electrical box has a ground screw, wrap the fixture's ground wire around it before connecting to the supply ground wire.
- Connect the white (neutral) wire from the fixture to the white (neutral) wire from the electrical box using a wire connector (D).
- Connect the black (hot) wire from the fixture to the black (hot) wire from the electrical box using a wire connector (D).
- Ensure all wire connections are secure. Wrap electrical tape around the wire connectors for added insulation if desired.
Zabezpieczenie osprzętu:
- Carefully push all excess wiring into the electrical box.
- Align the holes on the fixture body (A) with the threaded posts on the mounting plate (B).
- Secure the fixture body to the mounting plate using the decorative nuts (E). Tighten firmly but do not overtighten.
Montaż żarówki:
- Insert one medium base (E26) bulb (not included) into the socket. Do not exceed the maximum recommended wattage 100 watów.

Obraz: Bok view of the wall lantern with a clear incandescent bulb installed, showing the internal socket.
Sizing and Selection Guidance Video:
For additional guidance on selecting the appropriate size and mounting height for outdoor lighting fixtures, please watch the official Progress Lighting video below:
Video: An official Progress Lighting guide on sizing and selecting outdoor lighting fixtures, covering optimal placement for entryways, garages, and other outdoor areas.
Instrukcja obsługi
Once the fixture is securely installed and wired, restore power at the circuit breaker. The light fixture can then be operated using your wall switch or external control system (if applicable).
Konserwacja
- Czyszczenie: To clean the fixture, turn off the power and allow it to cool. Wipe with a soft, damp ściereczką. Nie używaj środków czyszczących o właściwościach ściernych ani rozpuszczalników, ponieważ mogą one uszkodzić wykończenie lub szkło.
- Wymiana żarówki: Ensure power is off before replacing the bulb. Allow the bulb to cool completely before touching. Replace with a new medium base (E26) bulb, not exceeding 100 Watts.
- Przeglądy okresowe: Okresowo sprawdzaj szczelność wszystkich połączeń i elementów montażowych.
Rozwiązywanie problemów
| Problem | Możliwa przyczyna | Rozwiązanie |
|---|---|---|
| Światło się nie włącza. | Brak zasilania urządzenia. | Sprawdź wyłącznik automatyczny lub bezpiecznik. Upewnij się, że przełącznik ścienny jest włączony. |
| Luźne połączenia przewodów. | Wyłącz zasilanie i sprawdź wszystkie połączenia przewodów. | |
| Uszkodzona żarówka. | Wymień żarówkę. | |
| Światło migocze. | Luźna żarówka. | Dokręcić żarówkę w gnieździe. |
| Nieprawidłowy typ lub moc żarówkitage. | Ensure bulb meets specifications. | |
| Luźne okablowanie. | Wyłącz zasilanie i sprawdź wszystkie połączenia przewodów. |
Gwarancja i wsparcie
Progress Lighting products are manufactured to the highest standards and are backed by a limited warranty. For specific warranty details, technical support, or replacement parts, please visit the official Progress Lighting webOdwiedź stronę internetową lub skontaktuj się z działem obsługi klienta. Zachowaj paragon jako dowód zakupu.
Więcej informacji znajdziesz na stronie: Sklep Progress Lighting na Amazon


