1. Wprowadzenie
This manual provides detailed instructions for the setup, operation, and maintenance of your Vibe Axcess 5-in-1 Universal Remote. Please read this manual thoroughly before using the remote control to ensure proper functionality and to maximize your user experience. This remote is designed to control up to five different audio/video devices.
2. Koniec produktuview
The Vibe Axcess 5-in-1 Universal Remote is designed to consolidate control of multiple home entertainment devices into a single unit. It features dedicated buttons for various functions and device types.
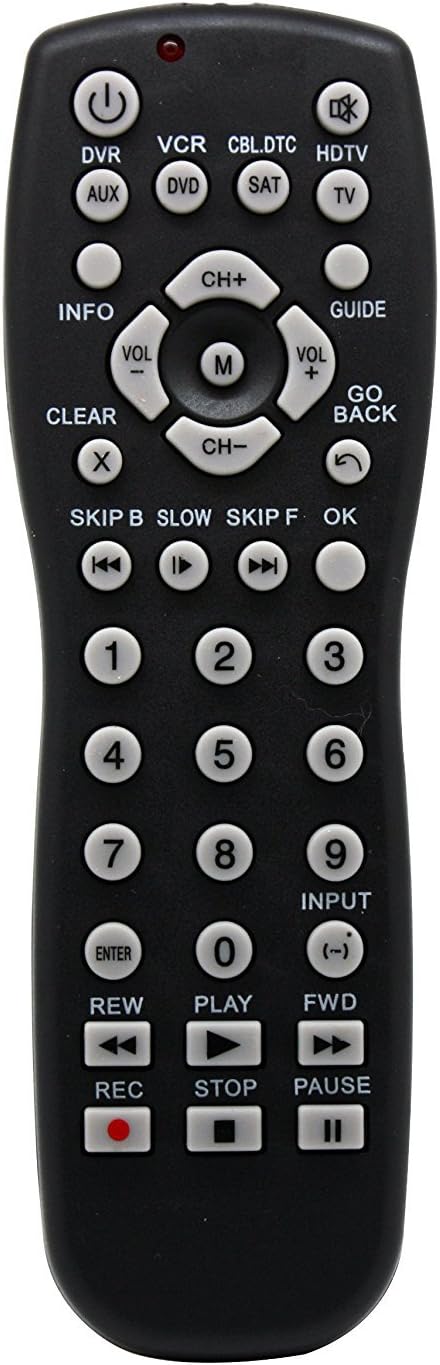
Rysunek 1: Przód view of the Vibe Axcess 5-in-1 Universal Remote. This image displays the remote's layout, including device selection buttons (DVR, VCR, CBL.DTC, HDTV, AUX, DVD, SAT, TV), navigation pad, number keys, and media control buttons (REW, PLAY, FWD, REC, STOP, PAUSE).

Rysunek 2: Packaging of the Vibe Axcess 5-in-1 Universal Remote. The packaging highlights the remote's 5-in-1 capability and compatibility with various device types such as DVD/VCR, HDTV, DVD, AUX, and CBL/SAT/CABLE.
3. Konfiguracja
3.1 Instalacja baterii
- Znajdź pokrywę komory baterii z tyłu pilota.
- Aby otworzyć, przesuń pokrywę w dół lub naciśnij zatrzask i unieś.
- Włóż dwie (2) baterie AAA, upewniając się, że bieguny dodatni (+) i ujemny (-) odpowiadają schematom wewnątrz komory.
- Załóż pokrywę komory baterii i wsuń ją z powrotem na miejsce, aż usłyszysz kliknięcie.
Notatka: Always use fresh batteries and replace both batteries at the same time. Do not mix old and new batteries or different types of batteries.
3.2 Programowanie pilota
To control your devices, the universal remote must be programmed with the correct codes for each device. There are typically two methods for programming:
3.2.1 Bezpośrednie wprowadzanie kodu
This method involves entering a specific code from a code list (usually provided with the remote or available online) for your device's brand.
- Włącz urządzenie, którym chcesz sterować (np. telewizor, odtwarzacz DVD).
- Naciśnij i przytrzymaj przycisk żądanego urządzenia na pilocie (np. TV, płyta DVD) for approximately 3 seconds until the indicator light (usually red) illuminates and stays on.
- While the indicator light is on, enter the 3-digit or 4-digit code for your device's brand using the number keys.
- If the code is valid, the indicator light will turn off. If the light flashes and remains on, the code was invalid; re-enter the code.
- Przetestuj pilota naciskając MOC button. If the device turns off, the code is correct. If not, try the next code listed for your brand.
3.2.2 Automatyczne wyszukiwanie kodu
If you cannot find a code or direct code entry fails, use the auto code search method.
- Włącz urządzenie, którym chcesz sterować.
- Naciśnij i przytrzymaj przycisk żądanego urządzenia (np. TV) przez około 3 sekund, aż kontrolka zaświeci się i pozostanie zapalona.
- Przytrzymując przycisk urządzenia, naciśnij MOC button once. The indicator light will start flashing, indicating it is searching for a code.
- Point the remote at the device and wait for the device to turn off. This may take several minutes as the remote cycles through codes.
- Po wyłączeniu urządzenia natychmiast naciśnij przycisk WCHODZIĆ Naciśnij przycisk, aby zapisać kod. Kontrolka zgaśnie.
- Test the remote's functions. If some functions do not work, repeat the auto search process to find a more compatible code.
4. Instrukcja obsługi
Once programmed, operating your Vibe Axcess 5-in-1 Universal Remote is straightforward.
- Wybierz urządzenie: Naciśnij odpowiedni przycisk urządzenia (np. TV, płyta DVD, CBL.DTC) dla urządzenia, którym chcesz sterować. Kontrolka zaświeci się na krótko, aby potwierdzić wybór.
- Włączanie/wyłączanie: Naciśnij MOC przycisk, aby włączyć lub wyłączyć wybrane urządzenie.
- Regulacja głośności: Użyj Objętość + I TOM- Przyciski do regulacji głośności.
- Kontrola kanału: Użyj CH+ I CH- przyciski do zmiany kanałów.
- Klawisze numeryczne: Use the number keys (0-9) to directly enter channel numbers or other numerical inputs.
- Nawigacja: Użyj klawiatury kierunkowej (góra, dół, lewo, prawo) i OK przycisk do nawigacji po menu.
- Sterowanie multimediami: Używać GRAĆ, PAUZA, ZATRZYMYWAĆ SIĘ, REW, Przód, I REK for controlling media playback on compatible devices.
5. Konserwacja
5.1 Czyszczenie
To clean your remote, gently wipe it with a soft, dry cloth. Do not use abrasive cleaners, solvents, or harsh chemicals, as these can damage the remote's finish or internal components.
5.2 Wymiana baterii
When the remote's performance degrades or the indicator light fails to illuminate, it is time to replace the batteries. Follow the battery installation steps in Section 3.1. Dispose of used batteries responsibly according to local regulations.
6. Rozwiązywanie Problemów
- Pilot nie działa:
- Sprawdź, czy baterie są prawidłowo włożone i nie są rozładowane. W razie potrzeby wymień je.
- Ensure you have selected the correct device button (e.g., TV for your television).
- Verify that the remote is programmed with the correct code for your device. Re-program if unsure.
- Upewnij się, że między pilotem a czujnikiem podczerwieni urządzenia nie ma żadnych przeszkód.
- Niektóre funkcje nie działają:
- Some universal remote codes may not support all original remote functions. Try another code for your device brand using the programming steps.
- Ensure the device you are trying to control supports the specific function (e.g., not all TVs have a dedicated 'INFO' button function).
- Kontrolka nie świeci:
- Sprawdź i wymień baterie.
- If the issue persists after battery replacement, the remote may be faulty.
7. Specyfikacje
- Model: OT795-KO
- Marka: Wibracja
- Wymiary produktu: 10.7 x 4 x 0.8 cala
- Waga przedmiotu: 4 uncji
- Baterie: Wymagane 2 baterie AAA (brak w zestawie)
- Maksymalna liczba obsługiwanych urządzeń: 5
- Technologia łączności: Podczerwony
- Dodatek specjalny: Uniwersalny
8. Gwarancja i wsparcie
For information regarding warranty coverage or technical support, please refer to the documentation included with your purchase or contact the retailer where the product was acquired. Specific warranty terms may vary.


