1. Ważne instrukcje bezpieczeństwa
Always observe basic safety precautions when using this circular saw to reduce the risk of fire, electric shock, and serious personal injury. Read and understand all instructions before operating the tool.

Obraz 1.1: Warning label on the Ryobi P506 circular saw, highlighting critical safety information regarding blade guarding, two-hand operation, and battery removal for adjustments.
- Bezpieczeństwo w miejscu pracy: Utrzymuj miejsce pracy w czystości i dobrym oświetleniu. Zagracone lub ciemne pomieszczenia sprzyjają wypadkom. Nie używaj elektronarzędzi w atmosferach wybuchowych, takich jak łatwopalne ciecze, gazy lub pyły.
- Bezpieczeństwo elektryczne: This tool is battery-powered. Ensure the battery pack is compatible with the tool. Do not expose power tools to rain or wet conditions.
- Bezpieczeństwo osobiste: Zawsze noś okulary ochronne. Używaj ochrony słuchu podczas obsługi elektronarzędzi. Ubierz się odpowiednio; unikaj luźnej odzieży i biżuterii. Zabezpiecz długie włosy.
- Używanie i konserwacja narzędzia: Nie używaj elektronarzędzia na siłę. Używaj elektronarzędzia odpowiedniego do danego zastosowania. Odłącz akumulator od elektronarzędzia przed dokonywaniem jakichkolwiek regulacji, wymianą akcesoriów lub przechowywaniem elektronarzędzia.
- Bezpieczeństwo użytkowania pił tarczowych:
- Zawsze trzymaj piłę mocno obiema rękami.
- Ensure the blade guard operates freely and closes instantly.
- Avoid kickback by maintaining proper grip, body position, and using a sharp blade.
- Never reach underneath the workpiece when the blade is rotating.
2. Koniec produktuview
The Ryobi P506 18V ONE+ Cordless 5-1/2 Inch Circular Saw is designed for efficient cutting of wood and similar materials. It features an integrated laser guide for enhanced precision and a 50-degree bevel capacity for angled cuts.

Obraz 2.1: Przód view of the Ryobi P506 circular saw, showing the blade, handle, and motor housing.
Kluczowe komponenty:
- Główny uchwyt: Do podstawowego chwytu i kontroli.
- Uchwyt pomocniczy: For two-hand operation and stability.
- Przełącznik spustowy: Włącza piłę.
- Przycisk blokady: Zapobiega przypadkowemu uruchomieniu.
- Osłona ostrza (górna i dolna): Chroni ostrze.
- Ostrze: 5-1/2 inch carbide-tipped blade.
- Płyta bazowa (but): Podtrzymuje piłę na obrabianym przedmiocie.
- Dźwignia regulacji głębokości: Adjusts cutting depth.
- Dźwignia regulacji kąta nachylenia: Adjusts cutting angle.
- Przewodnik laserowy: Projects a line for accurate cuts.
- Port baterii: For 18V ONE+ battery pack.
3. Konfiguracja
3.1 Instalacja baterii
The Ryobi P506 operates with any Ryobi 18V ONE+ battery pack (sold separately).
- Ensure the saw is turned off and the lock-off button is engaged.
- Align the ribs on the battery pack with the grooves in the saw's battery port.
- Wsuń akumulator do portu, aż zatrzaśnie się pewnie na swoim miejscu.
- Aby wyjąć akumulator, naciśnij zatrzaski zwalniające na akumulatorze i wyciągnij go.

Obraz 3.1: Strona view of the Ryobi P506, showing the battery port where the 18V ONE+ battery pack is inserted.
3.2 Montaż i demontaż ostrza
Always disconnect the battery pack before installing or removing the blade.
- Połóż piłę na płaskiej powierzchni, ostrzem do góry.
- Naciśnij i przytrzymaj przycisk blokady wrzeciona, aby zapobiec obrotowi ostrza.
- Using the provided blade wrench, loosen the blade nut by turning it counter-clockwise.
- Remove the blade nut, outer washer, and the old blade.
- Install the new 5-1/2 inch blade with the teeth pointing in the direction of the arrow on the blade guard.
- Replace the outer washer and blade nut. Tighten the blade nut securely by turning it clockwise while holding the spindle lock button. Do not overtighten.
3.3 Regulacja głębokości
Adjust the cutting depth to be approximately 1/8 inch (3 mm) deeper than the material being cut. This ensures a clean cut and reduces kickback risk.
- Odłącz akumulator.
- Odkręć dźwignię regulacji głębokości.
- Podnieś lub opuść płytę bazową, aby uzyskać żądaną głębokość cięcia.
- Mocno dokręć dźwignię regulacji głębokości.

Obraz 3.2: View of the depth adjustment lever on the Ryobi P506 circular saw, used to set the cutting depth.
3.4 Regulacja kąta nachylenia
Piła może wykonywać cięcia skośne pod kątem do 50 stopni.
- Odłącz akumulator.
- Poluzuj dźwignię regulacji kąta skosu.
- Pochyl płytę bazową pod żądanym kątem, wyrównując wskaźnik ze skalą kąta.
- Mocno dokręć dźwignię regulacji kąta skosu.
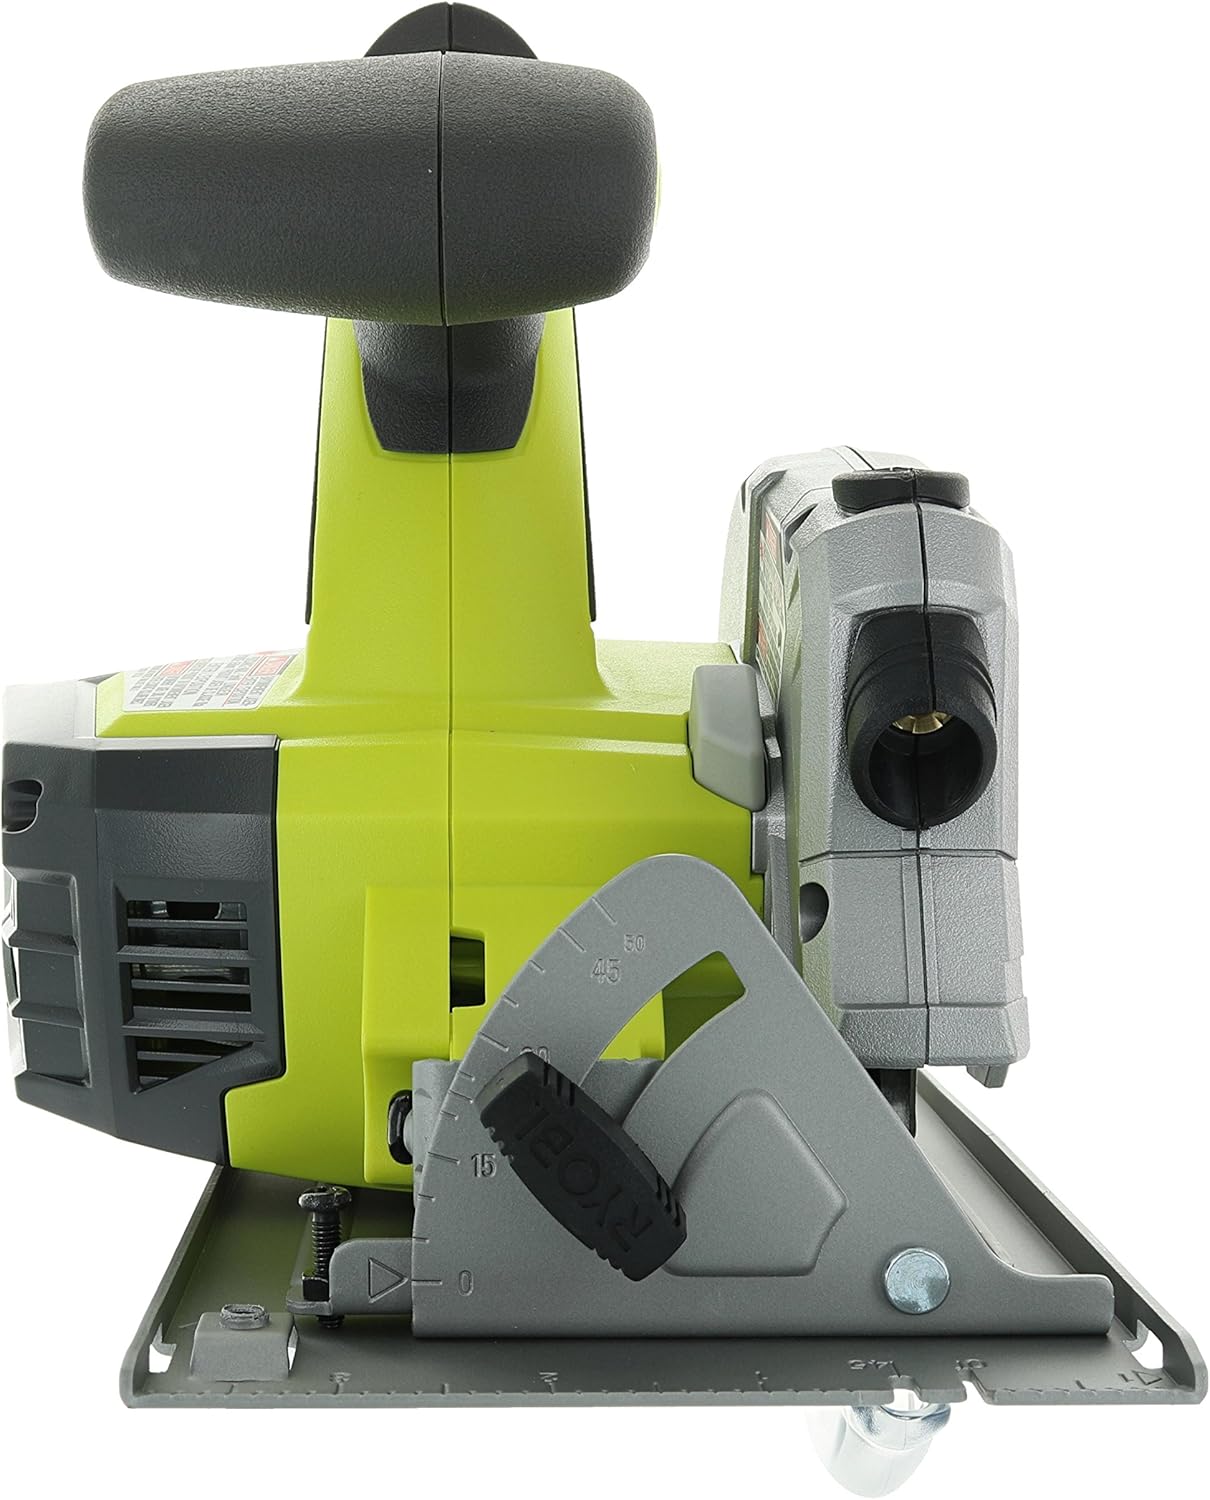
Obraz 3.3: View of the bevel adjustment mechanism on the Ryobi P506 circular saw, allowing for angled cuts.
4. Działanie
4.1 Uruchamianie i zatrzymywanie piły
- To start the saw, depress the lock-off button with your thumb, then squeeze the trigger switch.
- To stop the saw, release the trigger switch. The blade will stop rotating.
4.2 Dokonywanie cięć
Przed cięciem upewnij się, że przedmiot obrabiany jest bezpiecznie zamocowany.amped and the cutting line is clearly marked.
- Trzymaj piłę mocno obiema rękami – jedną za uchwyt główny i jedną za uchwyt dodatkowy.
- Position the front edge of the base plate on the workpiece, ensuring the blade is not touching the material.
- Uruchom piłę i pozwól, aby ostrze osiągnęło pełną prędkość przed wejściem w materiał.
- Powoli przesuwaj piłę wzdłuż linii cięcia, utrzymując stały, równomierny nacisk. Nie używaj siły.
- Po zakończeniu cięcia zwolnij wyłącznik spustowy i odczekaj, aż ostrze całkowicie się zatrzyma, zanim podniesiesz piłę z obrabianego przedmiotu.
4.3 Laser Guide Use
The integrated laser guide projects a red line onto the workpiece, indicating the cutting path for improved accuracy. The laser activates automatically when the trigger is pressed.
- Wyrównaj wyznaczoną linię lasera z zaznaczoną linią cięcia na obrabianym przedmiocie.
- Maintain alignment throughout the cut for precise results.
- Periodically check the laser's alignment for accuracy.
5. Konserwacja
Regular maintenance ensures optimal performance and extends the life of your circular saw. Always disconnect the battery pack before performing any maintenance.
5.1 Czyszczenie
- Utrzymuj otwory wentylacyjne narzędzia w czystości i bez zanieczyszczeń, aby zapobiec przegrzaniu.
- Wytrzyj obudowę narzędzia miękką ściereczką.amp płótno. Nie używaj ostrych środków chemicznych ani ściernych środków czyszczących.
- Regularly clean the base plate and blade guard to ensure smooth operation.
5.2 Pielęgnacja ostrzy
- Use only sharp, undamaged blades. Dull or damaged blades can cause kickback and reduce cutting efficiency.
- Clean resin and sawdust buildup from the blade regularly using a suitable blade cleaner.
- Replace blades when they become dull or show signs of damage.
5.3 Przegląd ogólny
- Sprawdź, czy wszystkie śruby i elementy mocujące są dobrze dokręcone.
- Inspect the power tool for any damaged parts. If any part is damaged, have it repaired by a qualified service technician before further use.
- Ensure the lower blade guard moves freely and retracts properly.
6. Rozwiązywanie Problemów
This section addresses common issues you might encounter with your Ryobi P506 circular saw.
| Problem | Możliwa przyczyna | Rozwiązanie |
|---|---|---|
| Piła się nie uruchamia | Battery not installed correctly or discharged; Lock-off button not depressed; Faulty switch. | Ensure battery is fully charged and properly seated. Depress lock-off button before squeezing trigger. If issue persists, seek professional service. |
| Słaba wydajność cięcia / Ostrze się zacina | Dull or dirty blade; Incorrect cutting depth; Forcing the saw; Workpiece not properly supported. | Replace or clean blade. Adjust cutting depth. Allow saw to work at its own pace. Securely clamp obrabiany przedmiot. |
| Nadmierne wibracje | Damaged blade; Loose blade nut; Damaged tool components. | Inspect and replace damaged blade. Tighten blade nut. If vibration continues, discontinue use and seek service. |
| Laser guide not visible or inaccurate | Dirty laser lens; Strong ambient light; Misalignment. | Clean laser lens. Use in appropriate lighting conditions. Refer to the full operator's manual for laser alignment procedures if necessary. |
7. Specyfikacje
| Funkcja | Specyfikacja |
|---|---|
| Numer modelu | P506 |
| Źródło zasilania | Battery Powered (18V ONE+ Lithium Ion) |
| Średnica ostrza | 5-1/2 cala |
| Prędkość bez obciążenia | 4700 obr./min. |
| Maksymalny kąt cięcia | 50 stopni |
| Waga przedmiotu | 2.2 funta (bez baterii) |
| Wymiary produktu | 12" dł. x 5.5" szer. x 12" wys. |
| Funkcja specjalna | Integrated Laser Guide, Brushless Motor |
| Zawarte komponenty | 5-1/2 in. blade, blade wrench, operator's manuals (Battery not included) |
8. Gwarancja i wsparcie
This Ryobi P506 circular saw comes with a limited warranty. For specific warranty details, including duration and coverage, please refer to the official warranty documentation included with your product or visit the official Ryobi webstrona.
For technical support, replacement parts, or service inquiries, please contact Ryobi customer service. Contact information can typically be found in your product's operator's manual or on the Ryobi official webstrona.
Always use genuine Ryobi replacement parts to ensure compatibility and maintain product safety and warranty validity.


