1. Wprowadzenie
This manual provides detailed instructions for the installation, operation, and maintenance of your Soundstream VL-11A Single DIN Digital Media Receiver. Please read this manual thoroughly before using the product to ensure proper operation and to prevent damage.
The Soundstream VL-11A is designed to provide high-quality audio playback from various digital sources, including USB drives, SD cards, and auxiliary input devices. It features a compact single DIN chassis for easy integration into most vehicle dashboards.
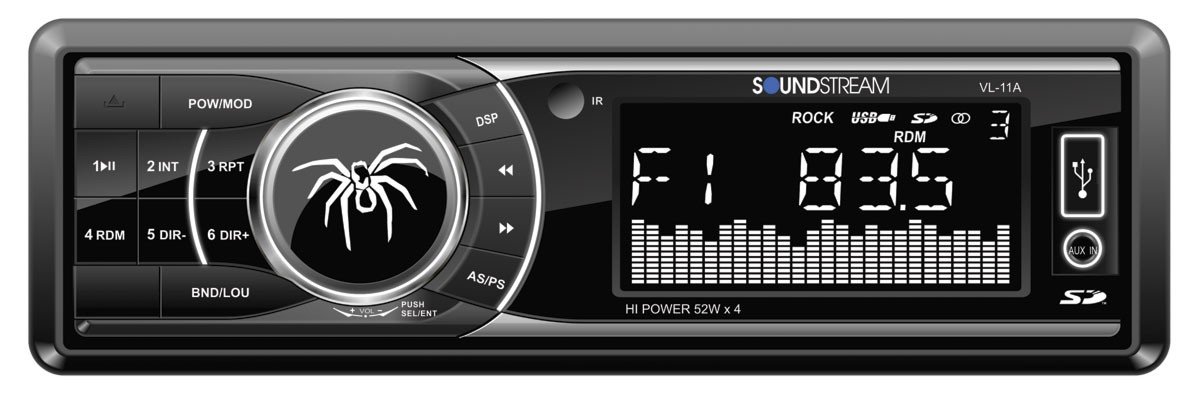
Rysunek 1.1: Przód view of the Soundstream VL-11A Digital Media Receiver. This image displays the main unit with its control buttons and display panel.
2. Informacje dotyczące bezpieczeństwa
Aby zapobiec obrażeniom ciała lub uszkodzeniu urządzenia, należy przestrzegać następujących środków ostrożności:
- Nie używaj urządzenia w sposób rozpraszający Cię podczas jazdy. Zawsze priorytetem jest bezpieczeństwo na drodze.
- Ensure proper wiring connections. Incorrect wiring can cause fire or damage to the vehicle's electrical system.
- Unikaj wystawiania urządzenia na działanie wilgoci i ekstremalnych temperatur.
- Nie próbuj demontować ani modyfikować urządzenia. Wszelkie prace serwisowe zlecaj wykwalifikowanemu personelowi.
- Utrzymuj głośność na poziomie pozwalającym usłyszeć odgłosy ruchu ulicznego.
3. Zawartość opakowania
Sprawdź, czy w opakowaniu znajdują się wszystkie elementy:
- Soundstream VL-11A Digital Media Receiver
- Wiązka przewodów
- Sprzęt montażowy (śruby, tuleja montażowa)
- Zdalne sterowanie
- Instrukcja obsługi (ten dokument)
4. Koniec produktuview
4.1 Elementy sterujące na panelu przednim
The front panel provides access to primary functions and media inputs.
Rysunek 4.1: Illustrative diagram of the VL-11A front panel. This image highlights the display, volume knob, mode button, track controls, USB port, SD card slot, and auxiliary input.
- Przycisk zasilania / trybu: Press to turn on/off. Short press to cycle through audio sources (Radio, USB, SD, AUX).
- Pokrętło głośności: Obróć, aby dostosować głośność. Naciśnij, aby uzyskać dostęp do ustawień audio (basy, soprany, balans, wyciszanie, korektor).
- Wyświetlacz: Pokazuje aktualny status, informacje o utworze i ustawienia.
- Port USB: Podłącz urządzenia pamięci masowej USB w celu odtwarzania multimediów.
- Gniazdo karty SD: Włóż kartę SD, aby odtwarzać multimedia.
- Wejście AUX: Podłącz zewnętrzne urządzenia audio za pomocą gniazda 3.5 mm.
- Track/Tune Buttons: Navigate tracks or tune radio frequencies.
4.2 Połączenia tylne
The rear of the unit contains the main wiring harness and preamp wyjścia.
Rysunek 4.2: Illustrative diagram of the VL-11A rear connections. This image shows the main wiring harness connector and the RCA preamp wyjścia.
- Main Wiring Harness: Connects to vehicle power, ground, accessory, and speaker wires.
- RCA Preamp Wyjścia: Two sets of 2V outputs for connecting external ampwężownice.
5. Konfiguracja
5.1 Instalacja
Professional installation is recommended. If installing yourself, ensure the vehicle's battery is disconnected before beginning.
- Montowanie: Insert the metal mounting sleeve into the vehicle's dashboard opening. Bend the tabs to secure it.
- Okablowanie: Connect the supplied wiring harness to the vehicle's wiring. Match wire colors and functions carefully.
- Połączenia głośnikowe: Connect the speaker wires from the harness to your vehicle's speakers. Ensure correct polarity.
- Połączenia zasilania: Connect the yellow wire (constant 12V), red wire (switched 12V), and black wire (ground) to the appropriate vehicle circuits.
- Antena: Podłącz kabel antenowy pojazdu do wejścia antenowego urządzenia.
- Bezpieczna jednostka: Slide the VL-11A into the mounting sleeve until it clicks into place.
Warning: Incorrect wiring can cause severe damage to the unit or vehicle. Consult a professional if unsure.
5.2 Początkowe włączenie zasilania
After installation, reconnect the vehicle's battery. Press the power button on the unit or remote control to turn it on. The display should illuminate.
6. Instrukcja obsługi
6.1 Podstawowe sterowanie
- Włączanie/wyłączanie: Naciśnij PWR/MODE przycisk.
- Regulacja głośności: Obróć TOM pokrętło.
- Wybór źródła: Naciśnij krótko PWR/MODE button to cycle through Radio, USB, SD, and AUX.
6.2 Ustawienia audio
Naciśnij TOM knob to enter the audio menu. Rotate the knob to navigate options and press to select.
- BASY/WYSOPY: Dostosuj poziom basów i sopranów.
- BALANSOWAĆ: Dostosuj balans dźwięku między lewym i prawym głośnikiem.
- TŁUMIK: Adjust audio balance between front and rear speakers.
- EQ (korektor): Select from preset EQ curves (e.g., Pop, Rock, Classic) or a custom setting.
6.3 Odtwarzanie USB/SD
Insert a USB drive into the USB port or an SD card into the SD card slot. The unit will automatically switch to the respective source and begin playback.
- Odtwórz/Pauza: Naciśnij ODTWÓRZ/PAUZA przycisk.
- Następny / poprzedni utwór: Naciśnij NASTĘPNY/POPRZEDNI pikolak.
- Nawigacja po folderach: Użyj FOLDER W GÓRĘ/W DÓŁ buttons (if available on remote or unit).
6.4 Wejście pomocnicze (AUX)
Connect an external audio device (e.g., smartphone, MP3 player) to the 3.5mm AUX input on the front panel using an audio cable. Select AUX as the source using the TRYB przycisk.
6.5 Tuner radiowy
Select Radio as the source. The unit supports AM/FM bands.
- Wybór zespołu: Naciśnij ZESPÓŁ przycisk do przełączania między FM1, FM2, FM3 i AM.
- Strojenie ręczne: Naciśnij krótko STROJENIE W GÓRĘ/W DÓŁ buttons to adjust frequency step-by-step.
- Szukaj strojenia: Naciśnij i przytrzymaj STROJENIE W GÓRĘ/W DÓŁ przyciski umożliwiające automatyczne wyszukiwanie kolejnej silnej stacji.
- Zaprogramowane stacje: Press and hold a numbered preset button (1-6) to save the current station. Short press to recall a saved station.
6.6 Pilot zdalnego sterowania
The included remote control provides convenient access to most functions. Point the remote control towards the unit's front panel sensor.
Rysunek 6.1: Illustrative diagram of the VL-11A remote control. This image shows the various buttons for power, mode, volume, track control, and numeric presets.
7. Konserwacja
7.1 Czyszczenie urządzenia
- Do przecierania panelu przedniego i wyświetlacza należy używać miękkiej, suchej ściereczki.
- Nie należy używać środków czyszczących o właściwościach ściernych, wosków ani rozpuszczalników.
- Unikaj bezpośredniego rozpylania środków czyszczących na urządzenie.
7.2 Ogólna opieka
- Zapewnij odpowiednią wentylację wokół urządzenia, aby zapobiec przegrzaniu.
- Unikaj umieszczania ciężkich przedmiotów na urządzeniu.
- If the unit is exposed to extreme cold, allow it to warm up before operation to prevent condensation.
8. Rozwiązywanie Problemów
Jeśli napotkasz problemy, przed skontaktowaniem się z pomocą techniczną zapoznaj się z poniższą tabelą:
| Problem | Możliwa przyczyna | Rozwiązanie |
|---|---|---|
| Brak zasilania | Blown fuse; Incorrect wiring; Disconnected battery. | Check vehicle fuses and unit fuse. Verify wiring connections. Ensure battery is connected. |
| Brak dźwięku | Volume too low; Mute activated; Incorrect speaker wiring; Source not selected. | Increase volume. Deactivate mute. Check speaker connections and polarity. Select correct audio source. |
| USB/SD nie odtwarza się | Nieobsługiwane file format; Corrupt media; Incorrectly inserted device. | Ensure media contains supported audio files (e.g., WMA). Try a different USB/SD. Reinsert device. |
| Słaby odbiór radia | Antena nie jest podłączona. Obszar o słabym sygnale. | Sprawdź połączenie antenowe. Spróbuj dostroić się do silniejszej stacji. |
| Pilot nie działa | Dead battery; Obstruction; Not pointing at sensor. | Replace remote battery. Remove obstructions. Ensure direct line of sight to unit's IR sensor. |
9. Specyfikacje
Technical specifications for the Soundstream VL-11A Digital Media Receiver:
- Model: VL-11A
- Marka: Strumień dźwiękowy
- Producent: Strumień dźwiękowy
- Wymiary produktu: Wymiary 22.35 x 20.32 x 9.65 cm
- Waga przedmiotu: 771.11 g (1.7 funta)
- Dźwięk Wattage: 52 watów (maks.)
- Liczba kanałów: 4
- Przedamp Wyjścia: 2 Sets of 2V
- Format nośnika: WMA (and other common digital audio formats)
- Cechy szczególne: SD Card Input, USB Input, Auxiliary Input
- Typ złącza: Auxiliary, USB, 3.5mm Jack
- Zgodne urządzenia: Głośnik
- Metoda sterowania: Zdalny
10. Gwarancja i pomoc techniczna
Soundstream products are designed and manufactured to the highest quality standards. For specific warranty information, please refer to the warranty card included with your product or visit the official Soundstream webstrona.
For technical support or service inquiries, please contact Soundstream customer service through their official channels. Keep your purchase receipt and product model number (VL-11A) handy when contacting support.


