Wstęp
This manual provides detailed instructions for the operation and maintenance of your Eton Grundig G2 AM/FM/Shortwave Radio Recorder. Please read this manual thoroughly before using the device to ensure proper function and longevity.
Zawartość opakowania
Sprawdź, czy w opakowaniu znajdują się wszystkie elementy:
- Eton Grundig G2 Radio Recorder
- Przewód zasilający
- Akumulator do ponownego ładowania
- Instrukcja obsługi (ten dokument)
Produkt ponadview
Familiarize yourself with the various components and controls of your Grundig G2 radio.

Rysunek 1: Elementy sterujące i wyświetlacz na panelu przednim. This image shows the front of the Eton Grundig G2 radio, highlighting the LCD display, dual speakers, numeric keypad, and various function buttons for power, volume, tuning, and mode selection.

Rysunek 2: Przykład użycia przenośnegoample. The radio is shown being held by two hands, demonstrating its compact and portable design suitable for use in various environments, such as outdoor events.

Figure 3: Rear Panel and Battery Compartment. This image displays the back of the radio, including the battery cover, product information, and ventilation grilles.

Figure 4: Top Panel with Micro SD Slot. A close-up of the top edge of the radio, showing the Micro SD card slot for media playback and recording storage.
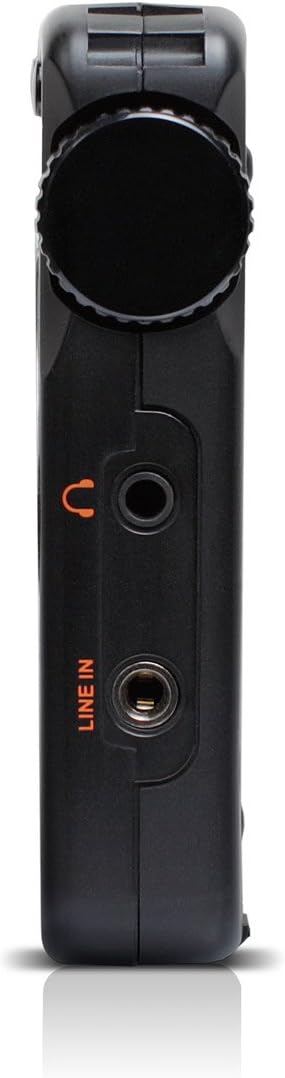
Figure 5: Left Side Panel. Ten view highlights the headphone jack and line-in audio input on the left side of the device.

Figure 6: Right Side Panel. This image shows the USB port, microphone input, and power switch located on the right side of the radio.
Organizować coś
1. Montaż i ładowanie akumulatora
- Locate the battery compartment on the rear of the radio (refer to Figure 3).
- Open the compartment cover and insert the provided rechargeable battery, ensuring correct polarity.
- Dokładnie zamknij pokrywę komory baterii.
- Connect the power cord to the radio's power input and a suitable power outlet. The radio will begin charging. Allow approximately four hours for a full charge during initial use.
2. Pierwsze włączenie zasilania
- Ensure the battery is installed or the power cord is connected.
- Naciśnij Moc button (usually located on the top left of the front panel) to turn on the radio.
- Wyświetlacz LCD zostanie podświetlony.
Instrukcja obsługi
Włączanie/wyłączanie zasilania
Naciśnij Moc przycisk, aby włączyć lub wyłączyć urządzenie.
Regulacja głośności
Użyj V- I V+ buttons to decrease or increase the volume level.
Radio Tuning (AM/FM/SW)
The Grundig G2 offers five tuning methods:
- Wybór zespołu: Naciśnij FM, MW (AM), or SW przyciski umożliwiające wybór żądanego pasma częstotliwości.
- Jog Tuning: Rotate the tuning knob (often labeled MENU/WPROWADŹ or similar) to manually scan frequencies.
- Strojenie ręczne: Użyj Strzałka w górę/w dół przyciski umożliwiające regulację częstotliwości krok po kroku.
- Przeróbka samochodu: Naciśnij i przytrzymaj Strzałka w górę/w dół przyciski umożliwiające automatyczne skanowanie następnej dostępnej stacji.
- ATS (Auto Tuning Storage): Naciśnij i przytrzymaj USTAWIĆ button to automatically scan and store strong stations in the current band.
- Strojenie pamięci: Use the numeric keypad (0-9) to directly enter a stored station number or frequency.
Station Memory Storage
Aby zapisać stację:
- Dostrój się do żądanej stacji.
- Naciśnij USTAWIĆ button. The memory location number will flash on the display.
- Wybierz lokalizację pamięci za pomocą klawiatury numerycznej lub pokrętła strojenia.
- Naciskać USTAWIĆ ponownie, aby potwierdzić. Stacja została zapisana.
The radio supports up to 248 station memory storage locations.
MP3 and WMA Playback
The Grundig G2 can play MP3 and WMA audio filez karty Micro SD.
- Insert a Micro SD card containing MP3/WMA files into the Micro SD slot (refer to Figure 4).
- Naciśnij RADIO/MP3 button to switch to MP3 mode.
- Użyj Odtwórz/Pauza, Następny/Poprzedni utwór przyciski do sterowania odtwarzaniem.
Funkcja nagrywania
The radio supports recording of radio broadcasts and external audio via the microphone or line-in input.
- Sprawdź, czy karta Micro SD jest włożona.
- To record radio: Tune to the desired station. Press the REK button (if available, or a combination like MENU/WPROWADŹ then select record).
- To record via microphone: Ensure the radio is in recording mode. Speak into the built-in microphone.
- To record via line-in: Connect an external audio source to the WYRYSOWAĆ jack (refer to Figure 5). Ensure the radio is in recording mode.
- Naciśnij ZATRZYMYWAĆ SIĘ button to end recording. Recordings are saved to the Micro SD card.
Ustawienia języka
The radio supports multiple display languages. To change the language:
- Naciśnij MENU/WPROWADŹ przycisk.
- Navigate through the menu options using the tuning knob or arrow buttons until you find "Language" or a similar setting.
- Select the desired language and confirm.
Konserwacja
- Czyszczenie: Do czyszczenia obudowy radia używaj miękkiej, suchej ściereczki. Nie używaj płynnych środków czyszczących ani materiałów ściernych.
- Składowanie: When not in use for extended periods, store the radio in a cool, dry place. Remove the battery if storing for several months.
- Pielęgnacja baterii: Recharge the battery regularly to maintain its lifespan. Avoid fully discharging the battery frequently.
- Antena: Handle the telescopic antenna with care to prevent damage.
Rozwiązywanie problemów
| Problem | Możliwa przyczyna | Rozwiązanie |
|---|---|---|
| Radio się nie włącza. | Battery is discharged or not installed correctly. Power cord is not connected. | Ensure battery is charged and correctly inserted. Connect the power cord. |
| Słaby odbiór radia. | Weak signal. Antenna not extended. Interference from other electronics. | Extend the telescopic antenna fully. Reposition the radio. Move away from interfering devices. |
| MP3/WMA filenie gra. | Micro SD card not inserted or corrupted. Incorrect file format. | Ensure Micro SD card is properly inserted. Verify files are MP3 or WMA format. Try a different Micro SD card. |
| Nagrywanie nie działa. | No Micro SD card inserted. Card full. | Włóż kartę Micro SD. Usuń starą files aby zwolnić miejsce. |
| Display shows incorrect time. | Time not set or ATS not used. | Manually set the time or use the ATS function on an FM station that broadcasts RDS time data. |
Specyfikacje
| Numer modelu | NG2B |
| Wymiary (dł. x szer. x wys.) | 7.5 x 3.5 x 0.8 cala |
| Waga | 9.6 uncji |
| Obsługiwane pasma radiowe | AM, FM, fala krótka (SW) |
| Metody dostrajania | Jog, Manual, Auto, Memory, ATS |
| Ustawienia pamięci | 248 stacji |
| Odtwarzanie dźwięku | MP3, WMA (via Micro SD card) |
| Nagranie | Radio broadcasts, Microphone, Line-in |
| Łączność | USB |
| Źródło zasilania | Rechargeable Battery, Corded Electric |
| Zawarte komponenty | Power Cord, Battery |
Gwarancja i wsparcie
For warranty information and technical support, please refer to the official Eton or Grundig webOdwiedź witrynę lub skontaktuj się z działem obsługi klienta. Zachowaj dowód zakupu na wypadek reklamacji.
Uwaga: Szczegółowe warunki gwarancji mogą się różnić w zależności od regionu i sprzedawcy.


