1. Wprowadzenie
This manual provides comprehensive instructions for the safe and effective use of the PeakTech True RMS P 3131 Clamp Meter with Multimeter. This device is designed for measuring AC/DC currents without circuit interruption, as well as AC/DC voltage and resistance, with continuity testing capabilities. It features a 3 3/4 digit LCD display with True RMS measurement for accurate readings.
Przed rozpoczęciem korzystania z urządzenia należy uważnie przeczytać instrukcję i zachować ją do wykorzystania w przyszłości.
2. Informacje dotyczące bezpieczeństwa
WARNING: Improper use of this meter can cause damage, shock, injury, or death. Always follow all safety precautions.
- Zawsze przestrzegaj lokalnych i krajowych przepisów bezpieczeństwa.
- Do not use the meter if it appears damaged or if the insulation on test leads is compromised.
- Przed dokonaniem pomiarów należy upewnić się, że miernik jest ustawiony na właściwą funkcję i zakres.
- Unikaj kontaktu z obwodami pod napięciem. Stosuj odpowiedni sprzęt ochrony osobistej (PPE).
- The device is rated for CAT II 600V. Do not exceed these limits.
- Wymień baterie niezwłocznie, gdy pojawi się wskaźnik niskiego poziomu naładowania baterii.
- Do not operate the meter in explosive atmospheres.
3. Koniec produktuview i komponenty
The PeakTech P 3131 is a robust and reliable clamp miernik. Zapoznaj się z jego głównymi elementami:

Rycina 1: Przód view of the PeakTech P 3131 Clamp Licznik pokazujący clamp jaw, function selector, LCD display, and input terminals.
- Clamp Szczęka: For non-contact AC/DC current measurement.
- Pokrętło wyboru funkcji: To select measurement modes (A~, A=, V~, V=, Ω/Continuity, OFF).
- Wyświetlacz LCD: Pokazuje odczyty pomiarów, jednostki i wskaźniki.
- Pikolak: AC/DC, ZERO, H/MAX (Data Hold/Max Hold).
- Terminale wejściowe: COM (common) and VΩ (voltage/resistance) for test leads.
- Osłona dłoni: Provides protection against accidental contact.
4. Konfiguracja
4.1 Instalacja baterii
The PeakTech P 3131 requires two 1.5V AAA batteries (included). To install or replace batteries:
- Upewnij się, że urządzenie jest WYŁĄCZONE.
- Znajdź pokrywę komory baterii z tyłu miernika.
- Aby otworzyć komorę, użyj śrubokręta.
- Insert the two AAA batteries, observing correct polarity (+ and -).
- Załóż pokrywę komory baterii i zabezpiecz ją śrubą.
When the low battery indicator appears on the display, replace the batteries immediately to ensure accurate measurements.
4.2 Podłączanie przewodów pomiarowych
Dla voltage, resistance, and continuity measurements, connect the supplied test leads:
- Włóż czarny przewód pomiarowy do KOM (common) input terminal.
- Włóż czerwony przewód pomiarowy do VΩ terminal wejściowy.

Figure 2: PeakTech P 3131 Clamp Meter shown with its carrying case, test leads, batteries, and user manual.
5. Instrukcja obsługi
5.1 Włączanie/wyłączanie zasilania
Rotate the function selector dial from the "OFF" position to any desired measurement function to power on the meter. To power off, rotate the dial back to "OFF". The meter features an automatic power-off function (can be deactivated) to conserve battery life.
5.2 Pomiar prądu przemiennego/stałego (Clamp)
Aby zmierzyć prąd bez przerywania obwodu:
- Obróć pokrętło wyboru funkcji na pozycję A~ (Prąd przemienny) lub A= (Prąd stały) pozycja.
- Naciśnij Prąd zmienny/stały button if you need to switch between AC and DC current modes (if the dial position combines them).
- Naciśnij ZERO button to zero the display before measuring DC current, especially for small currents, to compensate for residual magnetism.
- Otwórz klamp szczękę poprzez naciśnięcie spustu.
- Enclose only jeden conductor with the clamp szczęka. Upewnij się, że szczęka jest całkowicie zamknięta.
- Odczytaj aktualną wartość na wyświetlaczu LCD.
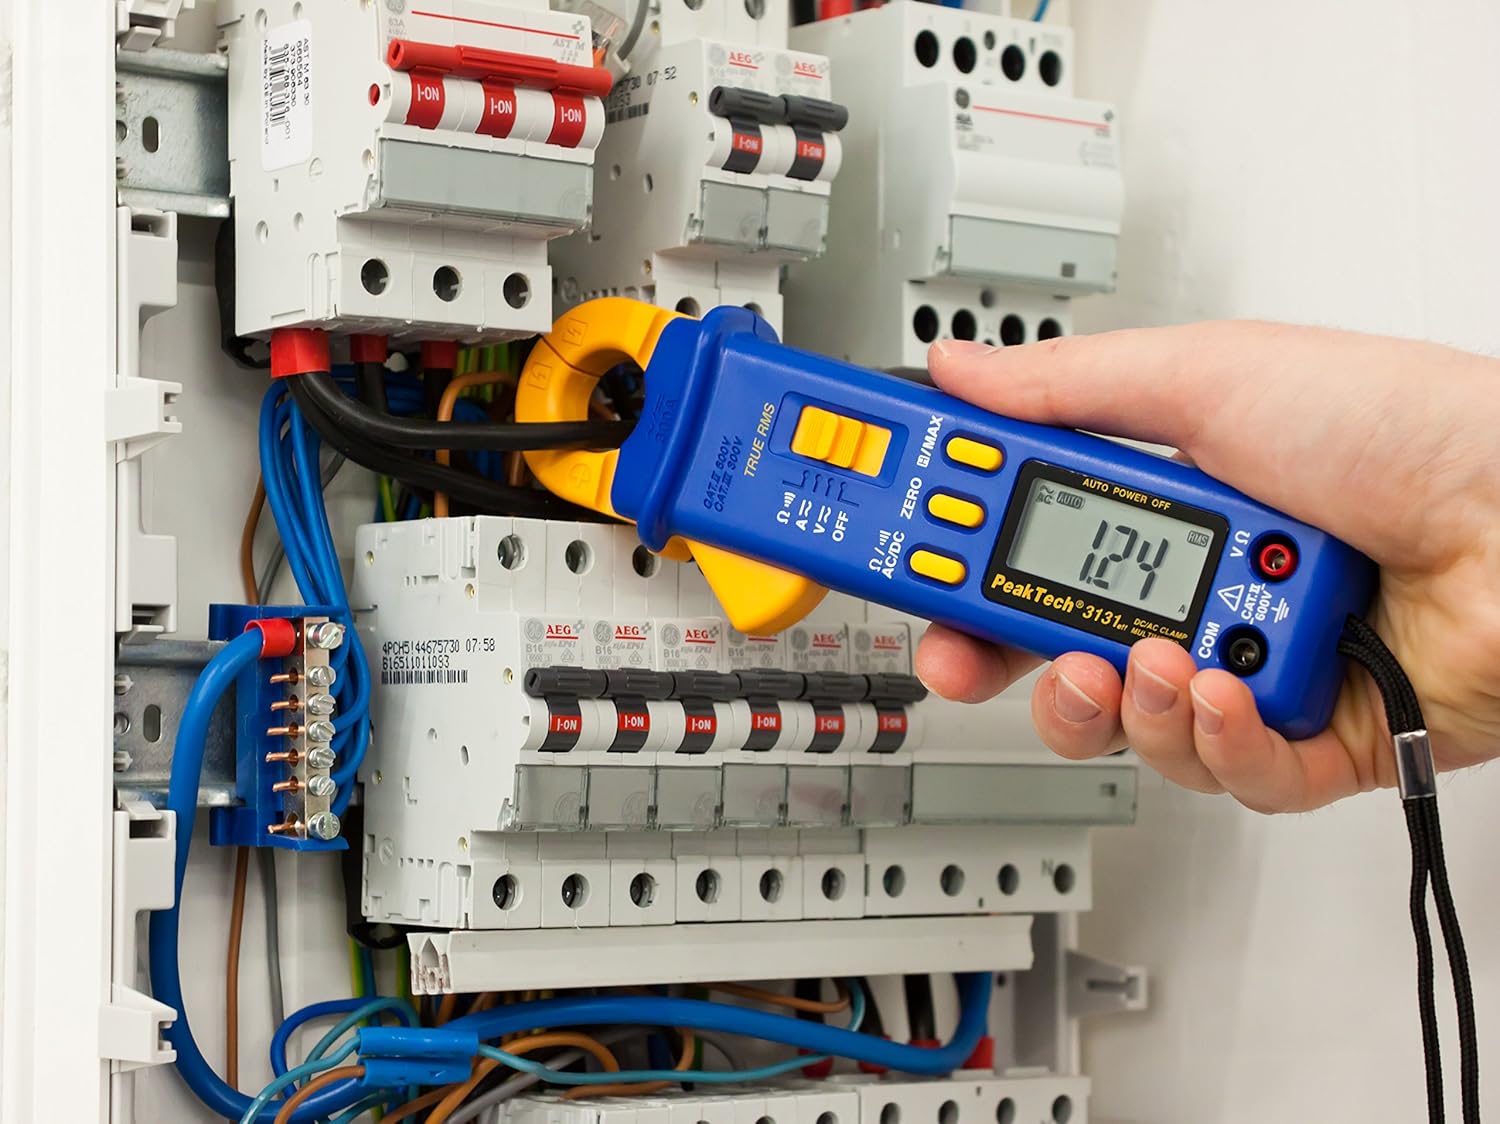
Figure 3: The PeakTech P 3131 Clamp Meter in use, measuring current on a single conductor within an electrical panel.
5.3 AC/DC objtage Pomiar
Do pomiaru objętościtage:
- Podłącz przewody pomiarowe zgodnie z opisem w rozdziale 4.2.
- Obróć pokrętło wyboru funkcji na pozycję V~ (tom ACtage) lub V= (DC tomtage) stanowisko.
- Podłącz sondy pomiarowe równolegle do obwodu lub elementu, który chcesz zmierzyć.
- Przeczytaj tomtage wartość na wyświetlaczu LCD.
5.4 Resistance and Continuity Measurement
Aby zmierzyć rezystancję lub sprawdzić ciągłość:
- Podłącz przewody pomiarowe zgodnie z opisem w rozdziale 4.2.
- Obróć pokrętło wyboru funkcji na pozycję Ω/))) (Resistance/Continuity) position.
- For resistance: Connect the test probes across the component. Ensure the circuit is de-energized.
- For continuity: Touch the test probes to the two points you want to check. A continuous beep indicates a low-resistance path (continuity).
- Odczytaj wartość rezystancji na wyświetlaczu LCD.
5.5 Funkcje specjalne
- Prawdziwa wartość skuteczna: The meter measures True Root Mean Square values for AC voltage and current, providing accurate readings for non-sinusoidal waveforms.
- Wstrzymanie danych (H): Naciśnij H/MAX Naciśnij przycisk krótko, aby zamrozić aktualny odczyt na wyświetlaczu. Naciśnij ponownie, aby zwolnić.
- Maximum Value Hold (MAX): Naciśnij i przytrzymaj H/MAX button to capture and display the maximum measured value. Press again to exit.
- ZERO Function: Used to zero the display for DC current measurements to eliminate offset errors.
- Automatyczne ustawianie zakresu: The meter automatically selects the appropriate measurement range.
- Automatyczne wyłączanie: The meter automatically turns off after a period of inactivity to save battery. This feature can typically be disabled by holding a specific button during power-on (refer to the device's on-screen indicators or a more detailed manual if available).
6. Konserwacja
6.1 Czyszczenie
Wytrzyj obudowę licznika wodąamp Ściereczką i łagodnym detergentem. Nie używaj środków ściernych ani rozpuszczalników. Przed użyciem upewnij się, że miernik jest całkowicie suchy.
6.2 Wymiana baterii
Refer to Section 4.1 for instructions on battery replacement. Always use two fresh 1.5V AAA batteries. Remove batteries if the meter is not used for an extended period to prevent leakage.
6.3 Przechowywanie
Store the meter in a cool, dry place, away from direct sunlight and extreme temperatures. Use the provided carrying case for protection.
7. Rozwiązywanie Problemów
| Problem | Możliwa przyczyna | Rozwiązanie |
|---|---|---|
| Miernik się nie włącza. | Rozładowane lub nieprawidłowo zainstalowane baterie. | Sprawdź biegunowość baterii; wymień baterie. |
| Wyświetla się komunikat „OL” lub „OVER”. | Pomiar przekracza wybrany zakres lub maksymalną pojemność miernika. | Select a higher range (if manual ranging) or ensure measurement is within meter's limits. |
| Niedokładny odczyt prądu stałego. | Residual magnetism in clamp szczęka. | Naciśnij ZERO button before measurement. |
| Brak sygnału dźwiękowego. | Obwód otwarty lub wysoka rezystancja. | Check connections; ensure circuit is complete. |
If problems persist, contact PeakTech customer support or a qualified service technician.
8. Specyfikacje techniczne
| Parametr | Specyfikacja |
|---|---|
| Wyświetlacz | 3 3/4 digit LCD, max. 3999 counts |
| Objętość DCtage (prąd stały) | 0.1 mV to 600 V (Accuracy: 0.5% + 2 digits) |
| AC Objętośćtage (ACV) | 1 mV to 600 V (Accuracy: 1.5% + 5 digits) |
| Prąd stały (DCA) | 10 mA to 300 A (Accuracy: 1% + 2 digits) |
| Prąd AC (ACA) | 10 mA to 300 A (Accuracy: 1% + 3 digits) |
| Rezystancja (Ω) | 0.1 Ω to 40 MΩ (Accuracy: 0.9% + 2 digits) |
| Test ciągłości | Funkcja brzęczyka |
| Prawdziwy RMS | Yes, for AC measurements |
| Otwarcie szczęki | 22 mm max. conductor diameter |
| Ocena bezpieczeństwa | EN 61010-1, CAT II 600 V |
| Zasilacz | 2 baterie AAA 1.5 V |
| Wymiary (dł. x szer. x wys.) | 192 x 66 x 27 mm (około 7.56 x 2.6 x 1.06 cala) |
| Waga | 205 g (ok. 0.45 funta) |
9. Gwarancja i wsparcie
PeakTech products are manufactured under strict quality control. This product is covered by a standard manufacturer's warranty against defects in materials and workmanship. Please refer to the warranty card included with your product or visit the official PeakTech webSzczegółowe warunki gwarancji można znaleźć na naszej stronie.
For technical support, service, or calibration inquiries, please contact your local PeakTech distributor or the PeakTech customer service department. Contact information can typically be found on the PeakTech webmiejscu lub w opakowaniu produktu.


